
User's Manual


5
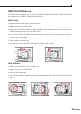
HDD Install/Remove
The NAS-7100 supports one 3.5-inch Serial-ATA (SATA) hard drive. NAS-7100 does
not support low prole or half high hard drive.
HDD Install
1. Make sure the NAS-7100 is powered off
2. Open top cover of NAS-7100
3. Make sure your hard drive is SATA interface and make sure you back up all pre-
existing data before use it on NAS-7100
4. Pull up the HDD tray then slide and push the HDD into the tray, make sure con
-
nector well connecting
5. Push down the HDD tray
6. Put the top cover of NAS-7100 back to nish HDD install
HDD Remove
1. Make sure the NAS-7100 is power off
2. Open top cover of NAS-7100
3. Pull up the HDD tray,
4. Pull out the HDD till SATA connector release then the HDD can slide out of HDD
tray