2 Bay SATA NAS RAID Server NAS-7201 Quick Installation Guide Version 1.
Table of Contents 1. OVERVIEW.................................................................................................................. 3 2. PACKAGE CONTENTS.............................................................................................. 3 3. HARDWARE INSTALLATION.................................................................................. 4 4. HARDWARE CONNECTION .................................................................................... 8 5. BASIC CONFIGURATION.........
1. Overview Thank you for purchasing NAS-7201, the 2-bay SATA RAID NAS server, this guide provides physical installation and initial HDD configuration for the this NAS RAID Server. Please read the information before your installation. 2.
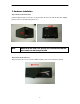
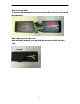
3. Hardware Installation Step 1: Remove the Front Case Follow the figure below to release the screws and open the front case with the direction. Slightly push the front case and lift up the plastic case. Note When lift up the front case, please be careful for the LED wire that connect to the front panel LED Step 2: Pull out the side case Also pull out the side case to locate the HDD mounting screws.
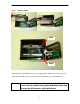
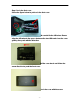
Step 3: Slide in the HDDs HDD1 HDD2 Gently slide in the SATA HDD one by one as the figure. When HDD touch the SATA connector, slightly push the HDD to make it well connected to the SATA interface of the RAID Server Caution Before slide in the HDD, please do make sure the HDD is in the correct direction. Slide in and push the HDD with violent could damage the SATA interface of the RAID Server.
Step 4. Lock the HDD To lock the HDD through two screws so that the HDD can well connected to the NAS server. Step 5 Slide back the side case After the HDD is installed, lock the HDD with screws and slide back the case.
Step 6 Lock the front case Follow the figure below to put back the front case. Be careful for the LED wires. Please align the LED wires to the space between the two HDD and close the case gentley then push with the direction Pull the case back and follow the arrow direction to push the front case. Lock the case with the screw.
4. Hardware Connection o n p Steps Description 1 Connect NAS-7201 and a Switch, Hub, Router, or computer with RJ-45 Ethernet cable. 2 Connect USB printer(s) or USB storage device(s) to this device with USB cable(s). NAS-7201 can automatically mount the USB devices connected. 3 Connect the power supply to NAS-7201. 4 Press the “Power button” to turn on NAS-7201. The HDD activate LED on the front panel will light up during booting-up.
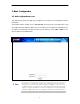
5. Basic Configuration 5.1. Web configuration access The NAS-7201 provides GUI (Web based, Graphical User Interface) for management and administration. The default IP address of NAS server is 192.168.0.100. You may now open your web browser, and insert http://192.168.0.100 in the address bar of your web browser to login web configuration page. The NAS server will prompt for login username / password please enter: admin / admin to continue the NAS Server administration.
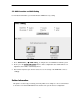
5.2. HDD Formation and RAID Setting For new attached hard disk, you should format the HDD before any setting. 1. Go to『Maintenance』Æ『RAID Setting』to configure the server RAID level and File system. 2. Please press the Create raid system button to make configuration after modified whole configurations, then it will be automatically reboot. 3. After format completed, you can then start to access the storage of the RAID NAS server accordingly.