USB ADSL Modem ADU-2120 User’s Manual
Copyright Copyright (C) 2004 PLANET Technology Corp. All rights reserved. The products and programs described in this User’s Manual are licensed products of PLANET Technology, This User’s Manual contains proprietary information protected by copyright, and this User’s Manual and all accompanying hardware, software, and documentation are copyrighted.
Revision User’s Manual for PLANET USB ADSL Modem Model: ADU-2120A / ADU-2120B Rev: 1.0 (JAN. 2004) Part No.
TABLE OF CONTENTS CHAPTER 1 INTRODUCTION ................................................................................. 1 FEATURES .............................................................................................................. 1 DATA REQUIREMENT................................................................................................ 1 ADSLRFC1483 mode user............................................................................... 1 ADSL PPPoE/PPPoA mode user ....................
Chapter 1 Introduction 1 PLANET USB ADSL modem ADU-2120 is designed to provide cost-effective access to high-speed ADSL services. With our ADSL modem, surfing on Internet is just like driving a sport car on the Express Highway. Video on Demand, Videoconference and any high-speed Internet applications is not a dream any more. But a reality! Features l l l l l l l USB bus-powered; an external power supply is not required ANSI T1.413 issue 2, ITU G.dmt(G.992.1), and ITU G.lite(G.992.
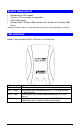
System Requirement l l l l Mainboard with USB support Pentium II CPU and above or compatible RAM: 64M or above Windows 98SE, Windows 2000, Windows ME, Windows XP, Windows 2003 Server NOTE: For Windows XP it is recommended that your PC have at least 128 M Bytes of memory. LED definition Below is the front panel of ADU-2120 and its LEDs definition.
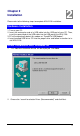
Chapter 2 Installation 2 Please refer to the following steps to complete ADU-2120 installation. Hardware Installation 1. Turn on your PC 2. Insert the rectangular end of a USB cable into the USB port of your PC. Then, insert the square end of the USB cable into the USB port of the ADU 2120. 3. PC will automatically detect this modem as “DynaMiTe USB Modem”. 4. Insert bundled USB driver CD into the proper drive and follow instruction to install ADU 2120. Driver Installation with Windows 98 1.
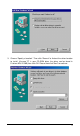
3. Choose “Specify a location”. Then click “Browse” to find out the driver location to install. (Assume "E" is your CD-ROM drive, the driver can be found in E:\driver\ADU-2120B) then click OK. Please then click “Next” to continue.
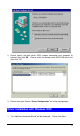
4. The Add New Hardware Wizard will appear and indicate the PLANET ADU-2120 USB ADSL modem has been recognized and will install a new driver. Click Next 5. Please then go to Section “Driver Configuration” for further configuration. Driver Installation with Windows ME 1. The “Found New Hardware Wizard” will be displayed. Insert ADU-2120 driver CD and click Next.
2. Please specify the path which ADSL modem connected your computer to Internet, then click OK. Please select the directory with ADU-2120 driver and then click “OK”. 3. Please then go to Section “Driver Configuration” for further configuration. Driver Installation with Windows 2000 1. The “Add New Hardware Wizard” will be displayed. Please click Next.
2. Choose the “Search for a suitable driver for my device (recommended)”, and click Next. 3. Next you will be prompted for software drivers. Select Specify a location.
4. Insert the ADSL Driver CD into your systems CD-ROM drive and then click “Browse” to find out the driver location to install. (Assume "E" is your CD-ROM drive, the driver can be found in E:\driver\ADU-2120B) then click OK. 5. The Found New Hardware Wizard will then find the ADSL USB MODEM, click Next.
6. The “Digital Signature Not Found” window will pop-up, Click Yes. 7. Please then go to Section “Driver Configuration” for further configuration. Driver Installation with Windows XP 1. The “Add New Hardware Wizard” will be displayed. Choose Install from a list or specific location (Advanced) and click Next.
2. Insert the ADSL Driver CD into your systems CD-ROM drive, select “Include this location in the search” and then click “Browse” to find out the driver location to install. (Assume "E" is your CD-ROM drive, the driver can be found in E:\driver\ADU-2120B). Click “Next” to continue.
3. The Hardware Installation window appears. Click Continue Anyway. 4. Now please go to Step 3 for driver configuration. Driver Configuration Step 3: Driver Configuration 1. The system will start to copy the driver and utility files to your PC. After completing, the ADSL Modem Driver Suite installation page is shown. Click “Next” to continue. 2. The modem driver version is shown. Click “Next” to continue.
3. On this page, you need to select the operation mode (RFC 1483, PPPoA or PPPoE) and input the VPI / VCI values per your ISP’s requirement. Click “Next” to continue.
4. Please then select the framing type your ISP uses: LLC or VCMUX/NULL. 5. If you select RFC 1483, you will then need to specified if it is Bridged or Routed RFC 1483. Your ISP should also provide this information.
6. The system will then ask you to reboot your PC. Please select “Yes, I want to restart my computer now” and click OK to finish this setup procedure. 7. After reboot, the system will ask you to install the driver again. “Install the software automatically“ and click “Next” to continue.
3 8. The Hardware Installation page is shown. Windows XP and “OK” on Windows 2000 Please select “Continue Anyway” or 3. The Found New Hardware Wizard window appears and displays your newly installed PLANET ADU-2120 USB ADSL Interface, then click Finish. The system may ask you to reboot again. Please select “Yes” to reboot if asked.
ADSL LAN Configuration To configure the connection, after you have installed the appropriate driver: 4 Step 1. Click either the desktop icon, or the Dial-Up Networking icon to open the Connect To window. For Windows XP, please click “Start” -> “Settings” -> “Network Connections” and then click the ADSL or PPPoE on the “Dial-up” option. Step 2. Provide the following information Step a. Supply the User Name. Step b. Supply the Password. Step c.
Chapter 4. User Interface ACCESSING CSA The User Interface to the ADSL Modem is provided by the Control and Status Application (CSA). You can access the CSA by double-clicking on the CSA icon in the System Tray, located near the clock on the task bar. The icon, which appears as two monitor screens, also changes color to indicate the status of the modem (see Table 1. ICON Condition.). If the icon does not appear in the System Tray, it can be restored by any of the following methods: • Restart the PC.
Modem Performance The Modem Performance displays performance information. The primary purpose is to display the instantaneous throughput rate for both transmit and receive paths of the modem. This rate is calculated based on the poll period (generally 2 seconds) and the number of bytes passed during that time. Transmit and Receive The throughput is indicated through two bar graphs, each provides a maximum rate label indicating the transmit and receive bit rates currently in use.
tion: • ADSL link connected • ADSL link disconnected Device Status The Device Status field changes to indicate the status of the modem connection: • ADSL Modem available • ADSL Modem not available Connect/ Disconnect Button The CONNECT/DISCONNECT button performs the connection/disconnection operation. If the ADSL Modem is unavailable, the button is disabled. This occurs when the ADSL modem driver is disabled or fails to communicate correctly. Close Button The CLOSE button closes the main interface screen.
Chapter 5. Uninstall Modem 5 USB Modem uninstallation USB MODEM To uninstall the software and hardware for the USB ASDL Modem, perform the following: Step 1. Detach the USB Modem from your computer. Step 2. At Windows Start, click on Programs > ADSL Modem Driver > Remove ADSL Modem Driver. Step 3. A Question screen asks for verification of an uninstallation. Click YES to continue. Step 4.
Chapter 6. Troubleshooting 6 If your internet connection is not working, the following hints may be helpful. After trying these hints, if you still can not make your connection work, it is recommended that you ask your service provider for assistance. To run troubleshooting on the system: Step 1. Is the system tray CSA icon green? If it is not, try a restart of your PC. This may clear the problem. Step 2. If this does not correct the problem, make the following checks: Step a.
Chapter 7. Abbreviations AAL 7 ATM Adaptation Layer. A function performed during ATM cell processing to adapt traditional IP or Ethernet traffic for transmission through an ATM network. ADSL Asymmetric Digital Subscriber Line. A method for modulating data to achieve high bit rates over common twisted-pair copper wire. ATM Asynchronous Transfer Mode. A method of networking the uses a fixed length cell to transmit data (versus a variable length packet).