Drawer KVM Console With 17” LCD DKVM-1700 Quick Installation Guide
Table of Content Before Installation............................................................................................. 3 Specification ................................................................................................. 4 Packet Contents................................................................................................ 5 Hardware Installation........................................................................................
Thank you for purchasing PLANET DKVM-1700. It is the drawer KVM with singlerail console design offering industrial level input solution, which optimizes your space utilization by controlling your systems in just 1U space on the rack. The separate rail design helps users install the KVM console more easily. You don’t have to prop the heavy console during the installation but just lock the rails into the rack and then pull the KVM console into the rails.
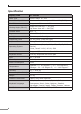
Specification Display Size 17 inches Panel Type Active Matrix TFT LCD Resolution Capabilities Maximum Resolution up to 1280 x 1024 (SXGA) Pixel Pitch Supports 0.264 mm x 0.264 mm Viewing Angle (CR>10) Right-Left view 60° ~ 70°(Typ) Up-Down View 45° ~ 60°(Typ) Contrast Ratio 450 : 1 Brightness White 250 cd/m2 Backlight Four Lamps for Backlight Supported Colors 16.7M Colors (8-bit with FRC) Response Time Rising Time 2 ms, Decay Time 14 ms Operating System Dos, Windows (3.
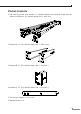
Packet Contents 1. Rail with front and rear bracket x 2 (Please identify the brackets. Right and left sides are different. For cabinet depth 614 ~ 828 mm) 2. Bracket A x 2 (For cabinet depth 828 ~ 1000 mm.) 3. Bracket B x 2 (For cabinet depth 504 ~ 614 mm.) 4. Bracket C x 2 (For cabinet depth 504 ~ 614 mm.) 5. Flat Screw (length = 6 mm) x 6 6.
7. Key x 2 8. Power Adapter x 1 9. KVM Cable x 1 10.USB Cable x 1 Note 1. Please check all peripherals according the list before installation. To make sure that the whole unit was not damaged and lost during shipping process. If you encounter any problem, please contact your dealer. 2. Before installation, make sure all peripherals and computer have been turned off. 3.
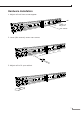
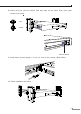
Hardware Installation 1. Adjust rail until two screws appear. rail two screws 2. Loose (Not remove) seven rear screws. 3.
4. Install front and rear bracket on cabinet. 5. Tight seven rear screws up. 6. Repeat step 1~5 for the other side. 7. Push console into rails. (Be careful rear box loose when take out console from carton.
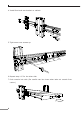
8. Unlock and pull rail–lock switch (left and right at the same time) then push console to the end. lock unlock rail-lock switch 9. Install three screws (length = 6 mm) in rear of the console. (Both sides) 10. Finish installation as below.
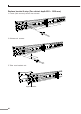
Replace bracket A step (For cabinet depth 828 ~ 1000 mm): 1. Loose (Not remove) seven rear screws. 2. Release six screws. 3. Take rear bracket out.
4. Adjust rail and input bracket A to rear of the rail then adjust bracket A to fit your cabinet. Install 2~3 screws (don’t tight-up) upon the length you need. One is forbidden. bracket A 5. Repeat step 1 ~ 4 for the other side. 6. Repeat step 3 ~ 10 of install console to finish installation. Replace bracket B and C step (For cabinet depth is 504 ~ 614 mm): 1. Remove seven rear screws. 2. Take two original brackets out.
3. Input bracket B to rear of the rail. bracket B 4. Install four screws (don’t tight-up) to combine rail, bracket B and bracket C. bracket C bracket B 5. Repeat step 1 ~ 4 for the other side. 6. Repeat step 3 ~ 10 of install console to finish installation. Further Configuration If you want to configure more detail settings of DKVM-1700, please refer to the user manual in the CD disk.