Wired / Wireless Internet Fiber Router FRT-401 / FRT-401S15 / FRT-405 FRT-401N / FRT-401NS15 / FRT-405N Quick Installation Guide
Table of Contents 1. Package Contents........................................................................ 3 2. Overview.................................................................................... 4 3. Hardware Installation................................................................... 8 4. Access Your Fiber Router.............................................................11 5. Further Information....................................................................
1. Package Contents l FRT-40x / FRT-40xN Series Unit x 1 l Power Adapter x 1 l User’s Manual CD x 1 l Quick Installation Guide x 1 l Antennas x 2 (For wireless models) If any of above items are damaged or missing, please contact your dealer immediately.
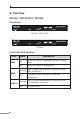
2. Overview FRT-401 / FRT-401S15 / FRT-405 Front Panel FRT-401 / FRT-401S15 FRT-405 Front Panel LED definition LED PWR State ON OFF When the router is powered off. Flashing Data is being transmitted or received via the fiber connection. ON The optical fiber connection connected successfully. Flashing Data is being transmitted or received via the corresponding LAN port. ON The port is up. WAN LAN1-4 Description When the router is powered on, and in ready state.
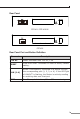
Rear Panel FRT-401 / FRT-401S15 FRT-405 Rear Panel Port and Button Definition Connector Description 12V DC Power connector with 12V DC, 1.0A RESET Press more than 3 seconds for reset to factory default setting. LAN (1-4) Router is successfully connected to a device through the corresponding port (1, 2, 3, or 4). If the LED light of LNK/ACT is flashing, the Router is actively sending or receiving data over that port.
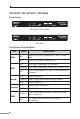
FRT-401N / FRT-401NS15 / FRT-405N Front Panel FRT-401N / FRT-401NS15 FRT-405N Front Panel LED definition LED PWR WPS WLAN Security State ON When the router is powered on, and in ready state OFF When the router is powered off ON WPS client registration is successful Flashing WPS client registration window is currently open OFF WPS is not available, or WPS is not enabled or initialized ON WLAN radio is on Flashing Data is being transmitted through WLAN OFF WLAN radio is off ON Enable WLAN
LAN1-4 Flashing Data is being transmitted or received via the corresponding LAN port ON The port is up Rear Panel FRT-401N / FRT-401NS15 FRT-405N Rear Panel Port and Button Definition Connector Description 12V DC Power connector with 12V DC, 1.0A. RESET Press more than 3 seconds for reset to factory default setting. LAN (1-4) Router is successfully connected to a device through the corresponding port (1, 2, 3, or 4).
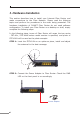
3. Hardware Installation This section describes how to install your Internet Fiber Router and make connections to the Fiber Network. Please read the following the following steps, terms VDSL2 Router topics and In perform the procedures in the order of being presented. The will mea unless model number specified; of VC-230 hardware installation of PLANET Fiber is Router do not and need photo software configuration. To install your Fiber Router on a desktop or shelf, simply complete the following steps.
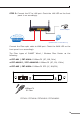
Power Adapter STEP 3: Connect the PC to LAN port. Check the LAN LED on the front panel is on accordingly. STEP 3: Connect the PC to LAN port. Check the LAN LED on the front panel is on accordingly Power Adapter Internet Data VoIP Entertainment PC (DHCP Client or 192.168.1.2) Connect the Fiber-optic cable to WAN port. Check the WAN LED on the front panel is on accordingly.
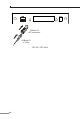
0Base-FX SFP transceiver 100Base-FX LC Fiber FRT-405 / FRT-405N 10
4. Access Your Fiber Router Now that the physical connection between your PC and Fiber Router has been established, you must login in order to access Web Management. The Fiber Router supports Web-based configuration. From this chapter, we will describe how to access Web Management of PLANET FRT-40x Series. First Time Login Launch a web browser (for example: IE, Firefox etc.) and type the IP address in the address bar. The default address is “http://192.168.1.1”.
5. Further Information For further detail configurations and information of Operation Mode, WAN, LAN, Firewall, Fiber/OAM, Wireless can be found in the user’s manual CD. If you have other questions, please contact the local dealer where you purchasing this product.