Z-Wave Ceiling-mount Smoke Detector HZS-200E/HZS-200A
Z-Wave Ceiling-mount Smoke Detector HZS-200E/HZS-200A Copyright Copyright © 2015 by PLANET Technology Corp. All rights reserved. No part of this publication may be reproduced, transmitted, transcribed, stored in a retrieval system, or translated into any language or computer language, in any form or by any means, electronic, mechanical, magnetic, optical, chemical, manual or otherwise, without the prior written permission of PLANET.
Z-Wave Ceiling-mount Smoke Detector HZS-200E/HZS-200A CE Mark Warning This is a Class B product. In a domestic environment, this product may cause radio interference, in which case the user may be required to take adequate measures.
Z-Wave Ceiling-mount Smoke Detector HZS-200E/HZS-200A Table of Contents Chapter 1. Product Introduction ......................................................................5 1.1 Package Contents...............................................................................5 1.2 Overview.............................................................................................5 1.3 Specifications......................................................................................7 Chapter 2.
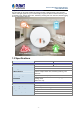
Z-Wave Ceiling-mount Smoke Detector HZS-200E/HZS-200A Chapter 1. Product Introduction 1.1 Package Contents The package should contain the following: z Smoke Detector x 1 z Quick Installation Guide x 1 z CR123A Lithium Battery x 1 z Bracket Holder x 1 z Screw Kit x 1 If any of the above items are missing, please contact your seller immediately. 1.
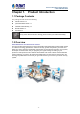
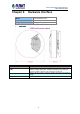
Z-Wave Ceiling-mount Smoke Detector HZS-200E/HZS-200A Vocal Smoke Alarm Horn PLANET HZS-200 is a Photoelectric Smoke Detector whose alarm of 85dB will be triggered upon detection of smoke coming from a fire or other burning sources. The alarm signal is then picked up by PLANET HAC-1000 Control Gateway where you will be remotely alerted of the situation via mobile devices, such as smart phone and tablet.
Z-Wave Ceiling-mount Smoke Detector HZS-200E/HZS-200A Easy Installation and Convenient Status Indicator The HZS-200 can be easily installed by ceiling mounted or wall mounted. It also provides various LED light signals for you to conveniently recognize its different statuses directly, such as standby mode, tamper switch alert, low battery warning and error detection, without logging in to its configuration interface. 1.
Z-Wave Ceiling-mount Smoke Detector HZS-200E/HZS-200A Chapter 2. Hardware Interface Model HZS-200E/HZS-200A Dimensions (W x D x H) 120 x 48.7 mm Weight 144g (gross weight) ¾ Front Panel LED/Test/Program switch Interface LED Description Red: Standby mode, low battery warning Yellow: Tamper switch alert, low battery warning, error detection *For more details of indicator, refer to HZS-200 user manual. Test Set the Silence Feature and check whether this device got crash or ready.
Z-Wave Ceiling-mount Smoke Detector HZS-200E/HZS-200A Chapter 3. Z-Wave Device Setting 3.1 Configuring Z-Wave Device via HAC-1000 Please refer to the following steps to add Z-Wave device via HAC-1000 web. Step 1. Include a Z-Wave device via web. a) Go to "Z-Wave" and click "Device Configuration". b) Click” Include New Device” and the screen will appear with "Add Device: Waiting for a user action." c) The distance between HZS-200 and HAC-1000 is suggested to be in one meter.
Z-Wave Ceiling-mount Smoke Detector HZS-200E/HZS-200A Step 2. Set up the location and room for Z-Wave device via HAC-1000 web. a. Create rooms in your environment. b. Edit device. Step 3. Create a scene via web. a. Click “Create Scene” and name new scene. b. Select a device from this scene.
Z-Wave Ceiling-mount Smoke Detector HZS-200E/HZS-200A c. Select ON or OFF from this scene. d. You can click “RUN” to run this scene. Step 4. Create trigger via web. a. Click “Create a Trigger” and name new trigger. b. Select a Z-Wave device for this trigger. c. Select when it triggers, it will alarm or bypass. d. Select when it triggers, it will run which scene.
Z-Wave Ceiling-mount Smoke Detector HZS-200E/HZS-200A After entering the time selected for the scene to trigger, tick “Save and send alarm notification”. Tick “Active” to enable this trigger. 3.2 Configuring Z-Wave via Smart Phone The HAC-1100 can be used on iOS and Android operating system. Cloud Home can be downloaded at Google Play store or app store. Please refer to the following steps to install Cloud Home app and add Z-Wave device via smart phone.
Z-Wave Ceiling-mount Smoke Detector HZS-200E/HZS-200A Step 1. Include a Z-Wave device via smart phone (Android/iOS). a. Register a user account. b. Setting c. Inclusion/Exclusion d. Click Inclusion to add device e. e. The distance between HZS-200 and HAC-1000 is suggested to be one meter. Press the program switch of the HZS-200 at least for 1 second to be included.
Z-Wave Ceiling-mount Smoke Detector HZS-200E/HZS-200A Step 2. Set up the location and room for Z-Wave device. b. Click “No Room” to show the device. a. Create rooms in your environment. And place the new device in a room. c. Select “Name” to name this device and select “Location” to place this device in the room that you created. d. Select Picture for your Z-Wave device. f. e. Click “Back” to save. - 14 - Done successfully.
Z-Wave Ceiling-mount Smoke Detector HZS-200E/HZS-200A Step 3. Create a scene via smart phone. a. Click “Add” and name a new scene. c. b. Click “Add” to add a Z-Wave device. d. Click ON or OFF for the device you select. Select a Z-Wave device. f. e. Click “Back” to save. - 15 - Done successfully.
Z-Wave Ceiling-mount Smoke Detector HZS-200E/HZS-200A Step 4. Create Trigger via smart phone. a. Click “Add”. c. b. Name this new Trigger. Select the Z-Wave device and click next. d. Select a mode for a Z-Wave device. e. Select a scene. f. Select the time for the trigger and which scene to run. h. If you enable Save and send alarm notification, when it triggers, it will have a log. You can check this in Notification History. g. Done successfully.
Z-Wave Ceiling-mount Smoke Detector HZS-200E/HZS-200A 3.3 Configuring Z-Wave via HTS-1000P Step 1. Fill out the IP of control gateway to connect with gateway. Click the “Gateway” button. Click the magnifying glass to search the IP of gateway. Control pad found an IP of gateway. Click the IP to join.
Z-Wave Ceiling-mount Smoke Detector HZS-200E/HZS-200A The default gateway port is 5000, and user name and password are both admin. Step 2. Include a Z-Wave device via HTS-1000P. Click the “Z-Wave devices” button to add Z-Wave devices to gateway. Click the “Include New Device” button to add Z-Wave device.
Z-Wave Ceiling-mount Smoke Detector HZS-200E/HZS-200A When you see the message “Waiting for user action”, you can press the match button on Z-Wave devices. The distance between HZS-200 and HAC-1000 is suggested to be in one meter. Press the program switch of the HZS-200 at least for 1 second to be included. If a device is added successfully, it will show the message: Command has completed successfully in device No. XX. Click the “Exclude Device” button to exclude Z-Wave device.
Z-Wave Ceiling-mount Smoke Detector HZS-200E/HZS-200A When you see the message “Waiting for user action”, you can press the match button on Z-Wave devices to exclude device. Step 3. After including Z-Wave devices in gateway, you can create different scenes with this function. You can set scenes to control your devices in Scene mode. Click the “Scene” button. Click “Create Scene” and name the new scene. Select one device to add to the device list.
Z-Wave Ceiling-mount Smoke Detector HZS-200E/HZS-200A Select one device. Click the “Plus” button to add device. Select the status device (ON or OFF). of Click “All Scenes” check the scene.
Z-Wave Ceiling-mount Smoke Detector HZS-200E/HZS-200A Step 4. In Trigger mode, the trigger time is set. An alarm notification is sent via sensor. If a sensor is not installed, this step can be skipped. Click the button. “Trigger” Click “Create Trigger”. Trigger: Name this trigger. Device: Select a Z-Wave device. Mode: Select “Arm” to enable alarm. Scene: When it triggers, the fan will turn on. Optional: After triggering for 5 seconds, the fan will turn off by itself.
Z-Wave Ceiling-mount Smoke Detector HZS-200E/HZS-200A Step 5. After configuring this part, you can control Z-Wave devices and scenes via control pad. Click the “Control Panel” button. Click the three-line button on the upper right corner and click “Add Panel”. There are two types of panel that you can choose from. Name the panel.
Z-Wave Ceiling-mount Smoke Detector HZS-200E/HZS-200A Click and hold for two seconds to select the device or scene. Click on the Device field. Use a paper clip or pin to press the program button on the back of the sensor for 1 time to connect.
Z-Wave Ceiling-mount Smoke Detector HZS-200E/HZS-200A Go back to the main page and click the “Control” button. You can control scenes and devices here.
Z-Wave Ceiling-mount Smoke Detector HZS-200E/HZS-200A Appendix A: Troubleshooting & Frequently Asked Questions Features This difference between Z-Wave and ZigBee z The frequency is different between Z-Wave and ZigBee. ZigBee is 2.4GHz and Z-Wave is about 900MHz. z The outdoor distance is different. ZigBee is 10~75 meters and Z-Wave is about 30 meters. Z-Wave Device Installation How to reset the HZS-200 Series HZS-200 will reset back to default value while excluding from the network.