Z-Wave 4-in-1 Multi Sensor HZS-300E/HZS-300A
Z-Wave 4-in-1 Multi Sensor HZS-300E/HZS-300A Copyright Copyright © 2015 by PLANET Technology Corp. All rights reserved. No part of this publication may be reproduced, transmitted, transcribed, stored in a retrieval system, or translated into any language or computer language, in any form or by any means, electronic, mechanical, magnetic, optical, chemical, manual or otherwise, without the prior written permission of PLANET.
Z-Wave 4-in-1 Multi Sensor HZS-300E/HZS-300A WEEE Regulation To avoid the potential effects on the environment and human health as a result of the presence of hazardous substances in electrical and electronic equipment, end users of electrical and electronic equipment should understand the meaning of the crossed-out wheeled bin symbol. Do not dispose of WEEE as unsorted municipal waste and have to collect such WEEE separately.
Z-Wave 4-in-1 Multi Sensor HZS-300E/HZS-300A Table of Contents Chapter 1. Product Introduction ...................................................................... 5 1.1 Package Contents .............................................................................. 5 1.2 Overview............................................................................................. 5 1.3 Specifications...................................................................................... 7 Chapter 2.
Z-Wave 4-in-1 Multi Sensor HZS-300E/HZS-300A Chapter 1. Product Introduction 1.1 Package Contents The package should contain the following: z 4-in-1 Sensor x 1 z Quick Installation Guide x 1 z AAA Battery x 2 z Accessory Bag x 1 If any of the above items are missing, please contact your seller immediately. 1.
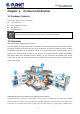
Z-Wave 4-in-1 Multi Sensor HZS-300E/HZS-300A or there is a change in humidity, luminosity and temperature. It not only helps to protect homes, offices and other establishments from theft, but also helps to keep humidity, luminosity and temperature in these places within their ideal range. Mini Design for Easy Installation As the HZS-300 Z-Wave sensor comes in lightweight and compact size, it can be installed on any door and window in less than 60 seconds.
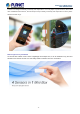
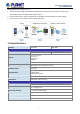
Z-Wave 4-in-1 Multi Sensor HZS-300E/HZS-300A Getting Started is as Easy as 1-2-3 1. Via the Cloud Home App (including Home Automation Controller Pad and Control Gateway): Press Inclusion/Exclusion to include/exclude Z-Wave device. 2. On the Z-Wave device: Press the Pair button to establish a connection with the control gateway. 3. Users can enjoy and manage Z-Wave network right away. 1.3 Specifications HZS-300A HZS-300E Z-Wave Frequency America: 908.42MHz Europe: 868.
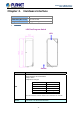
Z-Wave 4-in-1 Multi Sensor HZS-300E/HZS-300A Chapter 2. Hardware Interface Model HZS-300E/HZS-300A Dimensions (W x D x H) 69 x 28 x 19 mm Weight 40g (gross weight) ¾ Front Panel LED/Test/Program Switch LED Sensor Interface Description Opening/Closing the door/window Tamper switch Temperature changed LED Temperature Under 15°C 15~23°C 23~28°C 28~36°C Over 36°C LED Color Green Blue Yellow Orange Red *For more details on indicator, please refer to HZS-300 user manual.
Z-Wave 4-in-1 Multi Sensor HZS-300E/HZS-300A ¾ Bottom Program Switch -9-
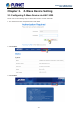
Z-Wave 4-in-1 Multi Sensor HZS-300E/HZS-300A Chapter 3. Z-Wave Device Setting 3.1 Configuring Z-Wave Device via HAC-1000 Please refer to the following steps to add Z-Wave device via HAC-1000 web. 1. The default username and password are both admin. 2. Click Z-Wave. 3. Click Z-Wave.
Z-Wave 4-in-1 Multi Sensor HZS-300E/HZS-300A 4. Click Device Configuration. Step 1. Include a Z-Wave device via web. a) Go to "Z-Wave" and click "Device Configuration". b) Click” Include New Device” and the screen will appear with "Add Device: Waiting for a user action." c) The distance between HZS-300 and HAC-1000 is suggested to be in one meter. Press the program switch of HZS-300 at least for 1 second to be included.
Z-Wave 4-in-1 Multi Sensor HZS-300E/HZS-300A Step 2. Set up the location and room for Z-Wave device via HAC-1000 web. a. Create rooms in your environment. b. Edit device. Step 3. Create a scene via web. a. Click “Create Scene” and name new scene.
Z-Wave 4-in-1 Multi Sensor HZS-300E/HZS-300A b. Select a device from this scene. c. Select ON or OFF from this scene. d. You can click “RUN” to run this scene.
Z-Wave 4-in-1 Multi Sensor HZS-300E/HZS-300A Step 4. Create trigger via web. a. Click “Create a Trigger” and name new trigger. b. Select a Z-Wave device for this trigger. c. Select when it triggers, it will alarm or bypass. d. Select when it triggers, it will run which scene. After entering the time selected for the scene to trigger, tick “Save and send alarm notification”. Tick “Active” to enable this trigger. 3.
Z-Wave 4-in-1 Multi Sensor HZS-300E/HZS-300A Step 1. Include a Z-Wave device via smart phone (Android/iOS). a. Register a user account. b. Setting c. d. Click Inclusion to add device.
Z-Wave 4-in-1 Multi Sensor HZS-300E/HZS-300A e. The distance between HZS-300 and HAC-1000 is suggested to be in one meter. Press the program switch 3 times within 3 seconds to be included.
Z-Wave 4-in-1 Multi Sensor HZS-300E/HZS-300A Step 2. Set up the location and room for Z-Wave device. a. Create rooms in your environment. b. Click “No Room” to show the device. And place the new device in a room. c. d. Select Picture for your Z-Wave device. Select “Name” to name this device and select “Location” to place this device in the room that you created.
Z-Wave 4-in-1 Multi Sensor HZS-300E/HZS-300A e. Click “Back” to save. f. - 18 - Done successfully.
Z-Wave 4-in-1 Multi Sensor HZS-300E/HZS-300A Step 3. Create a scene via smart phone. a. Click “Add” and name a new scene. b. Click “Add” to add a Z-Wave device. c. d. Click ON or OFF for the device you select. Select a Z-Wave device.
Z-Wave 4-in-1 Multi Sensor HZS-300E/HZS-300A e. Click “Back” to save. f. - 20 - Done successfully.
Z-Wave 4-in-1 Multi Sensor HZS-300E/HZS-300A Step 4. Create Trigger via smart phone. a. Click “Add”. c. b. Name this new Trigger. Select the Z-Wave device and click next. - 21 - d. Select a mode for a Z-Wave device. e. Select a scene. f. Select the time for the trigger and which scene to run.
Z-Wave 4-in-1 Multi Sensor HZS-300E/HZS-300A g. Done successfully. h. If you enable Save and send alarm notification, when it triggers, it will have a log. You can check this in Notification History.
Z-Wave 4-in-1 Multi Sensor HZS-300E/HZS-300A 3.3 Configuring Z-Wave via HTS-1000P Step 1. Fill out the IP of control gateway to connect with gateway. Click the “Gateway” button. Click the magnifying glass to search the IP of gateway. Control pad found an IP of gateway. Click the IP to join. The default gateway port is 5000, and user name and password are both admin.
Z-Wave 4-in-1 Multi Sensor HZS-300E/HZS-300A Step 2. Include a Z-Wave device via HTS-1000P. Click the “Z-Wave devices” button to add Z-Wave devices to gateway. Click the “Include Device” button to Z-Wave device. New add When you see the message “Waiting for user action”, you can press the match button on Z-Wave devices.
Z-Wave 4-in-1 Multi Sensor HZS-300E/HZS-300A The distance between HZS-300 and HAC-1000 is suggested to be in one meter. Press the program switch 3 times within 3 seconds to be included. If a device is added successfully, it will show the message: Command has completed successfully in device No. XX. Click the “Exclude Device” button to exclude Z-Wave device. When you see the message “Waiting for user action”, you can press the match button on Z-Wave devices to exclude device.
Z-Wave 4-in-1 Multi Sensor HZS-300E/HZS-300A Step 3. After including Z-Wave devices in gateway, you can create different scenes with this function. You can set scenes to control your devices in Scene mode. Click the “Scene” button. Click “Create Scene” and name the new scene. Select one device to add to the device list. Select one device.
Z-Wave 4-in-1 Multi Sensor HZS-300E/HZS-300A Click the “Plus” button to add device. Select the status of device (ON or OFF). Click “All Scenes” to check the scene. Step 4. In Trigger mode, the trigger time is set. An alarm notification is sent via sensor. If a sensor is not installed, this step can be skipped. Click the “Trigger” button.
Z-Wave 4-in-1 Multi Sensor HZS-300E/HZS-300A Click “Create Trigger”. Trigger: Name this trigger. Device: Select a Z-Wave device. Mode: Select “Arm” to enable alarm. Scene: When it triggers, the fan will turn on. Optional: After triggering for 5 seconds, the fan will turn off by itself. Switch to “AWAY” to enable monitor mode. When one of Z-Wave devices is triggered, control pad will alarm.
Z-Wave 4-in-1 Multi Sensor HZS-300E/HZS-300A Step 5. After configuring this part, you can control Z-Wave devices and scenes via control pad. Click the “Control Panel” button. Click the three-line button on the upper right corner and click “Add Panel”. There are two types of panel that you can choose from. Name the panel.
Z-Wave 4-in-1 Multi Sensor HZS-300E/HZS-300A Click and hold for two seconds to select the device or scene. Click on the Device field. Go back to the main page and click the “Control” button. You can control scenes and devices here.
Z-Wave 4-in-1 Multi Sensor HZS-300E/HZS-300A Appendix A: Troubleshooting & Frequently Asked Questions Features This difference between Z-Wave and ZigBee z The frequency is different between Z-Wave and ZigBee. ZigBee is 2.4GHz and Z-Wave is about 900MHz. z The outdoor distance is different. ZigBee is 10~75 meters and Z-Wave is about 30 meters.