Internet Camera ICA-101/ICA-101W User’s Manual
Copyright Copyright (C) 2003 PLANET Technology Corp. All rights reserved. The products and programs described in this User ’s Manual are licensed products of PLANET Technology, This User’s Manual contains proprietary information protected by copyright, and this User’s Manual and all accompanying hardware, software, and documentation are copyrighted.
TABLE OF CONTENTS CHAPTER 1 INTRODUCTION ...................................................................................... 1 ICA-101/ICA-101W Features ................................................................................. 1 Package Contents ................................................................................................. 2 Physical Details..................................................................................................... 2 CHAPTER 2 INSTALLATION.............
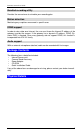
Chapter 1 Introduction 1 As broadband communication gets more and more popular, transferring video and audio through networks has become a major issue. The ICA-101 family provides an advanced Internet Camera solution, supporting wired or wireless Ethernet networking. The ICA-101/ICA-101W can be placed wherever there is a wired/wireless LAN or an available xDSL/Cable modem connection, and the ICA-101 family also supports DDNS.
Internet Camera User Guide Bundled recording utility Provides the convenience to schedule your recording plan. Motion detection Monitoring any suspicious movement in specific area. DDNS support In order to view video over Internet, the user must know the Internet IP address of the gateway used by the camera. If the gateway has a dynamic IP address, DDNS (Dynamic DNS) is required. Since many gateways do not support DDNS, this function is incorporated into ICA-101 family.
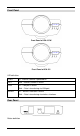
Front Panel Front Panel of ICA-101W Front Panel of ICA-101 LED definition: PWR On - Internet Camera is powered on. ACT Blink - Internet Camera is active. LAN On – LAN port is active. Blink – Data is transferring via LAN port. WLAN On – Wireless interface is active. Blink – Data is transferring via wireless interface.
Internet Camera User Guide Reset Button This button has two (2) functions: • When pressed and released, Internet Camera will reset (restart). • When reset button is pressed over 3 seconds and then release. ALL data will be clear and restore ALL settings to the factory default values. .
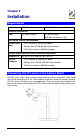
2 Chapter 2 Installation Requirements ICA-101 ICA-101W Network Environment LAN 10/ 100M Ethernet 10/ 100M Ethernet IEEE 802.
Internet Camera User Guide Hardware Install Procedure 1.Connect an Ethernet cable Connect one end of an Ethernet cable to the LAN port located on the ICA-101/101W rear panel and attach the other end to the network device (hub or switch). If you want to use wireless connection for ICA-101W, you can skip this step. 2.Attach the external power supply Connect the provided power adapter to the ICA-101’s connector labeled "5VDC" on rear panel. 3.
Chapter 3 Initial Setup Preparation 3 The initial setup of ICA-101 series must be done through bundled Setup Wizard utility. Before starting installation, please ensure that: • Your PC can establish a physical connection to the Internet Camera. The PC and the Internet Camera must be directly connected (using the LAN port on the Internet Camera) or on the same LAN segment. That is, the PC must be configured to an IP address and subnet mask in 192.168.0.x segment. For example: IP: 192.168.0.
Internet Camera User Guide 4. The screen will list all cameras in your LAN. You can view their current settings by selecting respective Device Name from left panel. Choose the one you want to configure, click Next. 5. A password verification screen will pop up. Please key in administrator name and password for login. The default strings are admin/admin. 6. In the next screen, you can select “Fixed IP Address” or “Dynamic IP Address”. Fixed IP Address is recommended, and can always be used.
7. Enter the desired network settings: IP Address, Subnet Mask, and Default Gateway. Click “Next” to proceed. 8. If you are using ICA-101, please skip to step 10. This screen allows you to configure wireless settings: Mode, Authentication Type, ESSID, Domain, and Channel. Enter appropriate values in each field, then click “Next”. 9. WEP key settings are used to secure your wireless connection. Enter the suitable settings in each field, then click “Next”.
Internet Camera User Guide 10. The next screen allows you to enter a suitable Description, and set the correct Date, Time, and Time Zone. Make any desired changes, then click Next to continue. 11. The Save settings screen displays all the details of your camera. Click “Save” if all settings are correct, or click “Back” to modify incorrect values. 12. After saving all settings, the follow screen appears.
13. Click on “Web UI” to access the web interface of ICA-101 series. Please refer to chapter 4 for more information about web UI. Click on “Exit” to close Setup Wizard.
Internet Camera User Guide Chapter 4 Web User Interface 4 Introduction After finishing the initial setup of ICA-101 series, your camera is ready to use for all users in LAN. This chapter describes how to view live image and manage camera with web browser. The demonstration screens are from ICA-101W, the screens of ICA-101 are similar except some wireless settings. Login Activate the web browser, type “http://192.168.0.20” in the address box to access Welcome page of ICA-101 series.
2. Select “Security” tab, choose “Internet” zone. Click “Custom Level…” button.
Internet Camera User Guide 3. Find the settings of “Download unsigned ActiveX controls”, change the option to “Prompt”. 4. Click “OK” button. 5. Click “Yes” while Warning dialog box appears. 6. Click “Apply”, then “OK” button to finish the setting. After the setting is done, a “Security Warning” dialog box would appear while you select “View Video”. Ensure the path and the ocx file name is correct, then click “Yes” to continue.
Once the installation is successfully finished, you will see the live video immediately. Administration Once you click “Administration” option, a dialog box will pop up. Please enter default username/password as admin/admin to access the management screens.
Internet Camera User Guide The management screens contain 5 sub-screens: System, Network, Image, User, and Status. System System Settings: Device Name: This field displays the name of your ICA-101 series. It cannot be changed. Description: This field is used for entering a descriptive name for the location used by ICA-101 series. Time: Enter the current time. Date: Enter the current date.
Select the time zone where you are locating from the drop-down list. If you are in a daylight saving area, check the box in front of “Adjust for daylight saving”. NTP: Time Server: Enable or disable the Time Server feature as required. If enabled, ICA-101 series will contact a Network Time Server at regular intervals and update its internal time. Server Address: Enter the Address of the Time Server in this field. M Please find below NTP server web address for your reference to set the time server.
Internet Camera User Guide Network IP Setting: There are two options to select from the IP setting. M Note Access to ICA-101 series is done through assigning a proper IP address. Please make sure to use a vacant IP address when you assign the IP address for ICA-101 series. This will prevent errors from occurring if the IP address is overlapped.
The default settings are as follows: · Default IP – 192.168.0.20 · Subnet Mask – 255.255.255.0 Wireless Setting: (ICA-101W only) Mode: Use this option to determine the type of wireless communication for ICA-101W. There are two choices of Infrastructure, and Ad-hoc. The default setting for the Connection Mode is Infrastructure. Authentication Type: Select appropriate authentication type, Open System or Shared Key, which matches with your current wireless network.
Internet Camera User Guide WEP Key Setting: WEP Encryption: Select the option used on your Wireless LAN. None - This is the default setting. If selected, data is not encrypted before being transmitted. 64 Bit Keys - If selected, data is encrypted with the 64-bit default key you entered below. 128 Bit Keys - If selected, data is encrypted with the 128-bit default key you entered below. Passphrase: Enter a phrase in this field, then click “Generate” button. ICA101W will generate 4 key values automatically.
Enable or disable DDNS function. Service Provider: Choose a service provider from the list. ICA-101 series only supports DynDNS currently. Host Name: Enter the host name which DDNS service provider assigned to you. Account: Enter the login name for your DDNS account. Password: Enter the password for your DDNS account. Check WAN IP schedule: This option determines how often ICA-101 series checks the WAN IP status. Options: UPnP: If UPnP is enabled, ICA-101 series will broadcast its availability using UPnP.
Internet Camera User Guide Video Settings: Resolution: Select the desired video resolution format ranging from 160x120 and 320x240 (default). Image Quality: Select the desired image quality with five levels from very low to very high. Lower image quality will generate more compact file size and use less bandwidth; viseversa. Power line frequency: Please check your local electricity frequency and select proper value for ICA-101. Adjustment: Exposure: Select Automatic or Manual as required.
Audio: Enable Audio function by selecting this option. Please note that this function requires an external microphone attached to the MIC IN port of ICA-101 series. Apply/Cancel: After making sure all settings in the Image are correct, click on the “Save” icon to store the settings for ICA-101 series. You can alternatively click on the “Cancel” icon to restore all settings to the values last saved to or retrieved from ICA-101 series.
Internet Camera User Guide use this option, you have to add users in the database below. Alerts: Select “Send E-mail Alert when Motion Detected” and enter the relevant information such as Receiver e-mail Address, Sender e-mail Address, Subject of the mail, SMTP server address, and authentication information if needed. M Note Motion Detection can be activated by rapid changes of light, as well as by moving object. For this reason, it should be used indoor and the light is fairly constant.
Upgrade Firmware: Click “Upgrade Firmware” button, a dialog box appears. Use “Browse” button to locate the upgrade file in your computer, then click “Start Upgrade” to start the upgrading. M Note Do not interrupt the upgrading procedure during proceeding; or the inner component might be permanently damaged. System Log: ICA-101 series will record the system events here. You can use these logs for diagnosis. Refresh: Click “Refresh” button to renew the system log.
Internet Camera User Guide Chapter 5 Client Utility 5 Install Procedure STEP 1 Insert the CD-ROM into the CD-ROM drive to initiate the autorun program. Once completed a menu screen will appear as follows: STEP 2 To install the Viewer & Recorder Application click on the "Viewer & Recorder" hyperlink to activate the installation procedure for the application program. If the above screen is not shown, you can start the installation as follows. 1. Click on Start Menu/ Run. 2. Enter “D:\Utility\setup.
STEP 4 A “Choose Destination Location” screen appears, you may click on “Next” to accept the recommended destination location or click on “Browse” to select another location. After specifying the desired destination location, click on “Next” to proceed further. STEP 5 The Select Program Folder prompt will appear providing information of where the application will be located, click on “Next” to continue. Click on “Back” can return to the previous screens.
Internet Camera User Guide STEP 6 A message box appears to inform you that an ActiveX plug-in has been installed to your computer.. STEP 7 Once the setup is complete, the following message box pops up. Click “OK” button to close the screen. Using Viewer & Recorder Utility After successfully installing the utility, this icon, Double click on it to launch the program. , will be added to the desktop.
Once the utility is executed, its main screen appears as follow. The Camera List displays all available ICA-101 series you have defined. The Current Recordings lists scheduled recording activity in progress. Add Camera Click “Add Camera” button, the utility will search available cameras in LAN automatically. Once it finds the camera, the detailed information will be displayed. If the camera has enabled User Access control, you have to enter the authorized Name and Password in Login field.
Internet Camera User Guide If you want to add a camera which located on Internet, click “Internet” tab and fill in the necessary information: IP address, port number, and login name/password (if required). Click “Test” button to check the connection to the camera, and click “Add” to add the camera to Camera List. Modify Camera If a camera’s IP address or port number has been changed, you can use this option to rebuild the connection.
Delete Camera Select an existing camera from Camera List, click “Delete Camera” button to remove it from the list. View To view live video with utility, select an existing camera from Camera List, then click “View” button. The live video of the selected camera will pop up immediately. There are three control buttons available in this screen. cording, and is for play, is for re- is for stop. Files Click “Files” button to check the files which have been recorded in your computer.
Internet Camera User Guide Preferences To set recording preferences, click “Preferences” button. You can modify File Location and Time Limit here. The Time Limit sets the maximum time period of a recording session which started by clicking button on the View screen. Schedule To schedule a recording session, click “Schedule” button. The screen displays all scheduled recordings. Click “Add” button, and select desired parameters, then click “Save” button.
Appendix A Frequently Asked Questions A Internet Camera Features Q: What is an Internet Camera? A: The Internet Camera is a standalone system connecting directly to an Ethernet or Fast Ethernet network. And ICA-101W also supports the wireless transmission based on the IEEE 802.11b standard.
Internet Camera User Guide Appendix B Trouble Shooting B Q: I cannot access the Internet Camera from a web browser. A: If ICA-101 series do not respond, check the following: • Machine is properly installed, LAN or WLAN connection is OK, and it is powered ON. You can test the connection by using the "Ping" command: Open the MS-DOS window or command prompt window. Enter the command: ping 192.168.0.
Appendix A - Troubleshooting A: A likely issue is that the CMOS sensor becomes overloaded when the light source is too bright such as direct exposure to sunlight or halogen light. You need to reposition the Internet Camera into a more shaded area immediately for the bright light will damage the CMOS sensor. Q: There is bad focus on ICA-101 series, what should be done? A: The focus might not be correctly adjusted for the line of sight.
C Appendix C Specification Model ICA-101 ICA-101W Hardware Specifications 10/100M Ethernet port 1 Wireless LAN None IP assignment Manually assigned, DHCP WEP encryption None 64-bit, 128-bit LED indicator PWR, ACT, LAN PWR, ACT, LAN, WLAN Power requirement DC 5V, 2A Audio support Yes Dimension 164 x 88 x 53 mm Operating temperature 0 ~ 40 degree C Storage temperature -10 ~ 70 degree C Humidity 5% ~ 95% non-condensing Built-in 802.