
Quick Guide

– 1 – – 2 –
– 3 – – 4 –
The guide contains the basic information you need to quickly set up
the camera.
For detailed information on installations or operations, please refer
to the user manual on PLANET web site (http://planet.com.tw/en/
support/download.php).
Step 1: Unpack the Camera
Check the camera package and make sure all the items are present.
The complete package list is shown in the user manual in Chapter 1.
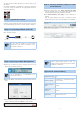
Step 2: Connecting Network and PoE
Basic connection example:
PoE Ethernet Switch
ICA-E Series
Laptop
(192.168.0.X)
PoE
Note
You can check the details of a PoE network
infrastructure under Product Introduction in the
user manual in Chapter 1.
Step 3: Running Installer Utility to Locate
the IP Camera
Download camera search tool: Smart Discovery Lite utility
from the Download Center of our website (http://planet.com.tw/
en/support/download.php?view=8184&key=ICA-E#list).
Run Smart Discovery Lite utility to start searching for
cameras.
After the Smart Discovery Lite utility is launched, all ICA-E
camera series found in your local area network will be displayed.
Step 4: Opening the Web Management
Select the IP camera you want to congure and input its IP
address into the browser search bar.
Note
For full functionality, it is recommended to use
Microsoft IE browser 11.
Please enter “admin” as the default user name and password, as shown
below:
When the device is logged on for the rst time, the browser will
prompt a message; please click “Allow” to install controls.
Note
If IE9 or higher version browser is used, it is
suggested that the PLANET camera web link should
be added as a trusted site.
Appendix A: Default Setting
Default DHCP Client On
Default IP Address
192.168.0.20 – if DHCP does not exist
in the network
Default Login User
Name
admin
Default Login
Password
admin
Search Tools Smart Discovery Lite