Industrial 2-/4-port RS232/422/485 Serial Device Server ICS-2200T/ICS-2400T Quick Installation Guide
Table of Contents 1 Package Contents...................................................................... 3 2. Requirements............................................................................. 4 3. Hardware Introduction................................................................ 5 3.1 Front Panel......................................................................... 5 3.2 Wiring the Power Inputs....................................................... 6 3.3 Serial Port PIN Assignment........
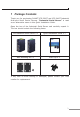
1 Package Contents Thank you for purchasing PLANET ICS-2200T and ICS-2400T Industrial Multi-port Serial Device Servers. “Industrial Serial Server” is used as an alternative name in this Quick Installation Guide. Open the box of the Industrial Serial Server and carefully unpack it.
2. Requirements The Industrial Serial Server provides remote login interface for management purposes. The following equipment is necessary for further management: Workstations running Windows XP/2003/Vista/7/8/2008/10, MAC OS X or later, Linux, UNIX, or other platforms are compatible with TCP/ IP Protocols. Ethernet Port Connection Workstations are installed with Ethernet NIC (Network Interface Card) Network cables -- Use standard network (UTP) cables with RJ45 connectors.
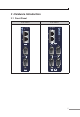
3. Hardware Introduction 3.
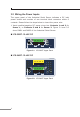
3.2 Wiring the Power Inputs The upper panel of the Industrial Serial Server indicates a DC inlet power socket and consists of one terminal block connector within 6 contacts. Please follow the steps below to insert the power wire. 1. Insert positive/negative DC power wires into Contacts 1 and 2 for Power 1, or Contacts 5 and 6 for Power 2. Figure 3-1 and 3-2 show PWR1 and PWR2 of the Industrial Serial Server. ICS-2200T: 12~48V DC 1 2 3 4 5 6 V1+ V1PWR1 V2+ V2Fault PWR2 DC Input: 12-48V , 1Amax.
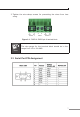
2. Tighten the wire-clamp screws for preventing the wires from loosening. 1 2 V1+ V1Power 1 3 4 Fault 5 6 V2+ V2Power 2 Figure 3-3: PWR1 & PWR2 pin of terminal block. Note The wire gauge for the terminal block should be in the range from 12 to 24 AWG. 3.
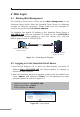
4 Web Login 4.1 Starting Web Management The following shows how to start up the Web Management of the Industrial Serial Server. Note the Industrial Serial Server is configured through an Ethernet connection. Please make sure the manager PC must be set to the same IP subnet address. For example, the default IP address of the Industrial Serial Server is 192.168.0.100, then the manager PC should be set to 192.168.0.x (where x is a number between 1 and 254, except 100), and the default subnet mask is 255.255.
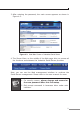
3. After entering the password, the main screen appears as shown in Figure 4-3. Figure 4-3: Web Main Screen of Industrial Serial Server 4. The Server Menu on the middle of the Web page lets you access all the functions and statuses the Industrial Serial Server provides. Now, you can use the Web management interface to continue the Serial Server management. Please refer to the user manual for more. 1. For security reason, please change and memorize the new password after this first setup. Note 2.
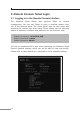
5. Remote Console Telnet Login 5.1 Logging in to the Remote Console Interface The Industrial Serial Server also supports Telnet for remote management. You can use Telnet to open a terminal session over one of the Ethernet ports. The Serial Server asks for user name and password for remote login when using Telnet; please use the following default IP address, username and password for the first-time login. Default IP Address: 192.168.0.
6. Getting Started with VCOM Utility With Industrial Serial Server’s VCOM administration utility, you can easily install and configure one or multiple ICS-2200T or ICS-2400T device servers over the network from a remote location. There are several functions to configure Industrial Serial Server: zz Searching device zz Create virtual COM port zz Firmware upgrade zz Import or export file VCOM COM1 (Port1) COM2 (Port2) Ethernet Serial Device 1 Serial bus PC Serial bus Serial Device 2 6.
6.2 Searching Serial Device Server First click “Add Device” and then click “Search” if Serial Server has access to network, as shown below. 6.3 Serial Server Login The ICS-2200T/ICS-2400T Serial Server is password protected, so user can’t modify any settings. The user must first log in the ICS-2200T/ ICS-2400T if the password is correct; the status will become “Logged in”. On the contrary, if the password is incorrect, the status will pop up an error window.
6.4 Serial Server Setting Click “Settings” to configuration window. open the target Industrial Serial Server’s Parameters are grouped into tables. Click “OK” to implement changes Please refer to user manual for a description of all functional properties for the Industrial Serial Server.
6.5 COM Port Mapping While using the COM Mapping of VCOM Utility, the connection between the ICS-2200T/ICS-2400T and the PC device administrator will create the corresponding Virtual COM Port, which supports Microsoft Windows XP or above platform. Add COM If your Serial Server has been found, select it in order to add it to the COM mapping list. Click “OK” to take effect. COM Mapping Settings. Click “Modify COM” to configure Serial Server’s serial COM port.
7. Recovering Back to Default Configuration IP Address has been changed or admin password has been forgotten To reset the IP address to the default IP address “192.168.0.100” or reset the login username and password to default value, press the hardware-based reset button on the bottom panel for about 5 seconds. After the device is rebooted, you can log in the management Web interface within the same subnet of 192.168.0.xx and default password.
8. Customer Support Thank you for purchasing PLANET products. You can browse our online FAQ resource on PLANET web site first to check if it could solve your issue. If you need more support information, please contact PLANET switch support team. PLANET online FAQs: http://www.planet.com.tw/en/support/faq Switch support team mail address: support@planet.com.tw ICS-2200T/ICS-2400T User’s Manual: https://www.planet.com.tw/en/support/download.