Industrial EtherCAT Slave I/O Module with Isolated 16-ch Digital Input/Output IECS-1116-DI/IECS-1116-DO User’s Manual
Table of Contents 1. Package Contents....................................................................... 3 2. Product Features........................................................................ 4 3. Product Specifications................................................................. 5 4. Hardware Introduction................................................................ 6 4.1 Three-View Diagram............................................................ 6 4.
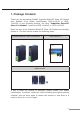
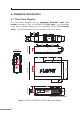
1. Package Contents Thank you for purchasing PLANET Industrial EtherCAT Slave I/O Module with Isolated 16-ch Digital Input/Output, IECS-1116-DI or IECS1116-DO. In the following sections, the term “Industrial EtherCAT Slave I/O Module” means the IECS-1116-DO or IECS-1116-DO. Open the box of the Industrial EtherCAT Slave I/O Module and carefully unpack it.
2.
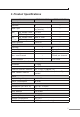
3. Product Specifications Model IECS-1116-DO IECS-1116-DI Digital Input Channels 16 -- Input Type Wet (sink/source) / Dry (source) -- ON Voltage Level 3.5~50V Wet Contact OFF Voltage Level 4V max. -- ON Voltage Level Close to GND Dry Contact OFF Voltage Level Open -- Photo Isolation -- --- 3750V DC Digital Output Channels -- 16 Output Type -- Open collector (sink) Load Voltage -- 3.5~50V Max.
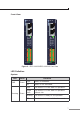
4. Hardware Introduction 4.1 Three-View Diagram Top View Rear View The three-view diagram of the Industrial EtherCAT slave I/O module consists of two 10/100BASE-TX RJ45 ports, one removable 3-pin power terminal block and one removable 16-pin I/O terminal block. The LED indicators are also located on the front panel.
Front View PWR RUN PWR RUN IN IN OUT OUT LNK ACT LNK ACT 0 1 2 3 0 1 2 3 4 5 6 7 4 5 6 7 8 9 10 11 8 9 10 11 12 13 14 15 12 13 14 15 Channel Status Channel Status GND GND Ext. GND Ext. GND 0 1 0 1 2 3 2 3 4 5 4 5 6 7 6 7 8 9 8 9 10 11 10 11 12 13 12 13 14 15 14 15 DI COM DI COM IECS-1116-DI Ext. PWR Ext.
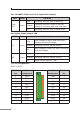
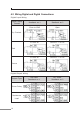
Per 10/100TX RJ45 Port (Port Input/Port Output) LED LNK/ ACT Color Green Function Light Indicating that the port is linked up. Blinking Indicating that the module is actively sending or receiving data over that port. Off Indicating that the port is linked down. Per Digital Input/Output LED LED DI Color Green DO Green Function Light Input voltage is higher than the upper switching threshold voltage. Blinking Indicating network packet delivery.
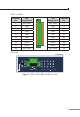
IECS-1116-DO Terminal No. Pin Assignment Pin Assignment Terminal No. 1 Ext. GND Ext. GND 2 3 DO0 DO1 4 5 DO2 DO3 6 7 DO4 DO5 8 9 DO6 DO7 10 11 DO8 DO9 12 13 DO10 DO11 14 15 DO12 DO13 16 17 DO14 DO15 18 19 Ext. PWR Ext. PWR 20 Top View V1+ PWR GND DC Input: 9-48V , 0.5A max.
4.
4.3 Wiring the Power Inputs The 3-contact terminal block connector on the top panel of Industrial EtherCAT slave I/O module is used for one DC power input. Please follow the steps below to insert the power wire. Note When performing any of the procedures like inserting the wires or tightening the wire-clamp screws, make sure the power is OFF to prevent from getting an electric shock. 1. Insert positive and negative DC power wires into contacts 1 and 2 for POWER. V1+ PWR GND DC Input: 9-48V , 0.
4.4 Wiring the Connector A tip for connecting the wire to the I/O connector Insert the wire 1 2 Use the blade of a flat-head screwdriver to push the wire clamp, then hold until step 2 complete. Insulated Terminals Dimensions F L Dimensions (Unit: mm) W C Item NO. CE007512 F L C 12.0 18.0 1.2 W 2.8 A tip for removing the wire from the I/O connector Remove the wire 12 2 1 Use the blade of a flat-head screwdriver to push the wire clamp, then hold until step 2 complete.
5. Installation This section describes the functionalities of the Industrial EtherCAT slave I/O module’s components and guides you to installing it on the DIN rail and wall. Please read this chapter completely before continuing. Note In the installation steps below, this manual uses PLANET IGS-801 8-port Industrial Gigabit Switch as an example. The steps for PLANET Industrial Slim-type Switch, Industrial Media/Serial Converter and Industrial PoE devices are similar. 5.
Step 2: Lightly insert the bottom of the module into the track 1 2 Step 3: Make sure the bracket is tightly secured on the DIN-rail track. 2 1 Step 4: To remove the module from the track, lightly pull out its bottom.
5.2 Wall-mount Plate Mounting To install the Industrial EtherCAT slave I/O module on the wall, follow the instructions described below. Step 1: Remove the DIN-rail bracket from the Industrial EtherCAT slave I/O module by loosening the screws. Step 2: Screw one piece of the wall-mount plate on one end of the rear panel of the Industrial EtherCAT slave I/O module, and the other plate on the other end. Step 3: And then screw the module on the wall to complete the installation.
6. Getting Started This chapter provides a basic overview of how to configure and operate your IECS-1116 series. 6.1 Connecting the Power and the Host PC Step 1: Connect both the IN port of the IECS-1116 Module and RJ45 Ethernet port of Host PC. Ensure that the network settings on the Host PC have been correctly configured and are functioning normally.
Step 3: Verify the “PWR”LED indicator on the IECS-1116 module is Green; “IN”LED indicator is Green. PWR RUN PWR RUN PWR RUN IN OUT LNK ACT IN 0 1 2 3 4 5 6 7 8 9 10 11 12 13 14 15 Channel Status IN GND GND 0 1 2 3 4 5 6 7 8 9 10 11 12 13 14 15 DI COM DI COM IECS-1116-DI OUT 6.2 Configuration and Operation Beckhoff TwinCAT 3.x is the most commonly used EtherCAT Master software to operate the IECS-1116 module. Click on the link below to download Beckhoff TwinCAT 3.
Inserting into the EtherCAT network Note Installation of the latest XML device description (ESI). Make sure to use the latest installation description to install the latest XML device. This can be downloaded from PLANET website (https://www.planet.com.tw/en/support/faq?method=ke yword&keyword=IECS-1116) and check the online FAQs for the installation of the XML device.
Step 2: Configuration via TwinCAT In the left-hand window of the TwinCAT System Manager, click on the brand of the EtherCAT Box you wish to configure (IECS-1116-DI/IECS1116-DO in this example). Click Dix or Dox to get and configure state.
Customer Support Thank you for purchasing PLANET products. You can browse our online FAQ resource on PLANET web site first to check if it could solve your issue. If you need more support information, please contact PLANET switch support team. PLANET online FAQs: http://www.planet.com.tw/en/support/faq.php Support team mail address: support@planet.com.tw Copyright © PLANET Technology Corp. 2019. Contents are subject to revision without prior notice.