ISDN Internet Telephony PBX System IPX-1800N User’s Manual
Copyright Copyright (C) 2006 PLANET Technology Corp. All rights reserved. The products and programs described in this User’s Manual are licensed products of PLANET Technology, This User’s Manual contains proprietary information protected by copyright, and this User’s Manual and all accompanying hardware, software, and documentation are copyrighted.
equipment in a residential area is likely to cause harmful interference in which case the user will be required to correct the interference at the user’s own expense. WEEE Warning To avoid the potential effects on the environment and human health as a result of the presence of hazardous substances in electrical and electronic equipment, end users of electrical and electronic equipment should understand the meaning of the crossed-out wheeled bin symbol.
TABLE OF CONTENTS 1 OVERVIEW................................................................................................................................................ 6 1.1 2 3 4 PHYSICAL INTERFACES ......................................................................................................................... 7 SYSTEM CONFIGURATION .................................................................................................................. 8 2.1 PBX SYSTEM .......................
4.3.8 IP Phone ....................................................................................................................................... 29 4.3.9 Extension of IP Phone................................................................................................................... 31 4.3.10 5 4.4 ROUTE CONFIGURATION .................................................................................................................... 36 4.5 ROUTE GROUP CONFIGURATION ....................
PLANET IP PBX user’s manual 1 Overview PLANET IPX-1800N ISDN IP PBX system are designed and optimized for the SMB, and SOHO daily communications. The IPX-1800N is the next generation voice communication platform for the small to medium enterprise. Designed as an open, scalable, and highly reliable telephony solution, the IPX-1800N is able to accept 30 extension registrations, and effectively meeting scales from various enterprises.
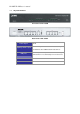
PLANET IP PBX user’s manual 1.1 Physical Interfaces Front Panel of IPX-1800N Rear Panel of IPX-1800N Power adapter Telephony interface ports 12V DC ISDN BRI TE ports are to be connected to NT points from PSTN or other ISDN network-side devices. 1 external port with compliance to USB 1.1/2.0.
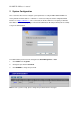
PLANET IP PBX user’s manual 2 System Configuration This section describes how to configure system parameters used by PLANET ISDN IP PBX. The factory default of LAN IP address is 192.168.1.1. Connect to LAN port and the configuration Web interface is at https://192.168.1.1/. Once connected, the browser will ask for accepting a certificate. Click Yes to see the home page. Type in the default administrator ID and password (both are admin) to log in for administration.
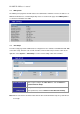
PLANET IP PBX user’s manual 2.1 PBX System The PBX System page briefs IP PBX status to the administrator. Firmware versions, IP addresses of WAN and LAN interfaces, and default gateway router are shown in this page. Click PBX System to see the basic information of IP PBX. 2.2 Time Setup The Time Setup page allows administrator to configure time zone and date for PLANET IP PBX. With correct time setup, functions such as IVR, work time, and voicemail can present the actions at the right time.
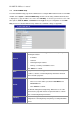
PLANET IP PBX user’s manual 2.3 On-board WAN Setup The On-board WAN Setup page allows administrator to configure WAN network interface for PLANET IP PBX. Select System -> On-board WAN Setup, and the current setting of WAN network interface is displayed, e.g. type, IP address etc. Unless the “LAN Only” is selected, you can choose one of the three options, Static IP, DHCP, and PPPoE from the Type list for your configuration.
PLANET IP PBX user’s manual 2.4 On-board LAN Setup The On-board LAN Setup page allows administrator to configure LAN network interface for PLANET IP PBX. 1. Select System -> On-board LAN Setup to see the current settings of LAN network interface. 2. Enter a new IP address and network mask. 3. Click “APPLY” to change the settings. Note: By default PLANET IP PBX grants IP addresses to LAN devices via DHCP, and translates those addresses into its WAN IP address for access beyond the LAN subnet.
PLANET IP PBX user’s manual Add a Route Edit a Route Only Delete a Route 1. Enter the IP Route ID, Subnet, Netmask, and Gateway. 2. Click ADD to have the newly added route in IP Rout ID. 1. Edit the information in a row. 2. Click “APPLY” in the row to update the information. 1. Select a route ID. 2. Click DEL to remove the route ID from the IP Route ID column. 2.6 Dynamic DNS Setup Dynamic WAN IP address causes difficulty for inbound connections from remote clients or IP PBX systems.
PLANET IP PBX user’s manual 2.7 QoS Setup To assure the bandwidth reserved for the outgoing VoIP traffic over regular data traffic from LAN, the QoS Setup page offers three parameters to characterize the WAN link. The default QoS setting is disabled because these parameters must be correctly given according to the actual WAN speed. 1. Click Enable 2. Enter the WAN Uplink Speed, WAN Downlink Speed, and Uplink VoIP Reserved (bandwidth). Enable QoS 3. Click APPLY.
PLANET IP PBX user’s manual 1. Enter the Service ID, Protocol, Port, Forward to IP, and Forward to Port. Add a Service 2. Click ADD to add the newly service in the Service ID. 1. Change any information in a row. 2. Click APPLY in the row to update the information. 1. Select a service ID. 2. Click DEL to remove the service from the Service ID. Edit a Service Delete a Service 2.
PLANET IP PBX user’s manual 2.9.2 SIP UA SIP UA lists the registration status of each client and remote IP PBX, and the IP Address/Port from where they register. SIP trunk registrations, if any, also show at the end of the list. The Dynamic column shows the listed IP address is dynamic or static. Reg. Progress is the response code and message if registration has been attempted but not successful so far. Slave Registrar column is used only under the stackable mode.
PLANET IP PBX user’s manual Field Client State Service Party Description Show the caller or callee’s extension number, port number, or SIP trunk ID. Connected In the conversation. Ring The client is a caller and is ringing a callee. Ringing The client is a callee and is ringed by a caller. Reserved FXS detects off-hook. Dial The client is a caller. Answer The client is a callee. IVR Calls from FXO are picked up by Auto-Attendant. Meet-me The client enters meet-me.
PLANET IP PBX user’s manual 2.11 Shutdown In System -> Shutdown, you can shutdown the machine by clicking YES, or reboot the machine by selecting the Rebooting After Shutdown check box and clicking YES. In case the software reboot fails, you can also press the hardware Reset button. It is advised to shut down IP PBX system before a power-off. 2.12 Logout Logout button locates at the top-left of the webpage. Administrator can logout, and go back to the login page by clicking it.
PLANET IP PBX user’s manual 3 Service Configuration This section describes details to configure various services built in the PLANET IP PBX. 3.1 NTP Service Select Service -> NTP Service to specify a NTP server for network time synchronization. You can enable or disable NTP service at any time. 1. Click Enable. 2. Select Automatic check box to use server pool at pool.ntp.org; or, enter a fully qualified domain name or the Enable NTP Service IP address of a NTP server. 3. Disable NTP Service 3.
PLANET IP PBX user’s manual 1. Click Enable. 2. Enter System Location, System Administrator Contact, SNMPv2 Read-only Community with allowed network Enable SNMP Service specifications, and also those of the Read-write Community. 3. Disable SNMP Service 3.3 Click APPLY. Click Disable, and click APPLY. STUN Service PLANET IP PBX has a built-in STUN client to solve NAT problems. Select Service -> STUN Service to specify a Simple Traversal of UDP through NATs (STUN) server for NAT traversal.
PLANET IP PBX user’s manual 3.4 TFTP Service Select Service -> TFTP Service to view the current status of TFTP Service. You can enable or disable TFTP Service at any time. Enable TFTP Service: To click Enable, and then click APPLY to manage files, e.g. upload and download files to and from the IP PBX. Uploaded files can then be retrieved through TFTP Service. Current directory is shown in the field on the right side of Directory, for instance, it is /.at the beginning.
PLANET IP PBX user’s manual 1. Click a directory in the Directory list. 2. Click a file in the Download / Delete File from the Above Download a File Folder list. 3. Click GET FILE to download the file. 1. Click a directory in the Directory list. 2. Select a file in the Download / Delete File from the Delete a File Upload a File Above Folder list. 3. Click DEL FILE to remove the file. 1. Click a directory in the Directory list. 2. Click Browse. 3.
PLANET IP PBX user’s manual Note: If the IP PBX was shut down abnormally, Select Service -> DHCP Service and click APPLY, or Go to Service -> IP PBX Service, and click RESTART to active the DHCP service. 1. Click CLEAR. 2. Enter a pool name (must have an alphabet initial) in Pool Name. 3. Select Single-host to enter an IP address of the host with MAC, if the binding is intended for a specific host only. 4. Enter a DHCP range of addresses available for lease in IP.
PLANET IP PBX user’s manual 3.6 IP PBX Service In Service -> IP PBX Service, you can click the Service & Configuration tab to reload, backup, restore, restart or revert the IP PBX configuration, or click the Advance tab for the IP PBX parameters settings. 3.6.6 Service & Configuration Select Service -> IP PBX Service, and then click the Service & Configuration tab. Click RELOAD, and IP PBX will reload the configuration once there is no active call.
PLANET IP PBX user’s manual settings. Click RESTART, and the IP PBX Service will restart completely. Restart IP PBX Configuration Currently active calls will be disconnected immediately. This function is rarely required unless the network setting has been changed, or the service operates abnormally without problematic configuration could be identified. Click REVERT, and IP PBX will erase current IP PBX settings and revert configuration back to the factory default.
PLANET IP PBX user’s manual Field Description PBX SIP Port Specify the UDP port where the SIP service listens on. Limit the UDP ports used by the IP PBX for media transport. ) The port range needs to have at least equals to the (number of extensions (also count shared-lines) + RTP Port Range number of SIP trunks (also count trunk terminals)) * 2. If selecting Enable Video Codec, the total amount needs to multiply by 2 to have the least requirements for RTP port range.
PLANET IP PBX user’s manual 4 IP PBX Configuration This section introduces steps to provision the IP telephony part of the IP PBX. Note that reloading configuration is required in order to make new configuration effective2. 4.1 User Configuration A user is a logical entity in IP telephony which associates extensions with a usergroup. It also propagates its attributes such as e-mail and voicemail PIN to extensions.
PLANET IP PBX user’s manual Table 4.1 User configuration Settings Field Description A unique ID containing alphabets, numbers, and underscore only without spaces; 32 characters maximum. Login ID This is the ID for personal configuration through IP PBX Web management. Name of the user, either a real or a virtual one, e.g. Alice Name Lee or Conference Room. Password Password for the user to access IP PBX Web management. Description Arbitrary description information.
PLANET IP PBX user’s manual 1. Enter a usergroup name beside the ADD button, and then click ADD. Add a User Group 2. The name will show in Group ID. 3. Click the name in Group ID to view the edit page. 4. Enter settings shown in Table 4.2. 5. Click SET to save the settings, and click BACK to return to the USERGROUP MANAGEMENT page. Now, you can see the newly added usergroup displayed in the Group ID. Edit a User Group Delete a User Group 1. Click a usergroup name in the Group ID. 2.
PLANET IP PBX user’s manual Reachable User Groups Select other usergroups reachable from this usergroup. By default, only users in the same usergroup can reach one another. ) If there is not any appropriate usergroup to select, come back later to revise this selection, once more usergroups have been created. Associated PBX Features3 Select PBX features enabled to this usergroup. Here vm stands for Voice Mail, mm for Meet-me Conference, parkedcalls for Call Parking, and operator for operator service.
PLANET IP PBX user’s manual 1. Enter a device name in the Device ID box, and a URL in the Device Administration URL box. Add a Device 2. Click ADD to see the newly added device in the Device ID. Once create the device, you can modify its information through the following steps. 1. Modify the Device Administration URL and click LINK as a shortcut to the device administration URL. 2. Click EDIT to see the Enable Automatic Client Configuration (ACC) page. Table 4.3.
PLANET IP PBX user’s manual 4.3.9 Extension of IP Phone The EXTENSION MANAGEMENT page lets the administrator to create extensions. Select Device -> Extension of IP Phone, and one can add, edit, and delete extensions. Go to Service -> IP PBX Service, and click RELOAD to activate changes. Add an Extension Edit an Extension Delete an Extension 1. Click ADD to set an extension. 2. Enter settings shown in Table 4.3.2. 3. Click ADD. 4. Click BACK to see the newly added extension. 1.
PLANET IP PBX user’s manual The usergroup that the extension can pick up. The extension can Pickup Group set a usergroup that when any extension in the usergroup rings, the extension can press *8 to pick up the call in ringing state. Line Type Language Voicemail Voicemail PIN Unavailable Timeout Allow LAN Use Only Specify the type of connection, wired or wireless, of the client with the extension. Preferred language for system instructions heard from the extension.
PLANET IP PBX user’s manual when not answered. The number could be an extension or a PSTN number with appropriate outbound prefix. (Optional) Enter a period of time in seconds for rings the extension to add the extension in in Unavailable Call Forward. Click Timeout To Next Forward Unavailable Call Forward and the time here into the list. Remove the extension of Unavailable Call Forward from the list by clicking .
PLANET IP PBX user’s manual 4. Click BACK to see the newly added analog phone in the Extension Number. Edit an Analog Phone Delete an Analog Phone 1. Click a port in POTS Port. 2. Edit settings shown in Table 4.3.3. 3. Click UPDATE. 4. Click BACK to see the edit information. 1. Select a POTS Port. 2. Click DEL to remove the extension from the POTS Port. Table 4.3.3 FXS Extension Configuration Settings Field Description POTS Port FXS port index.
PLANET IP PBX user’s manual Advanced Settings Select to see more optional settings shown below. (Optional) Select Block Anonymous Calls to block all calls without a Caller ID Selective Call Blocking (Optional) Block one or more calling numbers by typing the calling numbers and clicking . Removing the blocked numbers by clicking the number from the list, and then click . (Optional) Select Unconditional Call Forward and click a default destination in the list, e.g. Voicemail or Phone Number.
PLANET IP PBX user’s manual 4.4 Route Configuration A route is a destination number pattern for outbound call matching. A pattern consists of digits 0-9 (including “-”), “*”, “#”, digit set, and wildcard characters like “.”, “X”, “Z”, and “N”. Table 4.4.1 explains digit set and wildcard characters. Table 4.4.1 Digit Set and Wildcard Characters for Route Patterns Expression [] Description Match any single digit listed explicitly. E.g., digit set [13579] match odd digits.
PLANET IP PBX user’s manual Table 4.4.2 Route Configuration Settings Field Description Route ID Description A unique ID containing alphabets, numbers, and underscore only without spaces; 32 characters maximum. Arbitrary description information. A destination number pattern consisting of digits, digit set, and Destination Number Pattern wildcard characters, e.g. 9NXXXXXX matches any 7-digit called number starting from a digit larger or equal to 2 and with an extra prefix digit 9.
PLANET IP PBX user’s manual Select Route Management-> Route Group, and the administrator can add, edit and delete routegroups in the ROUTE GROUP MANAGEMENT page. Go to Service -> IP PBX Service, and click RELOAD to activate changes. Add a Route Group 1. Type a route group name and click ADD. 2. Click the route group in Group ID to see the settings. 3. Enter settings shown in Table 4.5, and click BACK. The newly added route group should be displayed in the Group ID.
PLANET IP PBX user’s manual 4.6 SIP Trunk Configuration A SIP trunk refers to a SIP account on a remote call routing or gateway device. A practical example is an account at an Internet Telephony Service Provider (ITSP) where a call is routed to a SIP client or off-ramped to an analog subscriber via PSTN. One could also build SIP trunk to a remote IP PBX to reach its extensions and PSTN ports. The SIP TRUNK MANAGEMENT page allows the administrator to configure SIP trunks used by PLANET IP PBX.
PLANET IP PBX user’s manual registration will be from a dynamic remote peer. Typical application is to accept registration from an IP PBX at a remote site with dynamic IP address. Once the remote IP PBX registers, calls from local to remote can be made reversely over the trunk. SIP Proxy Specify IP address (or fully qualified domain name) and UDP port of the remote SIP proxy, which usually refer to the SIP Proxy Port Auth. Name SIP server on the ITSP side.
PLANET IP PBX user’s manual after stripping. A number of leading digits to be stripped from the original called number. If prefix or stripping has been given but DID DID Stripping of Extension is not bynumber, the result of digit manipulation is dialed in a DTMF string after the call has been answered by the DID extension as an automatic 2nd dialing. Language IVR List8 Preferred language for system instructions heard from the trunk. Associate an IVR menu with incoming calls to this trunk.
PLANET IP PBX user’s manual Specify the SIP domain used by the proxy and registrar. If not specified, IP address will be used as the domain by SIP Domain default. Override default User-Agent header content. User-agent Content Select if failed to the registration, and cannot identify any Clear Bindings Prior Registration abnormal settings. IP PBX uses NAT traversal for outgoing traffics by default.
PLANET IP PBX user’s manual Delete an ISDN PSTN Trunk 1. Click the Trunks tab, and select a trunk group. 2. Click DEL to remove the ISDN PSTN trunk from the Trunk Group. Table 4.7 ISDN Trunk Configuration Settings Field Description ID number of this ISDN trunk group. A valid number ranges Trunk Group from 1 to 31. It should not overlap with existing FXO PSTN trunk groups. The Trunk Ports is the logical range of the sum of B and D channels.
PLANET IP PBX user’s manual When enabled DID, selects an extension from the list to be an unconditional destination for incoming calls to this trunk. Or click by number and then enter configurations in DID Prefix and DID Stripping to have the incoming calls directed to the corresponding extension derived by number DID of Extension manipulation. The ISDN numbers of the included ports are therefore regarded as the direct line of the extension.
PLANET IP PBX user’s manual 4.8 Terminal Trunk Configuration (IPX-2000, IPX-1803 and IPX-1804 only) A SIP trunk terminal refers to a SIP account for a remote SIP trunk to register with. It terminates SIP registration and invitation from a remote IP PBX and relay calls to local clients, PSTN trunks, or further SIP trunks. In a site-to-site SIP trunking application, a SIP trunk on one side usually pairs with a trunk terminal on the other side to form a unidirectional call hand-off path.
PLANET IP PBX user’s manual Password of SIP trunk given on the other IP PBX for Terminal Password Language authentication. Preferred language for system instructions heard from the terminal. When disabled DID, click a usergroup in the list whose reachability to other usergroups and trunks will be used as the privilege of inbound calls from this terminal. Usergroup13 of Privilege ) There may not be any appropriate usergroups to select initially.
PLANET IP PBX user’s manual 5 Feature Configuration A feature is a logical entity presenting a function module of IP PBX, e.g. meet-me conference, auto attendant, voice mail, music on hold, etc. Any configuration change to a feature requires clicking RELOAD in Service -> IP PBX Service to take effect. 5.1 Call Park During a call, the callee may want to continue the conversation using another phone. The call park feature enables so by letting the callee transfer the call to the call park pilot number.
PLANET IP PBX user’s manual going concurrently using different room numbers. Before entering a meeting room, the caller has to enter the correct PIN of the room number. Note: The administrator who invited another meet-me conference room must drop all parties by pressing *5 when the meeting ends. Select Feature -> Meet-me Conference to configure meet-me conference feature. Add a Meet-me Conference 1. Enter settings shown in Table 5.2. 2. Click ADD to add a new conference room.
PLANET IP PBX user’s manual During a conference, the administrator has following options: - # to quit conference - *1 to mute/unmute - *2 to lock/unlock the conference - *3 to invite a user into the conference - *4 to drop a party from the conference - *5 to drop all parties in the conference - *6 to drop the last invited party by *3 - ** to send DTMF string to the last invited party by *3. This is useful when the invited party is behind an IVR system. 5.
PLANET IP PBX user’s manual Table 5.3 MOH file Configuration Settings Field Description MOH ID A unique ID containing only alphabets, numbers, and underscore without spaces; 32 characters maximum. Candidate music files in the repository. To upload a new music file, click Browse to find a Windows PCM (8000 Hz, Media File 16-bit) file from the local host and click PUT FILE. On successful uploading, the filename will appear in the Media File list.
PLANET IP PBX user’s manual 1. Enter settings shown in Table 5.4. 2. Click APPLY. Table 5.4 Voice Mail Configuration Settings Field Description Voicemail Pilot Number Number to access voice mail system IVR. Minimum Message Time Maximum Message Time Maximum number of messages per Messages less than this duration will not be notified by email. E.g., 3 (sec). Maximum duration allowed for a single message. E.g., 60 (sec). Maximum number of messages allowed per extension.
PLANET IP PBX user’s manual Table 5.5 Replaceable Meet-me Prompts Prompt Description Get PIN number Please enter the conference pin number. Invalid PIN That pin is invalid for this conference. Only Person You are currently the only person in this conference. 5.6 Voicemail Prompts This page allows replacing built-in voicemail system prompts with user recordings. 1. Click a language and a prompt in the corresponding lists. 2. Find a corresponding recording in the local storage. 3.
PLANET IP PBX user’s manual 5.7 Worktime Worktime defines holidays and business hours for generic IVR application. Several groups of date/time could be defined for different IVR menus. Select Feature -> Worktime to configure Worktime features. Add a Worktime 1. Click the Add New tab. 2. Enter settings shown in Table 5.7. 3. Click ADD at the bottom of the page. The newly added worktime should display in the Group ID. Edit a Worktime Delete a Worktime 1. Click the Management tab. 2.
PLANET IP PBX user’s manual or 3. Optional Worktime 5.8 Special holidays or work day. User can set date and its work time, or set it to a whole-day holiday. Interactive Voice Response (IVR) Interactive Voice Response (IVR) helps a caller to select options from voice menus by pressing keys on a telephone keypad. With IVR, a caller can connect to an expected extension or a service promptly.
PLANET IP PBX user’s manual click Cancel in the pop-up window. 3. Enter settings shown in Table 5.8. 4. Click APPLY to add the new IVR menu and see it as a tree view in Info. 5. For example, to create a basic Auto Attendant IVR for a trunk with Usergroup of Privilege dial_in: • Enter an IVR Name, say Basic_AA • Choose */agent-newlocation.gsm from Prompt list in Action Data block. • Choose a usergroup from Group under Action Data. • Click the ADD next to the IVR Name box.
PLANET IP PBX user’s manual Node Child Rule Information of the configured keys and actions. Click a node and DEL to delete the node and its underlying structure. If a Next Layer is selected, Child Rule sets the key-action associations with the next-layer menu. Specify applicable parameter(s) for an action. Prompt Select a *.wav recording file that you add from the IVR Prompt tab, or select one of the following default voice file.
PLANET IP PBX user’s manual list. Select one action during the off hours. Off-Hour Actions Prompt Extension Play Back To play the selected prompt. Call To To transfer to an extension No Action No action. Select a *.wav file if Playback is selected in the Off-Hour Actions list. Enter an extension number if Call To is selected in the Off-Hour Actions list. 5.8.11 IVR Prompts Management One can upload customized IVR prompts in Feature -> IVR, and click IVR Prompts Management tab. 1.
PLANET IP PBX user’s manual 6 Voice communication samples There are several ways to make calls to desired destination in IPX-1800N. In this section, we’ll lead you step by step to establish your first voice communication via keypad and web browsers operations. 6.1 Voice communication via IP PBX system – IPX-1800N In the following sample, we’ll introduce how to integrate the client with our IP PBX system IPX-1800N via general settings.
PLANET IP PBX user’s manual STEP 3: After setting up the parameters, please refer to the path to activate the settings: Service ---> IP PBX service ---> IP PBX Configuration Reload Machine configurations on the VIP-153PT STEP 1: After creating accounts on the IP PBX system, please log in VIP-153PT via web browser, browse to the SIP Configuration, and refer to the account settings of the IP Extension to complete the SIP parameters.
PLANET IP PBX user’s manual Machine configurations on the VIP-156 STEP 1: Please log in VIP-156 via web browser, browse to the SIP Settings menu. In the setting page, please browse to the Service Domain page, and insert the SIP parameters for IP PBX system.
PLANET IP PBX user’s manual 6.2 Voice communication via IP PBX system – IPX-1800N (Auto-config) In the following sample, we’ll introduce how to integrate the client with our IP PBX system IPX-1800N via Auto-config feature. Registration / Registration / Authentication Authentication IPX-1800 LAN IP Address: 192.168.1.1 VIP-153PT IP Address: 192.168.1.2 Line Number: 1001 VIP-156 IP Address: 192.168.1.
PLANET IP PBX user’s manual LNote • 192.168.1.1 is the IP address of IPX-1800 STEP 2: Please browse to the Device Æ IP Phone menu and create new device for the auto configuration. STEP 3: Please press the Show extensions button to create the two extension accounts/password: 1001/123 (for VIP-153PT), and 1002/123(for VIP-156) for the voice calls.
PLANET IP PBX user’s manual STEP 4: After setting up the parameters, please refer to the path to activate the settings: Service ---> IP PBX service ---> IP PBX configuration reload Machine configurations on the VIP-153PT STEP 5: Please log in VIP-153PT via web browser, please browse to the Phone Configuration page, and enable the IPX PBX setting features for IP PBX system.
PLANET IP PBX user’s manual Machine configurations on the VIP-156 STEP 7: Please log in VIP-156 via web browser, browse to the Advanced Settings menu. In the setting page, please browse to the Auto-config page, and enable the Auto Configuration features for IP PBX system. (Your may connect telephone set to VIP-157, press #136 to enable the Auto configuration, or press #137 to disable the Auto Configuration setting.
PLANET IP PBX user’s manual 6.3 ISDN PSTN Trunk Procedure: STEP 1: Please browse to “ISDN PSTN trunk” page in “Trunk” menu, and refer to the following configuration steps for more understandings: Press button from the left panel to add a new ISND PSTN trunk.
PLANET IP PBX user’s manual STEP 2: a) Please browse to “Route management” page in “Route” menu to add routes ID in IP PBX system. b) Press button from the left panel to add a new routes table and Insert following data: Route ID: a unique ID containing alphabets, numbers, and underscore only without spaces; 32 characters maximum.
PLANET IP PBX user’s manual STEP 4: Please browse to “Usergroup” page in “User” menu, and select outbound “SIP accounts number” trunks accessible by this usergroup.
PLANET IP PBX user’s manual After these configurations, be sure to press to “Save” button to apply settings and browse to “IP PBX service” page in “Service” menu to click the “Reload” button to make the settings effective. IPX-1800N Usage: IPX-1800N IP Ext 1001 calls to ISDN PSTN number Human operation at IPX Equipment operation Caller side Human operation at Receiver Side Pick up phone 1001 1. IPX-1800N dial tone is heard. Dial 9 + phone number 1.Du Du is heard 2.