Multi-Port Fast Ethernet Print Server FPS-3121 Quick Installation Guide
Table of Contents Package Content.............................................................................. 4 Physical Installation......................................................................... 5 Print Server Setup........................................................................... 6 Administrator PC Setup.................................................................... 7 >> Windows Peer-to-Peer Printing...............................................
This Quick Installation Guide contains brief instructions for the following environments: ● Windows 95/98/Me/NT/2000/XP/Sever 2003 Peer-to-Peer Networks ● Macintosh (AppleTalk) For other environments, or any problems, please refer to the full User’s Manual in the CD-ROM.
Package Content 1 x Print Server 1 x Quick Installation Guide 1 x Drivers and User’s Manual CD 1 x Power Adapter
Physical Installation 1. Make sure the power is OFF then connect printer to the Print Server's printer port. 2. Connect the LAN cable to the proper connector of the Print Server. 3. Connect the other end of the LAN cable to a 10Base-T or 100Base-TX hub or switch. 4. Connect the supplied Power Adapter. 5. Please make sure the POWER LED is light on.
Print Server Setup In the following situation, you do not need to configure the Print Server. Just follow the procedures on section “Administrator PC Setup” to share your printer. If you want to install print server to a client PC, you may refer to our manual in the CD-ROM. Windows users: ● Already installed TCP/IP protocol. Apple Macintosh users: Already installed AppleTalk protocol.
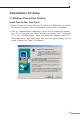
Administrator PC Setup >> Windows Peer-to-Peer Printing Install Peer-To-Peer Print Driver 1. Insert Drivers and User’s Manual CD into the CD-ROM drive to initiate the autorun program. Once completed a menu screen will appear. 2. Click on “Administrator Installation” hyper link to initiate the installation. Or you can click the “Start” button and choose “Run”. (Suppose “E” is your CD-ROM drive). When the dialog box appears, enter “E:\ Utility\Setup.exe” and press enter key.
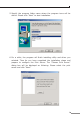
3. Specify the destination folder where the utility will be installed. Click “Next”. 4. Select the components you want to install. It is highly recommended to install all provided components in administrator installation. Please click “Next”.
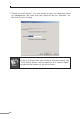
5. Specify the program folder name where the program icons will be add to. Please click “Next” to start installation. 6. For a while, the program will finish installing utility and driver you selected. Thus far you have completed the installation phase and prepare to configure the Print Server. The “Choose Print Server” dialog box will be displayed as following. Please select the print server and click “Next”.
7. “Name the print Server”, you can assign an easy to memorize name for management. But note that, this name will be the “Identifier” for the Peer-to-Peer Printing. Note 10 If this is the first time you configure the print server, the “Print Server Name” will the same as the “Device Name” printed at the bottom of the print server.
8. In the system default, IPX and NetBEUI are enabled. But the Peerto-Peer printing is not support those protocols, so it will show those protocols are not supported. About the TCP/IP, you can either assign a fixed IP address for the print server or configure it later by the configuration utility. Please click “Next”. 9. Configuration summary will display in this screen. Now, you have completed the “Print Server Setup”.
10. The “Setup complete” window is displayed to indicate that the Administrator Installation procedure is finished. Please click “Finish”. >> Macintosh (AppleTalk) 1. Click the Apple icon and then Control Panel - Network. 2. Ensure that EtherTalk is selected under AppleTalk Connection. 3. Click Chooser. The Chooser panel will open. 4. Click either the LaserWriter 8 icon (recommended) or the LaserWriter 7 icon. 5. Select a Print Server from the printer list.