8-/16-Channel Network Video Recorder with HDMI NVR-820/NVR-1620
NVR-820 / NVR-1620 Network Video Recorder with HDMI Copyright Copyright © 2015 by PLANET Technology Corp. All rights reserved. No part of this publication may be reproduced, transmitted, transcribed, stored in a retrieval system, or translated into any language or computer language, in any form or by any means, electronic, mechanical, magnetic, optical, chemical, manual or otherwise, without the prior written permission of PLANET.
NVR-820 / NVR-1620 Network Video Recorder with HDMI Safety This equipment is designed with the utmost care for the safety of those who install and use it. However, special attention must be paid to the dangers of electric shock and static electricity when working with electrical equipment. All guidelines of this and of the computer manufacture must therefore be allowed at all times to ensure the safe use of the equipment. CE Mark Warning This is a Class B product.
NVR-820 / NVR-1620 Network Video Recorder with HDMI Table of Contents Chapter 1. 1.1 1.2 1.3 1.4 Product Introduction ...................................................................6 Package Contents..........................................................................6 Overview ........................................................................................7 Features.........................................................................................9 Product Specifications...........
NVR-820 / NVR-1620 Network Video Recorder with HDMI 8.2 8.3 8.4 8.5 8.1.1 Adding a Camera via Automatic Search .................................47 8.1.2 Adding a Camera Manually ....................................................49 Recording.....................................................................................51 Scheduling ...................................................................................52 Preset Point Setting .............................................................
NVR-820 / NVR-1620 Network Video Recorder with HDMI Chapter 1. Product Introduction 1.1 Package Contents The package should contain the following items: z NVR unit x 1 z User’s Manual CD x 1 z Quick Installation Guide x 1 z Power Adapter x 1 z Power Cord x 1 z HDD Screw Packet x 1 z HDD Bracket Screw Packet x 1 z HDD Bracket Set x 1 z SATA Cable x 2 z Feed Pad Set x 1 1. If any of the above items are missing, please contact your dealer immediately. 2.
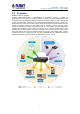
NVR-820 / NVR-1620 Network Video Recorder with HDMI 1.2 Overview SMB Surveillance Solution PLANET NVR-1620/NVR-820, a high-definition IP surveillance solution, is suitable for upgrading your CCTV system to IP system without re-cabling. The NVR-1620/NVR-820 is the 16-/8-channel Linux-embedded NVR with HDMI local display, bringing a stable and efficient system operation under a wide range of recording/network management/system settings.
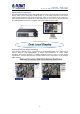
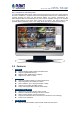
NVR-820 / NVR-1620 Network Video Recorder with HDMI High Resolution Local Display The NVR-1620/NVR-820 provides both HDMI and VGA video output interfaces for dual local display, which can be connected to HDMI monitor or TV for doing monitoring in the full HD (1920 x 1080) resolution, and check NVR system status on VGA monitor at the same time, eliminating the need for a separate PC to view video from the unit.
NVR-820 / NVR-1620 Network Video Recorder with HDMI Easy Configuration and Management The NVR-1620/NVR-820 features smart setup wizard program to help users easily complete the device installation. It supports web-based management interface for the administrators to remotely manage the device via web browser without any concern. Furthermore, the NVR-1620/NVR-820 can automatically search and find the available cameras in the network so it greatly reduces user’s effort when setting up the system.
NVR-820 / NVR-1620 Network Video Recorder with HDMI ¾ Supports DHCP server/client (auto detection) Convenient data access (SMB / CIFS / HTTP / FTP) Easy Installation & Management ONVIF compliant for interoperability Supports multiple languages Automatically discovered by management software E-map interface in web and utility configuration Web-based and management utility for easy configuration Up to 16 NVRs, max.
NVR-820 / NVR-1620 Network Video Recorder with HDMI Sequence Mode Sequence all/manually selected cameras in 1/4 split view with configurable timer Snapshot Video snapshot in JPEG format PTZ Support Digital PTZ/ Auto Pan/Preset Point/Sequence view Playback Split Screen 1/4 Play Method Play/Pause/Stop/Forward/Reverse/Speed Adjust/Frame by Frame Search by time or event only Bookmark Intuitive timeline interface with bookmark function for easy file export Monitor Dual Monitor Main UI + Full screen
NVR-820 / NVR-1620 Network Video Recorder with HDMI Humidity 10~90% (non-condensing) Weight 2.
NVR-820 / NVR-1620 Network Video Recorder with HDMI Chapter 2. Hardware Interface 2.1 Physical Descriptions Front Panel NVR-1620 NVR-820 LED Status Green Power Red Amber Buttons Power Reset Buzzer Beep Status ON OFF Restore default Restart Status Complete start Initiating restart Initiating shutdown Definitions Solid green - Normal operation Slow blinking in green after pressing and holding the reset button for 5 seconds indicates the device will enter the restore default process.
NVR-820 / NVR-1620 Network Video Recorder with HDMI Rear Panel Connector Description Ethernet 10/100/1000Mbps network Video VGA / HDMI Audio Line in/Line out/Mic Power Supply 19V AC, 3.42A, 50 / 60Hz 2.2 Hardware Installation 2.2.1 Installing Hard Disk 1. Remove the screws on back side.
NVR-820 / NVR-1620 Network Video Recorder with HDMI 2. Remove the top case by pulling it toward you. 3. Prepare HDD brackets. 4. Screw bracket to HDD; two HDDs can be bracketed.
NVR-820 / NVR-1620 Network Video Recorder with HDMI 5. Prepare SATA cable and connect it to SATA data connector and SATA power connector. 6. SATA cable is fixed to the HDD.
NVR-820 / NVR-1620 Network Video Recorder with HDMI 7. Screw HDD brackets to system.
NVR-820 / NVR-1620 Network Video Recorder with HDMI Chapter 3. Connecting to the NVR There are various ways you can connect to the NVR and below are the suggested methods for different network setups: The NVR is placed in a network with a DHCP server: Connect to the NVR by using “Device Search” Utility. The NVR is placed in a network without a DHCP server (or it can be connected directly): Access NVR with its default IP (192.168.0.20). 3.
NVR-820 / NVR-1620 Network Video Recorder with HDMI Please click “Next” to continue. Please click “Install” to start the installation.
NVR-820 / NVR-1620 Network Video Recorder with HDMI Once the installation is completed, please click “Finish”. Please go to Start => Programs => NVR => Search NVR to run the search tool. Then you will see the utility start searching the network. The NVR should be located and its IP address should be displayed: Double-click on it and the program should automatically access the NVR’s web administration page from your default browser.
NVR-820 / NVR-1620 Network Video Recorder with HDMI You will be prompted for the NVR’s login information before proceeding to change device’s IP address. You may click on the button highlighted below to perform search again. Or double-click on any of the search results to access NVR’s web administration page. 3.2 Accessing NVR with its Default IP Address The NVR comes with a pre-configured static IP address “192.168.0.20”. However, it is only used when there is no DHCP server presented in the network.
NVR-820 / NVR-1620 Network Video Recorder with HDMI • Please make sure you are using Internet Explorer 7 or above. • If you are running Windows Vista or 7, please make sure you are running Internet Explorer with the “administrator” privilege.
NVR-820 / NVR-1620 Network Video Recorder with HDMI Chapter 4. Web-based Management This chapter provides setup details of the Internet Camera’s Web-based Interface. 4.1 Main/Live Viewing The main/live view is the first interface displayed once you access to the NVR through the internet browser. It displays the live video of all the cameras added to the NVR and following the pattern chosen by the user. The interface has many functions explained below.
NVR-820 / NVR-1620 Network Video Recorder with HDMI 4.1.2 User’s Configuration It displays the name of the current user. If you click on the name of the user, the context menu offers the functions below: - Language settings - User setting - Locking the screen - Logout function 4.1.3 Hardware Event Notification In this section, you will receive notifications if a warning sound is triggered or if the hard drive of the NVR fails in recording data. 4.1.
NVR-820 / NVR-1620 Network Video Recorder with HDMI If you click on the name of the user, the menu will display as shown below: The camera menu offers the functions below: - Digital Zoom After clicking the digital zoom button, hold the mouse left button and draw a square on the video to specify the zoom in area Once the image is digitally zoomed in, use the mouse scroll button to further zoom on or zoom out the image. Hold and left-click on the image and move the mouse to move the zoomed in video.
NVR-820 / NVR-1620 Network Video Recorder with HDMI - Audio in Turn on/off audio of a live video. - Lens Control If this camera can control focus and iris, the button of the selection can be active; otherwise, it will be highlighted. There are three selections of focus and iris as shown below. - Preset Point Controls This page focuses on just PTZ camera, and here are some definitions below: - Add current position: Click this button and current position will be added in the preset point selection.
NVR-820 / NVR-1620 Network Video Recorder with HDMI - Changing Channel User can select another channel for another view or disconnect the current channel. - Enhancing Contrast You are able to adjust brightness and contrast of the live video from the camera menu. The default values of two parameters are 50%. User can adjust those values from 0% to 100%. The layout of this bar is 10%. 4.3 List Viewing It displays the list of channels added to the NVR.
NVR-820 / NVR-1620 Network Video Recorder with HDMI The channel status is defined by 3 colors: - Red: The channel is recording and the live view is available - Blue: The channel is connected and the live view is available - Grey: The camera is disconnected 4.3.1 Pattern View Different patterns of live view can be displayed on the video frame. You can display 1, 4, 9, or 16 cameras at once. Every time you click on an “n” pattern icon, the live video of the next “n” camera will be displayed.
NVR-820 / NVR-1620 Network Video Recorder with HDMI 4.4 Saved Viewing This section can display the views that you have already saved. You can choose the views from the list you have created. You are also able to switch between saved views every certain period of time by clicking on the “start sequence function”. If you check the box beside the name of the view, you can edit or delete the view. 4.5 Setting Up Password The default login username and password are admin and admin.
NVR-820 / NVR-1620 Network Video Recorder with HDMI Chapter 5. Playback Viewing Playback is a function that allows you to play one or more videos that were previously recorded by a chosen recording method or due to an event trigger. The NVR offers synchronized playback from up to 4 channels and various types of search methods are provided to help you find the footage you need quickly.
NVR-820 / NVR-1620 Network Video Recorder with HDMI z Digital Zoom After clicking the digital zoom button, hold the mouse left button and draw a square on the video to specify the zoom in area Once the image is digitally zoomed in, use the mouse scroll button to further zoom in or zoom out the image. Hold and left-click on the image and move the mouse to move the zoom in video. z Take Snapshot 1 / 3 User can select 1 or 3 continuous snapshots.
NVR-820 / NVR-1620 Network Video Recorder with HDMI 5.2 The Main Layout for Playback Here is some explanation of other parts of playback page as shown below: - Zooming on a range of time If you click on the icon you can zoom on range of the time and get more details on the playback bar. The “display current playback time” button will display while the NVR plays the recording. It can help user to find current playback time easily.
NVR-820 / NVR-1620 Network Video Recorder with HDMI Once you locate the recorded videos with steps described in the previous section, move the time bar to the specific start time which you want to export and then click the “Bookmark” button. “Bookmark” is used to set a time range for this specific time will be marked by a blue line. Move the time bar to the end time and click the “Bookmark” button again. You can find that this button will be changed to the “Clear” button.
NVR-820 / NVR-1620 Network Video Recorder with HDMI Specify the starting and ending hours of the video by entering numbers in the text boxes. Hit the “Start” button to start exporting. The file will be automatically named and saved under the C:\ partition.
NVR-820 / NVR-1620 Network Video Recorder with HDMI The NVR Media Player will be automatically installed after the CMS software is installed. You can find it in the Windows Start menu. You also can click this software on the playback page. icon to download this Click “Open” >> “AVI File” Locate the exported AVI file and click “open”. (Normally under “C:\ExportFolder)” 35
NVR-820 / NVR-1620 Network Video Recorder with HDMI Chapter 6. Event Viewing This section displays the last events recorded by the NVR. The events can only be detected and displayed if you have configured it on the NVR’s settings. You can display the event of all the channels at once or by each channel. You can click on one of the pictures on the bottom of the UI to display the event related to it. The event can also be displayed if you choose them from the list on the right side of the UI.
NVR-820 / NVR-1620 Network Video Recorder with HDMI 6.1 Opening Event Snapshot Images with NVR Media Player The NVR sends snapshots that are taken when an event occurs to a destined FTP server or mail recipient. These types of snapshot images are saved in a proprietary image file format, h4i or p4i, and can only be opened by the NVR media player. To do so, Select “Open” from the top menu and then select “Image File”. A new dialog should be displayed to enable you to locate the image file.
NVR-820 / NVR-1620 Network Video Recorder with HDMI Chapter 7. NVR Setup – Device Configuration 7.1 Network Setup The “Settings” page provides users with options to set up the device quickly and properly. After properly configuring all settings on all the sub-pages, users should expect a fully working network video recorder that is ready to manage cameras on the network. We will start by configuring its network settings to make sure it works correctly in your network. 7.1.
NVR-820 / NVR-1620 Network Video Recorder with HDMI Set network automatically Set the NVR to configure network settings automatically 1) When no other DHCP server is in the network, the NVR should use the default IP: 192.168.0.20 and turn on built-in DHCP servers. 2) Users should not be able to change IP settings when this mode is selected. 3) Users cannot turn on/off built-in DHCP server.
NVR-820 / NVR-1620 Network Video Recorder with HDMI the network or you can manually turn off the DHCP server function if you wish to use a separate DHCP server. 7.1.2 DHCP Server The built-in DHCP Server function is NOT always configurable and is greatly dependent to the connection type that is set to "Network Settings". 7.1.
NVR-820 / NVR-1620 Network Video Recorder with HDMI * If the NVR is placed behind a router or Internet gateway, please make sure port forwarding for port 80 is configured on the router or the gateway in order for the DDNS function to properly register with the service. It’s often suggested to use the DDNS function in the router/ gateway for such case instead.
NVR-820 / NVR-1620 Network Video Recorder with HDMI Go back to the NVR’s DDNS service configuration page under “Settings” >> “Network settings” >> “DDNS”. Fill in the domain name you picked during the registration in the “Domain Name” field and the username/password you created in the “User ID” and “Password” field and click “Apply” to finish You can click the “Check DDNS Status” button to check the PLANET DDNS service status.
NVR-820 / NVR-1620 Network Video Recorder with HDMI 7.2 Time and Date Set the time and date by selecting the time zone according to your location. It is imperative that you set the recorder’s time correctly to avoid the following errors: • Incorrect display time for playback videos • Inconsistent display time of event logs and when they actually occur After selecting the time zone, choose an option below to set the recorder time.
NVR-820 / NVR-1620 Network Video Recorder with HDMI 7.3 Storage Once you install a hard disk to the recorder, you would need to initialize it so that it can be ready for recording. You can obtain basic information about the disk you installed on this page. To initialize it, simply choose the “Format” and disk ID under Disk actions and then click “Apply”. This page will list the Internal disks and the USB disk only. The HDD will be formatted in EXT4 file system.
NVR-820 / NVR-1620 Network Video Recorder with HDMI 7.4 Users & Privileges Multiple users can access the recorder simultaneously. You can add, remove, and edit users by using options provided on this page to keep user information organized. Each recorder comes with a built-in “admin” account with password “admin”. It’s highly recommended to change the password upon your initial login. 7.4.1 Adding a New User • Click “Add” to add new user.
NVR-820 / NVR-1620 Network Video Recorder with HDMI 7.4.2 Changing the Password of the “Admin” Account 1. Click and highlight the “admin” account in the account list. 2. Its information should be displayed. 3. Enter a new password in the “Password” field and enter it again in “Confirm Password”. 7.4.3 Group Privilege Group Privilege is where you can create multiple customized access policies for situations if you need the recorder to be accessed by users other than the administrator.
NVR-820 / NVR-1620 Network Video Recorder with HDMI Chapter 8. NVR Setup -- Channel Configuration 8.1 Camera Setup The NVR provides two options for adding a new camera. Users have the option to let the recorder automatically find the cameras or it is possible to enter camera’s information and add it manually. 8.1.1 Adding a Camera via Automatic Search In “Settings” >> “Cameras”, click the “Auto search” button to perform the camera search.
NVR-820 / NVR-1620 Network Video Recorder with HDMI After that, the search should begin and its status should be displayed: Cameras found should be listed and simply select a camera from the list. Its corresponding information should be displayed in the “Camera Information” section.
NVR-820 / NVR-1620 Network Video Recorder with HDMI its username and password and press “Next” to detect this camera. If connection establishes successfully, camera’s detailed information should be polled and displayed as shown below. Adjust its video format, frame rate, resolution or bitrate, etc. if you wish and then click “Apply” to finish adding the camera. You can click “Next” to set up recording stream if dual stream is supported on this camera.
NVR-820 / NVR-1620 Network Video Recorder with HDMI Simply follow the instruction described above but instead of using the “Add manually” function, enter the camera’s IP address and credential in the “Camera Information” manually. If cameras are marked with "*" in the search result, it means those cameras are already configured and connected to the NVR.
NVR-820 / NVR-1620 Network Video Recorder with HDMI 8.2 Recording The “recording” gives users the overall control of how and when a recording is performed and the quality of different types of recordings performed on each channel. It can help the recorder to operate with sufficient system resource by performing recording only when it’s necessary with adjustable recording frame rate.
NVR-820 / NVR-1620 Network Video Recorder with HDMI 8.3 Scheduling You can define the time range of the schedule recording for all channels on this page. Use the “Channel” drop-down menu and select a camera first. You can use the schedule table to set the time range. Click the cell boxes and then move horizontally to let you set what hours to perform recording during a day. Click and then move vertically to let you set what days to perform recording at a specific time.
NVR-820 / NVR-1620 Network Video Recorder with HDMI You can also use the “Quick Configuration” to define recording time range instead of clicking cell boxes one by one on the timetable. Simply check what days you would like to perform recording and specify the recording duration by either choosing “All Day” or enter a start and end time for specific recording duration. Select the “Copy Schedule to Channel:” Opt for this if you would like to set the same recording schedule to another camera. 8.
NVR-820 / NVR-1620 Network Video Recorder with HDMI “Move Here when Event Triggers”: In order for this function to work properly, please also complete configuration in “Event Configuration” >> “Event Trigger”. 8.4.2 PTZ Preset Sequence Once you have multiple preset points defined for a camera, it is convenient for monitoring to set up the sequencing viewing among those preset points and let the recorder automatically switch between them for you. To configure preset sequence for a camera, 1.
NVR-820 / NVR-1620 Network Video Recorder with HDMI 8.5 OSD Settings The OSD (On Screen Display) allows users to add informational text message and embed it onto the video. By default, this function is turned off.
NVR-820 / NVR-1620 Network Video Recorder with HDMI Choose one or more display options if you would also like the recorder to automatically embed the system time or the frame rate for you. Or simply choose to display a custom message of your own. Next, define where the text will be displayed by either entering an X/Y value based on percentage or use the system pre-defined position from the drop-down menu.
NVR-820 / NVR-1620 Network Video Recorder with HDMI Chapter 9. NVR Setup -- Event Configuration 9.1 Event Sources The “Event sources” section allows users to define conditions that constitute an event, its corresponding trigger action and when it will be triggered. Such setting can reduce the management overhead and notify the administrator only when it’s necessary.
NVR-820 / NVR-1620 Network Video Recorder with HDMI 1. For cameras that come with physical digital input ports, their ports will be listed in the far left drop-down menu. 2. Pick the desired channel and then select the camera’s input port from the drop-down menu. 3. Select the trigger condition from the “Port condition” drop-down menu. * The recorder only acts as a medium for pairing up input/output ports between cameras and the recorder. * Only connected cameras will be displayed in the list.
NVR-820 / NVR-1620 Network Video Recorder with HDMI E-Mail Notification 1. 2. 3. 4. 5. Enter the hostname or the IP address of the SMTP server Enter the port of the SMTP server Specify the sender’s name in the “Sender’s name” field Enter the sender’s e-mail address Check “Enable Authentication” and enter the username and password of the SMTP server if it requires authentication 6. Click “Apply” to save the configuration z z The NVR supports SMTP servers that use base64 or MD5 authentication methods.
NVR-820 / NVR-1620 Network Video Recorder with HDMI FTP Notification To add an FTP server, 1. Start by giving a name to the server that you are adding to the recorder 2. Enter the hostname or the IP address of the FTP server 3. Enter the communication port of the FTP server (usually port 21) 4. Enter the username and password of the FTP server if it’s required 5. Check “Use Passive Mode” if it’s required or leaves it unchecked to use active mode 6.
NVR-820 / NVR-1620 Network Video Recorder with HDMI 9.3 E-map 9.3.1 Local Map Setting E-map monitor is a function that alerts users whenever there is an event triggered (e.g. motion detected) from a camera with a geographical perspective. With this function, users can quickly identify which camera has detected an unusual event and where this event is happening.
NVR-820 / NVR-1620 Network Video Recorder with HDMI Then click and drag the camera icon to move the camera to define its location. Access the E-map by enabling “Event view”. You can click on the camera icon to display video.
NVR-820 / NVR-1620 Network Video Recorder with HDMI 9.3.2 Google Map Setting The Google Map monitor is a similar function to the aforementioned E-Map monitor. It is useful if you are managing multiple cameras from different locations. To configure locations of each camera, first determine the location you’d like to place the camera to on the map. You can do so by: 1. Zooming in to a smaller area by using the zoom control bar on the map 2.
NVR-820 / NVR-1620 Network Video Recorder with HDMI Chapter 10. NVR Setup -- System Operations 10.1 Device Information System Operations give users a glance of the overall system status and allow users to perform maintenance tasks such as upgrading firmware, restoring/backing up device settings or rebooting device, etc. The “Device Information” provides the general information of the device such as firmware version and system time. It also provides information of the current network settings and status.
NVR-820 / NVR-1620 Network Video Recorder with HDMI 10.3 Maintenance “Maintenance” provides functions for users to: • Perform Firmware Upgrade (Only on Web UI) • Restart the NVR when necessary • Restart cameras directly from the NVR • Reset the NVR’s settings to their factory default values 10.4 Backup & Restore It is a function that allows users to back up the NVR’s settings to a local hard drive. Users also can restore the NVR’s settings from a previously-saved configuration file.
NVR-820 / NVR-1620 Network Video Recorder with HDMI On Web UI, the configuration can be backed up to or restore from a local computer. Click “Backup” to store configuration file in local computer. On local UI, the configuration can be backed up to or restore from a USB disk. It is required to plug in a USB disk formatted in FAT32 prior to using the backup and restore functions. Once it’s detected, click “Backup” to store configuration file in USB disk. 10.
NVR-820 / NVR-1620 Network Video Recorder with HDMI Next, select channels which you would like to back up the recording data from. Maximum 4 channels can be selected at once. Configure the start and end time of the recording data you would like to back up and click the “Backup” button to begin. 10.5.1 Things to Pay Attention to for the USB Backup Function Limitation: y It does not support USB Hub that extend the number of HDDs connected to the NVR. y Only one backup process can be performed at a time.
NVR-820 / NVR-1620 Network Video Recorder with HDMI Click “Browse...” to select the file from the USB disk.
NVR-820 / NVR-1620 Network Video Recorder with HDMI A new dialog should be prompted for you to select the file location. When done, click “Check” to validate the file.
NVR-820 / NVR-1620 Network Video Recorder with HDMI Once the file has been successfully verified, you should be prompted with the message shown below. Select the time zone according to your current location.
NVR-820 / NVR-1620 Network Video Recorder with HDMI Finally, click “OK” to begin playing. The player should now play the backup file.
NVR-820 / NVR-1620 Network Video Recorder with HDMI Chapter 11. NVR Local Interface 11.1 System Configuration 11.1.1 Service You will the see the "Service" configuration page first when visiting the Configuration page. You are able to set a unique device name, set system time and configure DDNS on this page. 11.1.
NVR-820 / NVR-1620 Network Video Recorder with HDMI The NVR comes with two video outputs (HDMI: Primary as default, VGA: Secondary as default). You can set which to be used as primary and secondary on this page other than setting the resolution. You are also able to set the function to be displayed on the secondary monitor on this page. Currently you can configure the secondary monitor to display live videos with selected channels in desired layout, or live video in automatic sequence view.
NVR-820 / NVR-1620 Network Video Recorder with HDMI The built-in DHCP Server function is NOT always configurable and is greatly dependent to the connection type that is used: 1. If the connection type is "Auto Mode", the DHCP server function is NOT configurable. It will be ON if the NVR doesn't obtain an IP from a DHCP server in the local network and uses its own default static IP 192.168.0.20. 2. If the connection type is "Auto Mode", the DHCP server function is NOT configurable.
NVR-820 / NVR-1620 Network Video Recorder with HDMI 11.1.4 User Account -- User setting Multiple users can access the recorder simultaneously. You can add, remove, and edit users by using options provided on this page to keep user information organized. Each recorder comes with a built-in “admin” account with password “admin”. It’s highly recommended to change the password upon your initial login. y Click "Add" to add a new user. y Enter a user name and password.
NVR-820 / NVR-1620 Network Video Recorder with HDMI 11.1.5 User Account -- User Group Setting Group Privilege is where you can create multiple customized access policies for situations if you need the recorder to be accessed by users other than the administrator. You can do so by creating a group, and then remove access privileges for certain configuration pages or cameras. Users that are created and assigned to this group will have limited access instead of full administration rights.
NVR-820 / NVR-1620 Network Video Recorder with HDMI Use the checkboxes to allow or deny access to certain functions/channels. You can also restrict access on the certain system wise configuration pages. 11.1.6 Disk Once you install a new hard disk to the recorder, it will be listed on this page and shown status "offline”. You would need to initialize it so that it can be ready for recording. You can obtain basic information about the disk you installed on this page.
NVR-820 / NVR-1620 Network Video Recorder with HDMI * The USB HDDs will only be listed on the "USB Backup" page. The USB HDDs have to be formatted in advance in FAT16/FAT32 or EXT3 file system. (FAT32 is recommended) * The internal disks that are formatted in EXT3 or FAT32 elsewhere will be listed on this page and shown as "Online" after they are installed to the NVR. It's highly recommended that it's formatted by the NVR, which will be formatted to EXT3 file system to ensure best performance.
NVR-820 / NVR-1620 Network Video Recorder with HDMI The progress will be displayed and you will be switched to the "Channel setting" page for more configurations. Double-click on one from the search result to add it and for more detailed configurations.
NVR-820 / NVR-1620 Network Video Recorder with HDMI The camera's current settings will be displayed on the right and you can adjust settings such as "Format", "Resolution" or "FPS" before adding it to the NVR. Click "Apply" to finish and save the settings.
NVR-820 / NVR-1620 Network Video Recorder with HDMI 11.1.8 Channel Configurations -- Adding a Camera (Add manually) To add a camera manually, go directly to the "Channel Setting" page, and enter the camera's IP address, HTTP port, user name and password. Click "Detect" to retrieve camera's settings. The progress will be displayed. Once it's successfully detected, follow the procedures described in the previous section to finish configuring and adding camera to the NVR.
NVR-820 / NVR-1620 Network Video Recorder with HDMI You can create up to 8 preset points for each channel if it's a PTZ-capable camera. To add a preset point: 1. Select a channel from the "Channel" list and its video will be displayed at the lower-left hand corner. 2. Click on the video to change its pointing direction. 3. Assign a name to this preset position. 4. Click "Add" to add it. 5. Click "Apply" to save the settings.
NVR-820 / NVR-1620 Network Video Recorder with HDMI To configure preset sequence for a camera, 1. Select a channel from the “Channel” drop-down menu. The available preset points should be listed in the “Camera Presets” section. 2. Pick the ones you like for sequence viewing and press the “->” button to move them to the “Preset Sequence” section, and then 3. Use the Up and Down buttons to adjust their sequencing positions. 4.
NVR-820 / NVR-1620 Network Video Recorder with HDMI quickly identify which camera has detected an unusual event and where this event is happening. This function works by incorporating the event detection function as well as the recording function, which, as a result, helps users take all the necessary actions when an unusual event occurs. E-map setting page in the local UI only allows you to configure the position of each camera (by using drag and drop).
NVR-820 / NVR-1620 Network Video Recorder with HDMI 11.1.10 Recording The “recording configurations” gives users the overall control of how and when a recording is performed and the quality of different types of recordings that will be performed on each channel. It can help the NVR to operate with sufficient system resource by performing recording only when it’s necessary with adjustable recording frame rate.
NVR-820 / NVR-1620 Network Video Recorder with HDMI You can tell that you are configuring a multi-stream capable camera if the "Video setting" option is available. You can further configure the recording frame rate for different types of recordings, and choose whether to record audio or not.
NVR-820 / NVR-1620 Network Video Recorder with HDMI You will be given with options to record i frame only or i+p frames if the recording format is MPEG4 or H.264. On the "Schedule" page, you are able to configure the NVR to record during a particular time frame for each channel.
NVR-820 / NVR-1620 Network Video Recorder with HDMI Start by selecting a channel for configuration from the upper-right hand corner. Use the schedule table to define recording time frame. Each cell box represents 15 minutes. You can click one to select or click and hold down the mouse left button and drag horizontally to select consecutive hours of a particular day, or drag vertically to select a particular hour for multiple days.
NVR-820 / NVR-1620 Network Video Recorder with HDMI The record buffer allows you to set the NVR to start recording with a certain period of time before and after an event trigger. 11.1.11 Event Setting The “Event Handling” section allows users to define conditions that constitute an event, its corresponding trigger action and when it will be triggered. Such setting can reduce the management overhead and notify the administrator only when it’s necessary.
NVR-820 / NVR-1620 Network Video Recorder with HDMI Start the configuration by defining the general settings: Define when an event will be triggered • Choose “Always” or “Scheduled” under “Event Trigger Duration” • For the “Scheduled” option, use the table to define a range of time if you would like events to trigger corresponding actions only during a certain period of time. * Use the mouse left button to select and the right button to deselect.
NVR-820 / NVR-1620 Network Video Recorder with HDMI How often an event is triggered y Set a time interval under “Event Trigger Interval” to define how often events are triggered. Trigger action Now that you have the event trigger duration and interval defined, choose what action to be taken during an event trigger: y You can choose to have the recorder sent out the first few frames of the video recorder upon an event is triggered.
NVR-820 / NVR-1620 Network Video Recorder with HDMI This function allows users to use camera's digital input port from the recorder as source of an event. You can set up the recorder to receive events from a particular camera’s input port and then trigger the NVR to start recording. * The recorder only acts as a medium for pairing up input/output ports between cameras and the recorder. * Only connected cameras will be displayed in the list.
NVR-820 / NVR-1620 Network Video Recorder with HDMI To add an FTP server, 1. Click "Add" to begin 2. Start by giving a name to the server that you are adding to the recorder 3. Enter the host name or the IP address of the FTP server 4. Enter the communication port of the FTP server (usually port 21) 5. Enter the user name and password of the FTP server if it’s required 6. Check “Use Passive Mode” if it’s required or leave it unchecked to use active mode 7.
NVR-820 / NVR-1620 Network Video Recorder with HDMI 3. Specify the sender’s name in the “Sender’s name” field. 4. Enter the sender’s e-mail address. 5. Check “Enable Authentication” and enter the user name and password of the SMTP server if it requires authentication. 6. Click “Apply” to save the configuration. *The NVR supports SMTP servers that use base64 or MD5 authentication methods.
NVR-820 / NVR-1620 Network Video Recorder with HDMI Define which system events should trigger the recorder to send out notifications if you will. Define how the notifications will be sent and where they will be sent. Event trigger may not work for cameras that are placed outside of your local network or on the Internet until the “UPnP Port Forwarding” is enabled in both the NVR and the router. 11.1.
NVR-820 / NVR-1620 Network Video Recorder with HDMI 11.1.13 Maintenance “Maintenance” provides functions for users to: y Reboot the NVR when necessary y Reboot cameras directly from the NVR y Perform Firmware Upgrade y Back up the NVR’s settings to a local hard drive y Restore the NVR’s settings from a previously-saved configuration file y Reset the NVR’s settings to their factory default values The configuration can be backed up to or restore from a USB disk.
NVR-820 / NVR-1620 Network Video Recorder with HDMI To reset the recorder back to its factory default, click the “Restore Factory Default” button and begin the process. It’s a function that allows users to back up the recording data in its database file format as well as in AVI to the externally connected USB hard disk.
NVR-820 / NVR-1620 Network Video Recorder with HDMI 11.1.14 USB Backup It’s a function that allows users to back up the recording data in its database file format as well as in AVI to the externally-connected USB hard disk. The USB hard disk(s) will be listed in the drop-down menu displaying the remaining disk space. Make your selection from the drop-down menu if you have more than one disk connected to the NVR. Next, select channels which you would like to back up the recording data from.
NVR-820 / NVR-1620 Network Video Recorder with HDMI Configure the start and end time of the recording data you would like to back up and click the “Backup” button to begin. Things to pay attention for the USB Backup function Limitation: • It does not support USB Hub, extending the number of HDDs connected to the NVR. • Only one backup process can be performed at a time. • A maximum of 4 channels can be selected for backup. • Only FAT32 USB hard disk is supported for backup.
NVR-820 / NVR-1620 Network Video Recorder with HDMI Appendix A: Ping IP Address The ping (Packet Internet Groper) command is used to detect whether a specific IP address is accessible by sending a packet to the specific address and waiting for a reply. It’s also a very useful tool to confirm whether or not Internet camera is installed or if the IP address conflicts with any other device over the network.
NVR-820 / NVR-1620 Network Video Recorder with HDMI Appendix B: Planet DDNS Application Configuring PLANET DDNS Steps: Step 1 Enable DDNS option through accessing web page of the ICA-3200. Step 2 Select on DDNS server provided, and register an account if you do not use yet. Let’s take dyndns.org as an example. Register an account at http://planetddns.
NVR-820 / NVR-1620 Network Video Recorder with HDMI Appendix C: Configuring Port Forwarding Manually The device can be used with a router. If the device wants to be accessed from the WAN, its IP address needs to be set up as a fixed IP address. The port forwarding or Virtual Server function of router also needs to be set up. This device supports UPnP traversal function. Therefore, user could use this feature to configure port forwarding of NAT router first.
NVR-820 / NVR-1620 Network Video Recorder with HDMI Your WAN IP Address will be listed here. 3. Opening/Setting Virtual Server Ports to enable remote image viewing The firewall security features built into the router and most routers prevent users from accessing the video from the device over the Internet. The router connects to the Internet over a series of numbered ports. The ports normally used by the device are blocked from access over the Internet.
NVR-820 / NVR-1620 Network Video Recorder with HDMI Enter valid ports in the Virtual Server section of your router. Please make sure to check the box on this line to enable settings. Then the device can be accessed from WAN by the router’s WAN IP Address. By now, you have finished your entire PC configuration for this device.