64-Channel Windows-based Network Video Recorder NVR-E6480
64-Channel Windows-based Network Video Recorder with 8-bay Hard Disks NVR-E6480 Copyright Copyright © 2016 by PLANET Technology Corp. All rights reserved. No part of this publication may be reproduced, transmitted, transcribed, stored in a retrieval system, or translated into any language or computer language, in any form or by any means, electronic, mechanical, magnetic, optical, chemical, manual or otherwise, without the prior written permission of PLANET.
64-Channel Windows-based Network Video Recorder with 8-bay Hard Disks NVR-E6480 Federal Communication Commission (FCC) Radiation Exposure Statement This equipment complies with FCC radiation exposure set forth for an uncontrolled environment. In order to avoid the possibility of exceeding the FCC radio frequency exposure limits, human proximity to the antenna shall not be less than 20 cm (8 inches) during normal operation.
64-Channel Windows-based Network Video Recorder with 8-bay Hard Disks NVR-E6480 Table of Contents CHAPTER 1. PRODUCT DESCRIPTION ..............................................................................................6 1.1 PRODUCT FEATURES ...................................................................................................................9 1.2 REMOTE ACCESS .......................................................................................................................10 1.
64-Channel Windows-based Network Video Recorder with 8-bay Hard Disks NVR-E6480 6.2.6 Manual Recording ...............................................................................................................51 6.2.7 Take a Snapshot of Live Image ..........................................................................................52 6.2.8 Digital PTZ Operation..........................................................................................................53 6.2.
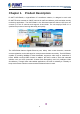
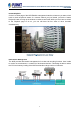
4-Channel Windows-based Network Video Recorder with 8-bay Hard Disks NVR-E6480 Chapter 1. Product Description PLANET NVR-E6480, a high-definition IP surveillance solution, is designed to work with PLANET E-series cameras or ONVIF cameras for traffic surveillance, public and other security monitoring applications. The NVR-E6480 is the Windows-based 64-channel NVR that can connect up to 64 IP cameras and supports 8 hard disks.
64-Channel Windows-based Network Video Recorder with 8-bay Hard Disks NVR-E6480 Instant Playback On the Live View page of the NVR-E6480’s management interface, whenever you want to look back to check suspicious events of a camera channel you just missed, just hit the ‘Instant Playback’ button to bring up the window to review recent feeds. While you don’t have to switch to the Playback page to do so, you can still have full live views of other channels simultaneously.
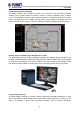
64-Channel Windows-based Network Video Recorder with 8-bay Hard Disks NVR-E6480 Location Management with eMap The eMap function helps visualize the layout of IP cameras in the surveillance network enabling you to quickly identify the location of each IP camera, especially when an alarm occurs. Just upload the pictures of the monitoring locations, and drag and drop the IP camera icons to the right place on the eMap.
64-Channel Windows-based Network Video Recorder with 8-bay Hard Disks NVR-E6480 transportations, campuses, etc. 1.1 Product Features Hardware Windows-based standalone NVR 2U rack-mount design Dual Gigabit Ethernet ports E-SATA, VGA and USB interface supported Audio line-in, line-out and mic-in jacks Video & Audio Simultaneous recording and live video streaming Supports M-JPEG, MPEG-4 and H.
64-Channel Windows-based Network Video Recorder with 8-bay Hard Disks NVR-E6480 Easy Installation & Management ONVIF compliant for interoperability Supports multiple languages Dual stream management Location-based management with eMap Up to max. 64 channels with the central management software Supports USB keyboard and mouse Remote access via mobile app viewer and Web browser Cam Viewer E-series software supported – CV7-VA, CV7-LP 1.
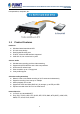
64-Channel Windows-based Network Video Recorder with 8-bay Hard Disks NVR-E6480 1.4 Product Specifications Product NVR-E6480 Hardware CPU Intel Processor RAM 2GB Operating System Windows 7 Standard Embedded Ethernet 2 x RJ45, 10/100/1000BASE-T USB Interface 6 x USB 2.0 for backup device and firmware upgrade Video Interface VGA video interface Audio Interface Mic-in, line-in and line-out Storage Device 8 x 3.
64-Channel Windows-based Network Video Recorder with 8-bay Hard Disks NVR-E6480 Audio Audio Type 2-way Live View Display Layout Mode Local: 1, 4, 5, 6, 8, 9, 10, 12, 16 Remote: 1, 4, 5, 6, 8, 9, 10, 12, 16, 18, 24, 25, 35, 36, 48, 49, 64 Digital Zoom Zoom in/out digitally by PiP (Picture-in-Picture) Manual Recording/ Snapshot Instant recording upon mouse click/Instant snapshot upon mouse click or hot key Dual Stream Management Live view of stream 1 or stream 2 of dual stream devices Event Panel
64-Channel Windows-based Network Video Recorder with 8-bay Hard Disks NVR-E6480 Monitor Max.
64-Channel Windows-based Network Video Recorder with 8-bay Hard Disks NVR-E6480 1.
64-Channel Windows-based Network Video Recorder with 8-bay Hard Disks NVR-E6480 Chapter 2. Hardware Installation Make sure this unit is turned off, and insert the hard disks into the disk bays following the sequence of tray numbers. 1. Slide the lock tab aside, and the hinge tab will pop out by itself. 2. Hold the tab lever and pull out the tray.
64-Channel Windows-based Network Video Recorder with 8-bay Hard Disks NVR-E6480 3. Loosen the two screws on the tray to remove the dummy disk. Secure the hard disk on the tray with the provided disk screws. Make sure the disk connector faces towards the SATA contacts inside the unit.
64-Channel Windows-based Network Video Recorder with 8-bay Hard Disks NVR-E6480 4. Place your thumb on the lock to push the tray into position in the chassis. 5. Press the hinge tab until it clicks into place. 6. Align the left end hooks to the holes on the unit’s left handle.
64-Channel Windows-based Network Video Recorder with 8-bay Hard Disks NVR-E6480 7. Press the latch and push the right end towards the unit’s right handle until it clicks into place. 8. The NVR with front cover is shown below. 2.1 Rack Mounting This unit is designed to be mounted on a standard server rack, which occupies 2U (3.5”) of vertical space. Step 1: Allow a minimum of 5 cm clearance at the front and the rear for front-to-back airflow of the unit.
64-Channel Windows-based Network Video Recorder with 8-bay Hard Disks NVR-E6480 2.2 Start Up Step 1: On the unit’s rear panel, press down the Power Switch to the side with “I” mark. Step 2: On the unit’s front panel, press down Power Button to turn on the unit. Step 3: As this unit starts up, you will enter Windows logon screen, and input the password “admin” to log in as administrator. The NVR-E6480 is strongly recommended to have it installed on the intranet in consideration of network security.
64-Channel Windows-based Network Video Recorder with 8-bay Hard Disks NVR-E6480 Chapter 3. 3.1 Log in to the System Access via Internet Explorer Browser The computer where NVR server is installed is called Server Computer. You may access the server directly via Internet Explorer or the NVR-E6480 workstation on any other client computer. Please open your browser, in URL box, type http://server ip address:port number, e.g. http://220.228.146.
64-Channel Windows-based Network Video Recorder with 8-bay Hard Disks NVR-E6480 Login A. Enter Account & Password Please obtain the Account & Password information from system administrator who has previously set up your User account in NVRE6480 system. The default account and password are “admin”. B. Change UI Language To change UI language, select the desired language from the “Language” dropdown list. To have the server remember your Login C.
64-Channel Windows-based Network Video Recorder with 8-bay Hard Disks NVR-E6480 information after your first login Please note that this procedure is only available when NVR server has accessed to SMTP service. The email address input in Forgot Password window should match the one under your User account saved in NVR server.
64-Channel Windows-based Network Video Recorder with 8-bay Hard Disks NVR-E6480 3.2 Access via NVR-E6480 Workstation The NVR-E6480 workstation includes a set of programs that provide the interface between users and NVR server. It may be installed in NVR server, or in the remote client computer that connects to NVR server via network.
64-Channel Windows-based Network Video Recorder with 8-bay Hard Disks NVR-E6480 B. Server IP & Server Port C. Enter Account & Password D. Choose the Initial Screen E. Language F. Remember Login Information In server IP field, key-in localhost or 127.0.0.1 if the NVRE6480 workstation is on the same computer with NVR server. If you are connecting from another computer, please input the IP address of server computer, for example, 220.228.146.21.
64-Channel Windows-based Network Video Recorder with 8-bay Hard Disks NVR-E6480 3.3 Change User Profile You can maintain your own account information on NVR interface without system administrator’s help. On NVR screen, click "Update Profile". You may change the email address or password and then click "Apply" to save the settings to NVR server.
64-Channel Windows-based Network Video Recorder with 8-bay Hard Disks NVR-E6480 Chapter 4. NVR User Interface Overview Unlike some NVR system products on the market, whose tree-like structure may easily confuse the user. The NVR-E6480’s easy user interface structure saves you a lot of time and hassle going from one page to another. Once you log in to the system, you may switch to any of the main function modules: Live View, Playback and Setup on any screen. 4.
64-Channel Windows-based Network Video Recorder with 8-bay Hard Disks NVR-E6480 Options are certain useful functions you mostly need. The provided functions vary on different screens.
64-Channel Windows-based Network Video Recorder with 8-bay Hard Disks NVR-E6480 System Log provides the search module for you to review the records of user’s behavior on this server. This is only available when your User right has permission to access it. About Us displays the software version number and required ActiveX Control version number. NVR Module Bar includes three main module screens: Live View, Playback and Setup.
64-Channel Windows-based Network Video Recorder with 8-bay Hard Disks NVR-E6480 4.2 NVR Main Screen You will enter the live view screen after Setup Wizard. On the right are link buttons to three NVR major functions: (1) Live, (2) Playback and (3) Setup. You can click the orange button to enter the function page.
64-Channel Windows-based Network Video Recorder with 8-bay Hard Disks NVR-E6480 Setup This screen allows you to perform user setup, device setup, event setup, schedule setup and system-wide settings.
64-Channel Windows-based Network Video Recorder with 8-bay Hard Disks NVR-E6480 Chapter 5. Live View Live View is the interface where you see the live views from your cameras. It is where most of the security professionals access the surveillance system.
64-Channel Windows-based Network Video Recorder with 8-bay Hard Disks NVR-E6480 5.1 Select a View In the NVR-E6480 system, a View refers to the layout where the live images of a few cameras are arranged in proper positions to suit the monitoring purpose. This is very similar to a Camera Group, which consists of cameras in the same physical location or with the same camera functions.
64-Channel Windows-based Network Video Recorder with 8-bay Hard Disks NVR-E6480 For details about how to create and edit a View, please refer to Chapter Customize Views in the NVR-E6480 Enterprise Administrator’s Manual. 5.2 Select a Camera To watch the live view of individual cameras, you need to identify and add this camera video stream to a blank channel in display area. All the cameras that you are allowed to see are in the Camera list panel on the left.
64-Channel Windows-based Network Video Recorder with 8-bay Hard Disks NVR-E6480 5.3 Camera List To view the camera information, put the cursor over the camera figure to bring the info box up. In Camera panel, you may also sort the cameras in a different order. Click select “Camera Sort”, and choose “by IP” or “by ID” as the sorting method.
64-Channel Windows-based Network Video Recorder with 8-bay Hard Disks NVR-E6480 5.4 Remove a Channel To remove a channel from display window, right-click the mouse for the quick menu on the channel, and select “Remove” to remove this video source.
64-Channel Windows-based Network Video Recorder with 8-bay Hard Disks NVR-E6480 5.5 Remove All Channels To remove all channels, disconnect all cameras by clicking “Remove All”.
64-Channel Windows-based Network Video Recorder with 8-bay Hard Disks NVR-E6480 5.6 Add Bookmark During live monitoring, you can create a bookmark of any time on any channel and edit your remarks about it. Select a channel and on the floating command bar, click on the bookmark button. On Bookmark window, input the name and description of this bookmark and then click on “Apply”.
64-Channel Windows-based Network Video Recorder with 8-bay Hard Disks NVR-E6480 TIP Full Screen On the system title bar, click mode. Click the icon mode. and then select “Full Screen” to enter full screen on the top right corner of the title bar to return to normal Stretch/Un-stretch Channel On the title bar, click and then select “Stretch” to make the width of video fill the window.
64-Channel Windows-based Network Video Recorder with 8-bay Hard Disks NVR-E6480 5.7 Enable View Patrol You may have the saved Views patrol in turn. In this way, the views in different areas in your site may cycle through themselves for you automatically. On the title bar, click to select a saved patrol. As patrolling is running on Live View, click to stop. You may create an Instant Patrol, which will only temporarily take effect during your current login.
64-Channel Windows-based Network Video Recorder with 8-bay Hard Disks NVR-E6480 below. 2. Choose the Views to display in patrol. If you select the All Cameras group, you will also need to select “All Camera Layout Style” for it. 3. Click “Apply” to save the settings. This patrol will instantly start running until you click 40 .
64-Channel Windows-based Network Video Recorder with 8-bay Hard Disks NVR-E6480 Chapter 6. 6.1 Monitor the System Read System Alerts and Channel Status On NVR live view screen, it is essential to observe the system status events. As unexpected environmental factors or human behaviors may take place to influence your surveillance system like power failure or internet connection interruption, NVR server may lose the connection with cameras, and hence you might lose the important video evidence. 6.1.
64-Channel Windows-based Network Video Recorder with 8-bay Hard Disks NVR-E6480 If this camera is triggered by events such as video motion, PIR motion or digital input device, the channel title bar would turn red for a while to alert you that some movements have been detected. On a map channel, if a camera is triggered by events such as video motion, PIR motion or digital input device, an event icon will blink beside the camera icon for a few seconds.
64-Channel Windows-based Network Video Recorder with 8-bay Hard Disks NVR-E6480 6.1.2 Event Panel It is important to check out the messages pushed into Event panel all the time. These messages are arranged in a reverse-time order (newest on top, oldest on bottom). The messages notify you of the following camera or system status: When NVR server fails to connect a device, to get the video or have disk problems, it might be caused by a temporary network disconnection in your overall environment.
64-Channel Windows-based Network Video Recorder with 8-bay Hard Disks NVR-E6480 6.1.3 Instant Event Playback Among these types of Event messages, you may individually watch the event playback of a motion (video motion, DI or PIR) event or transmission status event (video recovery and loss, or network recovery and loss). To bring up the instant event playback window, double-click on an event entry: As the window pops out, it will immediately start playing live view stream.
64-Channel Windows-based Network Video Recorder with 8-bay Hard Disks NVR-E6480 6.1.4 Pop-up Event Playback Sometimes the instant event playback window would automatically pop up to notify you of events detected on certain camera sites. As the events in certain sensitive spots will have higher priority than other channels, your system administrator would apply this “Pop-up Event Window” function to these cameras. In this way, these critical events will be pushed into your sight actively.
64-Channel Windows-based Network Video Recorder with 8-bay Hard Disks NVR-E6480 6.1.6 Motion Region Indicator The motion region indicator is a red frame that blinks when motion inside this ROI (Region of Interest) is detected. You can turn off the indicators of all channels on Live View screen. On Live View screen, click “Disable Motion Alert”. 6.2 Live View Operations Aside from pure watching, there are more benefits provided by NVR server to accomplish more tasks.
64-Channel Windows-based Network Video Recorder with 8-bay Hard Disks NVR-E6480 6.2.1 Show Mini Live View Windows on a Map You may open mini live view windows of all cameras on a map channel to get an overview of what is happening on this map. Click on the icon to enter another linked map. Double-click on a camera icon to open its live view window. On the map channel, right-click and select “Show All Live View”.
64-Channel Windows-based Network Video Recorder with 8-bay Hard Disks NVR-E6480 bottom right of Live View screen is the audio-in volume control. To mute the channel audio, click To activate the channel audio, click . . To adjust audio volume, drag on the volume meter.
64-Channel Windows-based Network Video Recorder with 8-bay Hard Disks NVR-E6480 6.2.3 Send Audio Signal To talk to the audience through speaker connected to one camera, right-click on a channel to bring up the quick menu, and select “Audio Out”. When this icon appears in orange, your audio-out function is activated, every sound you make through the microphone on your client computer will be sent out to this camera only. To broadcast to multiple cameras, click on Live View Control panel.
64-Channel Windows-based Network Video Recorder with 8-bay Hard Disks NVR-E6480 On the channel, right-click to bring up the quick menu, the DO icon will appear available if the corresponding DO device is connected. Click “DO” to trigger it, click again to stop triggering. As a channel is focused, click on Live view Control panel, click again to stop triggering. Triggering DO and sending audio to a specific device are only available on a single camera channel.
64-Channel Windows-based Network Video Recorder with 8-bay Hard Disks NVR-E6480 6.2.5 Watch Instant Playback of a Channel You may watch the playback of any channel in a pop-up window on Live View without switching to Playback screen. As a channel is focused, click on Live View Control panel. 6.2.6 Manual Recording You may manually record the real-time video on Live view screen. This video will only be searchable in Playback.
64-Channel Windows-based Network Video Recorder with 8-bay Hard Disks NVR-E6480 To manually record all channels in current View, on Live view Control panel, click start; click to to stop. 6.2.7 Take a Snapshot of Live Image You may take a snapshot on a channel live image on Live View screen. The snapshot will be saved to default folder on your client computer as .jpg format (The system default location is Windows Desktop).
64-Channel Windows-based Network Video Recorder with 8-bay Hard Disks NVR-E6480 As a channel is focused, click on Live view Control panel to take a snapshot. 6.2.8 Digital PTZ Operation Regardless of the camera models, you may perform digital zooming on Live view screen. Click and drag a highlight rectangle over any channel, and the area highlighted will be displayed in the full live video window. In this mode, a picture-in-picture view will show in the lower right of live view window.
64-Channel Windows-based Network Video Recorder with 8-bay Hard Disks NVR-E6480 PTZ Panel Overview Using Mouse Controls You may also use mouse to perform PTZ negation on a channel view or a mini live view window on a map. Place the mouse over the channel to do the following PTZ operations: To execute optical Panning and Tilting, click anywhere on the live window to allow the camera to move in that direction. The length of the direction indicator is proportional to the Pan and Tilt speed.
64-Channel Windows-based Network Video Recorder with 8-bay Hard Disks NVR-E6480 scroll the mouse wheel backward to zoom out. 6.2.10 Navigate a Fisheye Camera Channel On a fisheye camera channel, you may change the fisheye view mode and view point at will. What you see on Live View screen will not affect what is being recorded, and you can have an alternative of view mode when doing playback.
64-Channel Windows-based Network Video Recorder with 8-bay Hard Disks NVR-E6480 When you click on a channel which is set to such modes: Panorama mode with Wall mounting, Double Panorama mode with Wall mounting, Panorama Focus mode with Wall mounting and Double Panorama mode with Ceiling mounting, a clickable cursor will appear on the view to allow you explore the image. PTZ Operation Select a fisheye mode; click the entire channel or a region of interest to navigate this view.
64-Channel Windows-based Network Video Recorder with 8-bay Hard Disks NVR-E6480 Click the mouse anywhere on the view to pan/tilt; scroll the mouse wheel to zoom in/out. To reset the PTZ navigation area back to default viewing angle, right-click to bring up channel menu, and then click “Reset”.
64-Channel Windows-based Network Video Recorder with 8-bay Hard Disks NVR-E6480 Chapter 7. Playback NVR Playback is the NVR module that processes recorded clips, where you may search, play back and export video. Multiple channels can be played synchronizedly, and video clips may also be exported in either RAW or AVI format. 7.1 Playback UI Introduction Playback screen consists of four function areas: Video Source, Playback Display, Time Bar and Search Panel.
64-Channel Windows-based Network Video Recorder with 8-bay Hard Disks NVR-E6480 is selected in the beginning, and you have to select your desired channels. Add Video Source There are two ways to pull in video sources: 1. In View area, click on a saved view. 2. From Camera panel, double-click on a camera or drag it to Display area. Through either way, you may add video sources, and their time bars will display in Time Bar area. Your playback operations and search will be based on these selected channels.
64-Channel Windows-based Network Video Recorder with 8-bay Hard Disks NVR-E6480 To remove all channels at one time, on the title bar, click to bring up the most used playback-related commands menu, and select “Remove All”.
64-Channel Windows-based Network Video Recorder with 8-bay Hard Disks NVR-E6480 7.3 Search on Time Bar You may focus on a certain channel as a search base. Its time bar will be highlighted as well. 1.
64-Channel Windows-based Network Video Recorder with 8-bay Hard Disks NVR-E6480 Display Event Types By default, the “Manual” recording will display in orange, while “Schedule” recording displays in gray on the time bar. To highlight specific events, you may enable the “Event” and “DI” event highlighters on Playback Control Bar. Event Type Highlight Colors Playback Controls The playback related controls reside in Playback Control Bar.
64-Channel Windows-based Network Video Recorder with 8-bay Hard Disks NVR-E6480 7.4 Digital Zoom on Channel View Regardless of the camera models, you may perform digital zooming while the video is playing. 1. Click and drag a highlight rectangle over any channel, and the area highlighted will be displayed in the full live video window. In this mode, a picture-in-picture view will show in the lower right of live view window.
-Channel Windows-based Network Video Recorder with 8-bay Hard Disks NVR-E6480 7.5 Explore Fisheye View You may change to the desired fisheye view mode on Playback screen. To select a fisheye camera channel, right-click to bring up the channel menu Fisheye Mode select one view mode. In a view mode where ePTZ operation is available (e.g. Quad mode), you may explore the region of interest using mouse or PTZ Panel at will.
64-Channel Windows-based Network Video Recorder with 8-bay Hard Disks NVR-E6480 3. The time bar will immediately locate the target time. 7.7 Search by Event Type If you are clear about (1) When (2) as which event type (3) Where the incident happened, you will not need to drag on time bar all the way to the spot. The event search tool can sort out the video clips that match your criteria. 1. Double-click on your desired channel or drag it to the display window. The channel view will appear in the window.
64-Channel Windows-based Network Video Recorder with 8-bay Hard Disks NVR-E6480 4. Select an event type of event search, and you can select an unwanted filter and delete it by unchecking the option. 5. Select the desired filter and click “Apply” to start searching. 7.8 Search by Video Analytics NVR server is equipped with two useful video analytics that can perform advanced search – Motion and Tamper.
64-Channel Windows-based Network Video Recorder with 8-bay Hard Disks NVR-E6480 3. On Search Tool panel, click “Smart Search”. 4. Define the time range. 5. Select the video analytics type 6. Click “+” to create this filter. You can select an unwanted filter and delete it by clicking on the “x” on the right.
64-Channel Windows-based Network Video Recorder with 8-bay Hard Disks NVR-E6480 7. After this filter is created, draw the regions on the channel view. (You can define a total of six regions for a motion filter, while tamper filter will analyze the whole camera view.
64-Channel Windows-based Network Video Recorder with 8-bay Hard Disks NVR-E6480 If the area you want to mark does not fit to the form of a rectangle, you may also want to draw a polygon by selecting the icon. To draw the lines for the sides of your polygon, click your cursor to mark the endpoints of each line. Double-click on the final endpoint of the final line to confirm and highlight the polygon in light blue, as shown in the illustration below.
64-Channel Windows-based Network Video Recorder with 8-bay Hard Disks NVR-E6480 7.9 View Search Results The search results will then start being generated in thumbnails in Search Result Viewer window. However, it might take a few seconds if a large number of results are found. The thumbnails are listed in sequential order, left-to-right and top-to-bottom. You can drag on the Search Result Viewer to your desired time to find the snapshots of the incidents.
64-Channel Windows-based Network Video Recorder with 8-bay Hard Disks NVR-E6480 For easy exploring the search results, on Search Result Tool Bar, you can Adjust the size of the snapshots, the smaller the thumbnail’s size is, the more results you can see in the view. Select a thumbnail and click to download its snapshot. Select a thumbnail and click Select a thumbnail and click to directly start playing this event. to view the event card list instead of thumbnail view.
64-Channel Windows-based Network Video Recorder with 8-bay Hard Disks NVR-E6480 7.10 Take a Snapshot of the Playback View You may take a snapshot of a channel live image on Live view screen. The snapshot will be saved to default folder on your client computer as .jpg format (The system default location is Windows Desktop). You may find the location path on the bottom of NVR window after taking a snapshot. 7.11 Export the Recordings NVR playback offers two choices of video format for the exported video.
64-Channel Windows-based Network Video Recorder with 8-bay Hard Disks NVR-E6480 sites: http://sourceforge.net/projects/ffdshow/ http://www.divx.com/en/software/divx Define the Section of Exported Video on Time Bar You may define the video duration on time bar during the playback. In this way, you don’t spend extra time and effort on finding the specific date and time information. 1. On time bar, drag to the start point of the video, right-click to bring up quick menu and then select “Mark Export Start”. 2.
64-Channel Windows-based Network Video Recorder with 8-bay Hard Disks NVR-E6480 7.12 Set the Export Video Settings You may export video with or without defining the time duration beforehand since you can configure all the settings on Export Video window. On Search Result Tool bar, click to enter the window. 1. Select the cameras. If more than one camera is selected, you will get multiple recordings. 2. Set the time duration. The minimum duration is 10 seconds; maximum is 1 hour.
64-Channel Windows-based Network Video Recorder with 8-bay Hard Disks NVR-E6480 6. Click “Apply” to start file converting and exporting. The export process window will appear. In the Camera column displays the processed/total number of video clips of that camera. You may also observe the remaining processing time of each camera’s video files. There are five types of process status: success, converting, waiting, no data and fail.
64-Channel Windows-based Network Video Recorder with 8-bay Hard Disks NVR-E6480 Appendix A: Default Setting Default Login User Name for Windows admin Default Login Password for Windows admin Default Login User Name for NVR-E6480 Workstation admin Default Login Password for NVR-E6480 Workstation admin 76
64-Channel Windows-based Network Video Recorder with 8-bay Hard Disks NVR-E6480 Appendix B: NVR Performance NVR-E6480 (Live View) 10MP 5MP 4MP 3MP 2MP 1.