PLANET PoE IP Phone User’s Manual H.
PLANET PoE IP Phone User’s Manual Copyright Copyright (C) 2005 PLANET Technology Corp. All rights reserved. The products and programs described in this User’s Manual are licensed products of PLANET Technology, This User’s Manual contains proprietary information protected by copyright, and this User’s Manual and all accompanying hardware, software, and documentation are copyrighted.
PLANET PoE IP Phone User’s Manual Table of Contents Chapter 1 ...........................................................................................................................................4 Overview of the PoE IP Phone...........................................................................................................4 VIP/-103PT / VIP-153PT / VIP-153T Features.................................................. 4 1.1 Hardware Overview .....................................................
PLANET PoE IP Phone User’s Manual Chapter 1 Overview of the PoE IP Phone Meeting the next-generation Internet telephony service demands, PLANET Technology provides feature-rich, toll-quality Internet telephony service solutions. With 802.3af Power over Ethernet (PoE) LAN interface supported, the VIP-103PT is H.323 v2/v3/v4 compliant with H.235 security support, VIP-153PT is SIP 2.0 (RFC3261) compliant with SIP digest authentication supports. And the VIP-153 is the cost-effective SIP IP Phone.
PLANET PoE IP Phone User’s Manual Feature-rich keypad IP Phone The IP Phone integrates a high-quality speakerphone with the Call Hold, Forward and Transfer functions and also provides advanced telephone features, such as 10 speed-dial keys, last number redial, incoming call history indicator in a much more convenient and functional manner than traditional telephone sets.
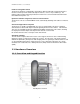
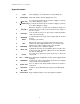
PLANET PoE IP Phone User’s Manual Keypad Description The red light goes on-off when there is an incoming call. 1 Light 2 LCD Display Menu and all status shall be displayed for users. “Í UP” Key To scroll up the menu items or left delete a digit per each key press while editing the settings. 3 “Æ DOWN” Key To scroll up the menu items or left delete a digit per each key press while editing the settings.
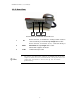
PLANET PoE IP Phone User’s Manual 1.1.2 Rear View 3. 2. 1. Rear Panel of VIP-103PT/VIP-153PT/VIP-153T 1 PC 2 WAN RJ-45 connector, to maintain the existing network structure, connected directly to the PC through straight CAT-5 cable RJ-45 connector, for Internet access, connected directly to Switch/Hub through straight CAT-5 cable. 802.3af PoE support in PT model 3 7V DC y L Hint 7V DC Power input outlet The Power over Ethernet support on PLANET PoE IP phones complies with the 802.
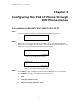
PLANET PoE IP Phone User’s Manual Chapter 2 Configuring the PoE IP Phone through LCD Phone menus 2.1 Initialize VIP103PT/VIP-153PT/VIP-153T STEP 1: Power on machine, the LCD screen displays flashing greeting as below: Starting … STEP 2: Wait for 10 seconds, the main LCD screen shall be shown as below, and when the Internet access is available, the VIP-103PT / VIP-153PT / VIP-153T will connect to the SNTP server. The current time will be displayed on the LCD.
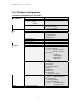
PLANET PoE IP Phone User’s Manual 2.2 LCD Menu Configuration LCD menu configuration for VIP-103PT 1st Level IP PBX mode 2nd Level 1.1 (On/Off) If Yes: 3rd Level Name Number 1.2 Hotline IP Address View 1.2.1 (Yes/No) Auto 1.2.2 (Yes/No) Manual If Yes: IP Address Check the active network parameters in machine 2.1 Network Value Configure 2.1.1 IP Address 2.1.2 Network Mask 2.1.3 Default Route 2.1.4 DNS Server 2.2 IP PBX Mode 2.2 Ping 2.3 GK IP Address 2.4 Firmware Version Password:123 3.1 Network 3.
PLANET PoE IP Phone User’s Manual LCD menu configuration for VIP-153PT/VIP-153T 1st Level 2nd Level 3rd Level View 1.1 Network Value Configure 1.1.1 IP Address 1.1.2 Network Mask 1.1.3 Default Route 1.1.4 DNS Server 1.2 Ping 1.3 Restart 1.4 Firmware Version 1.5 (Yes/No) PKT Trace Password:123 2.1 Network 2.1.1 (Yes/No) Dynamic IP 2.1.2 (Yes/No) PPPoE If Yes: PPPoE User Name PPPoE Password 2.1.3 Fixed IP IP Address Network Mask Default Route DNS Server 2.1.4 GMT 2.2.1 Username 2.2.
PLANET PoE IP Phone User’s Manual “View” menu In the “View” main menu, there are submenus, users may check these items for machine information and also provide some simple functions to check the network status of the IP Phone. 1.1 View current network settings By selecting “View” → ”Network”, you could see the active network parameters in machine. 1.2 Ping By selecting “View” → ”Ping” and key in the IP address or domain name of another device, the IP Phone can verify the connection between remote device.
PLANET PoE IP Phone User’s Manual network configuration menu, and enable the DHCP client in Dynamic IP selection menu and the IP phone will obtain the IP parameters dynamically, and connect to Internet automatically. Configuration steps: Configure → Password:123 → Network → (Yes/No) Dynamic IP 2.1.2 PPPoE Most of the broadband network environment provided now by ISP is the ADSL connection.
PLANET PoE IP Phone User’s Manual 2.2 Registration to H.323 gatekeeper / SIP Proxy Server After setting up the network parameters, the IP Phone is able to perform registration to the H.323 gatekeeper (VIP-103PT) or SIP Proxy server (VIP-153PT/VIP-153T) when you’ve been assigned the account from VoIP vendor/service provider. 2.2.1 Registration to a H.323 gatekeeper (VIP-103PT) When VIP-103PT is installed in an H.323 GK enabled network, the VIP-103PT registers to the gatekeeper for voice communications.
PLANET PoE IP Phone User’s Manual 2.2.1 Registration to a SIP Proxy Server (VIP-153PT/VIP-153T) When the VoIP vendor/operator is running the SIP system, use the VIP-153PT/VIP-153T to register to the proxy server. Configure the following parameters to do the registration. Configure → Password:123 → SIP Username: The username used to register to Proxy server. If Proxy server doesn’t request specific username, please enter the assigned telephone number here.
PLANET PoE IP Phone User’s Manual Outbound Proxy (Yes/No): Please set this item to Yes if the registration needs to pass through the Outbound Proxy server. Registration / Startup message When the network and registration configurations are set, please restart the IP Phone, the LCD display on the IP phone will show one of the following message depends on whether the registration is ok or not. When the VIP-103PT is registering to a H.
PLANET PoE IP Phone User’s Manual Means that the VIP-103PT/VIP-153PT/VIP-153T is working OK and ready for outgoing/incoming calls. But the “Proxy On” flag is “No”, i.e. the VIP-103PT/VIP-153PT/VIP-153T not needs to register. In this case, can call the IP address of other VIP-153PT/VIP-153T directly. When the PoE IP Phone is failed in registering to a H.
PLANET PoE IP Phone User’s Manual so, if the DHCP server is responding, the DHCPFail() display will change to Hi() display to notify that the PoE IP phone is working OK.
PLANET PoE IP Phone User’s Manual this PoE IP Phone will not ring. 2.3 Call Forward Configurations The PoE IP Phone supports three different kinds of call forward functions, please select “Configure” → ”Forward Mode” for these three kinds of selection: 2.3.1 Immediate Forward Under “Forward Mode” submenu, users are able to setup for immediate forward by selecting Yes on (Yes/No) Immediate and input the number he/she would like the call to be forwarded to.
PLANET PoE IP Phone User’s Manual Chapter 3 Configuring the VIP-103PT/VIP-153PT/ VIP-153T through Web Pages VIP-103PT/VIP-153PT/VIP-153T are equipped with a web-based graphical user interface that can cover most configurations and machine status monitoring. Via standard, web browser, you can configure and check machine status from anywhere around the world. Step 1.
PLANET PoE IP Phone User’s Manual • Firmware version: machine firmware version information • Network value: IP Address: 192168.0.1 Subnet Mask: 255.255.255.0 Default routing gateway: 192.168.0.254 DNS Server: 168.95.1.1 Step 4. Start machine configurations Most important items are Network Configuration and H.323/SIP Configuration. Please remember to configure these commands before start to work with VIP-103PT/VIP-153PT/VIP-153T.
PLANET PoE IP Phone User’s Manual Network configurations: • • • Dynamic IP: enable/disable DHCP Client function. PPPoE: enable/disable PPPoE function. 1. PPPoE Username: set PPPoE authentication User Name. 2. PPPoE Password: set PPPoE authentication password. Fixed IP 3. IP Address: IP Address of VIP-103PT/VIP-153PT/VIP-153T 4. Subnet Mask: setup the subnet mask of VIP-103PT/VIP-153PT/VIP-153T 5. Default routing gateway: setup default gateway of VIP-103PT/VIP-153PT/VIP-153T 6.
PLANET PoE IP Phone User’s Manual After setting up network parameters, be sure to apply settings (via “DONE” button) and browse to “System Configuration” menu to reboot the machine to make the settings effective Connection Type Dynamic IP (DHCP client) PPPoE Fixed IP Address L Hint Data required. In most circumstances, it is no need to configure the DHCP settings. The ISP will assign PPPoE username / password for Internet access, The ISP will assign IP Address, and related information.
PLANET PoE IP Phone User’s Manual 3. H.323 Configuration (VIP-103PT) Please select the “H.323 Configuration” icon on the left menu; the following page will displayed for H.323 related configurations. H.323 Parameters: • Telephone Number: insert telephone number of VIP-103PT when registering to Gatekeeper. • Password: the authorized password in the gatekeeper application • H.323 ID: setup H.323 ID provided by service provider, the H.
PLANET PoE IP Phone User’s Manual • GK mode: Enable/disable Gatekeeper function. • GK IP: Set Gatekeeper IP address or Domain Name. • RAS/Q931 Port: communication port number of the Gatekeeper for VIP-103PT to send messages. Forward Mode: • Immediate: enable/disable Immediate Forward function. • Immediate Number: setup the immediate forward number here. • Busy: enable /disable Busy Forward function.
PLANET PoE IP Phone User’s Manual 3. SIP Configuration (VIP-153PT/VIP-153T) Please select the “SIP Configuration” icon on the left menu; the following page will display to allow you to set all the SIP related configurations. SIP Parameters: • Username: the username to register to Proxy Server. If Proxy server doesn’t request specific username, please enter line number here. • Telephone Number: the telephone number of VIP-153PT/VIP-153T to register to SIP proxy.
PLANET PoE IP Phone User’s Manual circumstances, please setup the username same as telephone number for SIP registration. • Proxy mode: enable/disable SIP proxy mode. • Proxy Server Address: SIP proxy IP address or domain name. • Proxy Port: setup proxy port for SIP proxy communication. • Outbound Proxy: Enable/disable SIP outbound proxy functions. • Outbound Proxy Address: IP address / domain name of the SIP outbound proxy.
PLANET PoE IP Phone User’s Manual 4. Phone Configuration (VIP-103PT) Please browse to the “Phone configuration” on the left menu, following page will be displayed for phone call and voice codec related configurations.
PLANET PoE IP Phone User’s Manual IP PBX Setting: LNote • IP PBX Setting: enable/disable IP PBX support. • Name: extension name displayed on the LCD screen • Number: extension number displayed on the LCD screen • Current supported IP PBX system: PLANET IPX-1000/IPX-1500 Hot Line: Auto/Manual: please set up the auto/manual function to enable/disable hot line function. IP address: if the hot line function is use manual mode, please input the IP address of the destination device.
PLANET PoE IP Phone User’s Manual 4. Phone Configuration (VIP-153PT/VIP-153T) Please browse to the “Phone configuration” on the left menu, following page will be displayed for phone call and voice codec related configurations. IP PBX Setting: • IP PBX Setting: enable/disable IP PBX function. Prefix Setting: This parameter is used to setup the calling prefix string. For some specific VoIP system, the IP Phone can call to PSTN/mobile number and the called number must include the country code, e.g.
PLANET PoE IP Phone User’s Manual set the “Area Prefix Code” value to 0. As for the “International Code”, when you want to dial an international call, the International Code will be removed. E.g., suppose want to make a call to China, the dialed number will be 002-86-2112341234, the IP Phone will remove the “International Code” 002, and send the real number of 86-2112341234. This prefix code implementation is only needed for some specific VoIP system.
PLANET PoE IP Phone User’s Manual Firmware Upgrade: • FTP Server: IP address of the FTP server, which contains the firmware file of the PoE IP phone • Image File Name: firmware file name of VIP-103PT/VIP-153PT/VIP-153T. Change web Username & Password: The default username/password for web login is root / , you may modify the username/password for more security. Please enter the new login name, re-enter the current password, new password and confirm new password to enable new password.
PLANET PoE IP Phone User’s Manual 6. Speed Dial Please select the “Speed Dial” on the left menu; users may set up the speed dial related configurations. • M1~M10 Name: user can specify 10 sets of speed dial via web interface. Please input name of the destination device • M1~M10 Number: please input IP address and URL of the destination device 7. Phone Book Please select the “Phone Book” on the left menu; users may set up the phone book related configurations.
PLANET PoE IP Phone User’s Manual Chapter 4 Voice communication samples There are several ways to make calls to desired destination in VIP-103PT/VIP-153PT/VIP-153T. In this chapter, we’ll lead you step by step to establish your first voice communication via web browsers operations. Peer to peer (P2P) mode VIP-103PT to VIP-103PT connection via IP address Assuming there are two VIP-103PT in the network the IP address are 192.168.0.1, 192.168.0.2 192.168.0.1 192.168.0.
PLANET PoE IP Phone User’s Manual IP PBX extension configurations – IPX-1000/IPX-1500 Machine configurations on VIP-103PT a) Log in machine via web browser, and browse to the H.323 configuration page, and enable the “IPX ” feature. b) After enabling the “IP extension” feature, please enable hotline feature, and insert the IP address of IP PBX system. PLANET IPX-1000, IPX-1500).
PLANET PoE IP Phone User’s Manual b) In the VoIP extension configuration page, please insert the IP address, MAC address information of the VIP-103PT. Assign and save the extension related parameters for the VIP-103PT.
PLANET PoE IP Phone User’s Manual c) In the VoIP extension configuration page, please insert the IP address, MAC address information of the VIP-103PT. After these settings, the VIP-103PT is able to act as one of the IP extensions under the IPX-1000, IPX-1500. Peer to peer (P2P) mode VIP-103PT to VIP-103PT connection via IP address Assuming there are two VIP-103PT in the network the IP address are 192.168.0.1, 192.168.0.2 192.168.0.1 192.168.0.
PLANET PoE IP Phone User’s Manual In peer-to-peer (P2P) mode, you can direct pickup the handset and dial the number using the keypad as below: 1 9 2 * 1 6 8 * 0 * 2 # Then the phone of 192.168.0.2 should ring. You can do the same thing to the second VIP-153T. y L Hint y If the IP address of the remote calling party is known, you may directly make calls via its IP address and end with an “#”.
PLANET PoE IP Phone User’s Manual STEP 2: After these configurations, be sure to click the “DONE” button to apply settings and browse to “System Configuration” menu to reboot the machine to make the settings effective. After rebooting, the unit will communicate with the remote calling party, the LCD screen will show below: Registering (100) Nov 16 12:10 STEP 3: At this moment, you may pick up the handset and dial “200” to connect the remote VIP-153T to start the voice communications.
PLANET PoE IP Phone User’s Manual Machine configurations on the VIP-153PT/VIP-153T: STEP 1: Log in SIP-50 and create two testing accounts/password: 1001/123 (for VIP-153PT), and 1002/123(for VIP-153T) for the voice calls. STEP 2: Please log in VIP-153PT via web browser, browse to the SIP setting menu and select the Domain Service config menu.
PLANET PoE IP Phone User’s Manual Voice communication via IP PBX system – IPX-2000 (Auto-config) In the following sample, we’ll introduce how to integrate the SIP Phone with our IP PBX system IPX-2000 via Auto-config feature. Registration / Registration / Authentication Authentication IPX-2000 LAN IP Address: 192.168.0.50 VIP-153PT IP Address: VIP-153T IP Address: 192.168.0.2 192.168.0.
PLANET PoE IP Phone User’s Manual STEP 2: Please browse to the Device menu and create new device for the auto configuration. STEP 3: Please press the Show extensions button to create the two extension accounts/password: 1001/123 (for VIP-153PT), and 1002/123(for VIP-153T) for the voice calls.
PLANET PoE IP Phone User’s Manual Machine configurations on the VIP-153PT/VIP-153: STEP 5: Please log in VIP-153PT via web browser, please browse to the Phone Configuration page, and enable the IPX PBX setting features for IP PBX system. After these configurations, be sure to click the “DONE” button to apply settings and browse to “System Configuration” menu to reboot the machine to make the settings effective.
PLANET PoE IP Phone User’s Manual Appendix A IP Phone Specifications Product Model Hardware WAN PC LCD display Speaker Protocols and Standard Standard Voice codec Voice Standard Supplementary services Call history Protocols Network and Configuration Access Mode Management Dimension (W x D x H) Operating Environment Power Requirement EMC/EMI H.323 PoE IP Phone VIP-103PT SIP IP Phone VIP-153T SIP PoE IP Phone VIP-153PT 1 x 10/100Mbps RJ-45 port Power Over Ethernet 802.