
Quick Guide

– 1 – – 2 –
– 3 – – 4 –
1. Package Contents
Thank you for purchasing PLANET VPN Router, VR-100 or
VR-300 Series. The descriptions of these models are as follows:
VR-100 5-Port 10/100/1000T VPN Security Router
VR-300
Enterprise 5-Port 10/100/1000T VPN Security
Router
VR-300P
Enterprise 4-Port 10/100/1000T 802.3at PoE +
1-Port 10/100/1000T VPN Security Router
VR-300F
Enterprise 4-Port 10/100/1000T + 1-Port
1000X SFP VPN Security Router
VR-300FP
Enterprise 4-Port 10/100/1000T 802.3at PoE +
1-Port 1000X SFP VPN Security Router
VR-300W5
Wi-Fi 5 AC1200 Dual Band VPN Security
Router
VR-300PW5
Wi-Fi 5 AC1200 Dual Band VPN Security
Router with 4-Port 802.3at PoE+
VR-300W6
Wi-Fi 6 AX1800 Dual Band VPN Security
Router
VR-300PW6
Wi-Fi 6 AX1800 Dual Band VPN Security
Router with 4-Port 802.3at PoE+
VR-300W6A
Wi-Fi 6 AX2400 2.4GHz/5GHz VPN Security
Router
VR-300PW6A
Wi-Fi 6 AX2400 2.4GHz/5GHz VPN Security
Router with 4-Port 802.3at PoE+
“VPN Router” mentioned in this Quick Installation Guide
refers to the above models. "Wireless Router" is for the
above router with wireless interface.
Open the box of the VPN Router and carefully unpack it. The
box should contain the following items for each of the above
models:
VPN Router x 1
Quick Installation Guide x 1
Power Cord x 1
Rubber Feet x 4
Rack-mounting Kit x 1
SFP Dust Cop x 1 (VR-300F/VR-300FP)
Wireless Antenna (Wireless Router)
- 2.4G/5G Antenna x 2 (VR-300W5/VR-300PW5)
- Dual Band Antenna x 2 (VR-300W6/VR-300PW6)
- Dual Band Antenna x 4 (VR-300W6A/VR-300PW6A)
If any of the above items are damaged or missing, please
contact your dealer immediately.
2. Hardware Installation
Refer to the illustration and follow the simple steps below to
quickly install your VPN router.
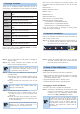
Step 1: For wireless models, fasten the 2.4G/5G antennas to
the 2.4G/5G antenna connectors. And you can bend
the antennas to t your actual needs.
OFF
ON
POWER
50/60Hz
100-240V , 1A max.
2.4GHz 5GHz 5GHz 2.4GHz
Step 2: You can either place the VPN Router on desktop or
install it on rack.
Step 3: Keep enough ventilation space between the VPN
Router and the surrounding objects.
Note
When choosing a location, please keep in mind
the environmental restrictions should be under
the specifications of the VPN router.
Step 4: Connect a PC or work stataion to the LAN port (port 1)
of the VPN Router.
A. Connect one end of a standard network cable to
the LAN port (port 1) on the front panel of the VPN
router.
B. Connect the other end of the cable to a PC or work
station.
Note
The UTP Category 5e/6 network cabling with
RJ45 tips is recommended.
Step 5: Connect your VPN Router to internet.
A. Connect one end of a standard network cable to
the WAN port (port 5) on the front panel of the
VPN router.
B. Connect the other end of the cable to the xDSL /
xPON modem/ONU LAN port or an upper layer port
to outer network layer.
Note
If there is only one line connected to the outer
network in your network environment, it is
suggested that you use WAN port (port 5)
Step 6: Connect the included power cord to an AC 100-240V
wall outlet. When the VPN router receives power, the
Power LED should remain solid Green.
3. Setup of The VPN Router
3.1Requirements
Please conrm the following items before conguration:
1. Please conrm the network is working properly: It is strongly
suggested to test your network connection by connecting
your computer directly to ISP.
2. Suggested operating systems: Windows 7/8/10.
3. Recommended web browsers: IE/Firefox/Chrome.
3.2 Logging in to the VPN Router
Then refer to the steps to congure the VPN Router:
Step 1: Connect the IT administrator’s PC and VPN router’s LAN
port (port 1) to the same hub / switch, and then launch
a browser to link the management interface address
which is set to http://192.168.1.1 by default.
Note
The DHCP server of the VPN Router is enabled.
Therefore, the LAN PC will get IP from the VPN
Router. If user needs to set IP address of LAN PC
manually, please set the IP address within the
range between 192.168.1.2 and 192.168.1.254
inclusively, and assigned the subnet mask of
255.255.255.0.