User Manual of WDAP-C1800AX &WDAP-1800AX Dual Band 802.11ax 1800Mbps Wireless Access Point w/802.
User Manual of WDAP-C1800AX &WDAP-1800AX Copyright Copyright (C) 2021 PLANET Technology Corp. All rights reserved. The products and programs described in this User’s Manual are licensed products of PLANET Technology, This User’s Manual contains proprietary information protected by copyright, and this User’s Manual and all accompanying hardware, software, and documentation are copyrighted.
User Manual of WDAP-C1800AX &WDAP-1800AX FCC Caution: Any changes or modifications not expressly approved by the party responsible for compliance could void the user’s authority to operate the equipment. To assure continued compliance, for example, use only shielded interface cables when connecting to computer or peripheral devices. This device complies with Part 15 of the FCC Rules.
User Manual of WDAP-C1800AX &WDAP-1800AX Revision User Manual of PLANET 802.11ax Dual Band Ceiling-mount Wireless Access Point Model: WDAP-C1800AX Rev: 2.1 (November, 2021) Part No. EM-WDAP-C1800AX_v2.
User Manual of WDAP-C1800AX &WDAP-1800AX Table of Contents Chapter 1. Product Introduction.............................................................................................8 1.1 Package Contents ......................................................................................................8 1.2 Product Description ....................................................................................................9 Applications .........................................................
User Manual of WDAP-C1800AX &WDAP-1800AX 4.3 4.4 4.5 4.2.4 Routing...................................................................................................36 4.2.5 RIP .........................................................................................................38 4.2.6 OSPF .....................................................................................................38 4.2.7 IGMP .........................................................................................
User Manual of WDAP-C1800AX &WDAP-1800AX Q1: How to Set Up the AP Client Connection ...................................................................86 Appendix C: Troubleshooting ...................................................................................................92 Appendix D: Glossary ...............................................................................................................94 EC Declaration of Conformity ................................................................
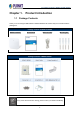
User Manual of WDAP-C1800AX &WDAP-1800AX Chapter 1. Product Introduction 1.1 Package Contents Thank you for choosing PLANET WDAP-C1800AX Wireless AP. Please verify the contents inside the package box. Package Contents of WDAP-C1800AX WDAP-C1800AX Quick Guide Ethernet Cable Mounting Kit Package Contents of WDAP-1800AX If any of the above items are missing, please contact your dealer immediately.
User Manual of WDAP-C1800AX &WDAP-1800AX 1.2 Product Description (Please refer to PLANET website for WDAP-1800AX information.) Ultra-high-speed Wi-Fi 6 Wireless LAN Solution PLANET WDAP-C1800AX 1800Mbps Dual Band 802.11ax Wireless AP, supporting MU-MIMO, OFDMA, Seamless Roaming, Beamforming and BSS Coloring technology, provides a maximum wireless speed of 1200Mbps in the 5GHz band and 600Mbps in the 2.4GHz band.
User Manual of WDAP-C1800AX &WDAP-1800AX Improves the overall traffic quality, and effectively uses bandwidth in an environment where multiple people use the Internet. Increases the number of devices that can be connected to the AP. Reduces the power consumption of the device by way of the use of low bandwidth. Beamforming Beamforming is to improve your Wi-Fi signal when you are far away from your router.
User Manual of WDAP-C1800AX &WDAP-1800AX BSS Coloring The BSS color is a numerical identifier of the BSS. 802.11ax radios that are able to differentiate between BSSs using BSS color identifier when other radios transmit on the same channel. If the color is the same, this is considered to be an intra-BSS frame transmission. In other words, the transmitting radio belongs to the same BSS as the receiver.
User Manual of WDAP-C1800AX &WDAP-1800AX Super Power Dual band WLAN Solution PLANET WDAP-C1800AX, adopting the IEEE 802.11ax Wi-Fi 6 standard, provides a high-speed transmission. The maximum wireless speed in 2.4GHz band is up to 11AX of 574Mbps, and in the 5GHz band is up to 11AX of 1201Mbps. Both the 2.4GHz and 5GHz wireless connections can also be used simultaneously.
User Manual of WDAP-C1800AX &WDAP-1800AX which they provide more flexibility for users when wireless network is established. Compared with general wireless access points, the WDAP-C1800AX offers more powerful and flexible capability for wireless clients. Ceiling-mount Design for Your Environment With the standard IEEE802.3at Power over Ethernet (PoE) design, the WDAP-C1800AX can be easily installed in the areas where power outlets are not available. By supporting the standard IEEE 802.
User Manual of WDAP-C1800AX &WDAP-1800AX Optimized Efficiency in AP Management The brand-new GUI configuration wizard helps the system administrator easily set up the WDAP-C1800AX step by step. Besides, the built-in Wi-Fi analyzer provides real-time channel utilization to prevent channel overlapping to assure greater performance.
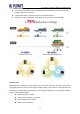
User Manual of WDAP-C1800AX &WDAP-1800AX Applications Extreme High Speed and Wi-Fi 6 Technology Make Wireless Transmission More Powerful The WDAP-C1800AX delivers the dual band and more bandwidth to avoid signal interference and ensure the best Wi-Fi performance. It allows you to check e-mails and surf the Internet via the 2.4GHz band and simultaneously watch full high-definition (HD) video or any other multimedia application via one 5GHz band.
User Manual of WDAP-C1800AX &WDAP-1800AX - 16 -
User Manual of WDAP-C1800AX &WDAP-1800AX 1.3 Product Features (Please refer to PLANET website for WDAP-1800AX information.) Industrial Compliant Wireless LAN Compliant with the IEEE 802.11a/b/g/n/ac/ax wireless technology Equipped with 10/100/1000Mbps RJ45 ports, and auto MDI/MDI-X RF Interface Characteristics 802.11ax 2T2R architecture with data rate of up to 1800Mbps (600Mbps in 2.
User Manual of WDAP-C1800AX &WDAP-1800AX Self-healing mechanism through system auto reboot setting System status monitoring through remote syslog server Gateway mode supports PLANET DDNS/Easy DDNS, Captive Portal, RADIUS Server/Client - 18 -
User Manual of WDAP-C1800AX &WDAP-1800AX 1.4 Product Specifications Product WDAP-C1800AX Dual Band 802.11ax 1800Mbps Ceiling-mount Wireless Access Point Hardware Specifications Interfaces Antennas Reset Button LAN 2 x 10/100/1000BASE-T RJ45 port Auto-negotiation and auto MDI/MDI-X Gain: 4 x Internal 4dBi antenna (2.4G x2, 5G x2) Reset button on the rear side (Press over 5 seconds to reset the device to factory default) LED Indicators Power, SYS Dimensions (W x D x H) 186 x 186 x 35.
User Manual of WDAP-C1800AX &WDAP-1800AX ETSI: 5.180~5.700GHz ETSI: 2.4GHz: 1, 2, 3, 4, 5, 6, 7, 8, 9, 10, 11, 12, 13 (13 Channels) 5GHz: 36, 40, 44, 48, 52, 56, 60, 64, 100, 104, 108, 112, 116, 120,124,128,132, 136, 140 (19 Channels) Operating Channels FCC: 2.
User Manual of WDAP-C1800AX &WDAP-1800AX 802.11ax HT20 802.11ax HT40 802.
User Manual of WDAP-C1800AX &WDAP-1800AX Remote management through PLANET DDNS/ Easy DDNS Configuration backup and restore Management Supports UPnP Supports IGMP Proxy Supports PPTP/L2TP/IPSec VPN Pass-through Supports Captive Portal, RADIUS Server/Client Central Management Applicable controllers: NMS-500, NMS-1000V, PLANET CloudViewer Environment & Certification Temperature Humidity Regulatory Operating: -20~ 55 degrees C Storage: -40 ~ 70 degrees C Operating: 10 ~ 90% (non-condensing) Storage: 5 ~ 90
User Manual of WDAP-C1800AX &WDAP-1800AX Product WDAP-1800AX Dual Band 802.11ax 1800Mbps Outdoor Wireless AP Hardware Interface PoE WAN: 1 x 10/100/1000BASE-T, auto-MDI/MDIX, 802.3at PoE In Antenna Built-in four N-type connectors Button Reset button (Press over 5 seconds to reset the device to factory default) Dimensions (W x D x H) 231 x 80 x 295 mm Weight 2.5kg Material Aluminum Power Requirement 48V 0.5A, IEEE 802.3at PoE+ Power Consumption (max.
User Manual of WDAP-C1800AX &WDAP-1800AX 5GHz: FCC: 5.180~5.240GHz, 5.745~5.825GHz ETSI: 5.180~5.700GHz ETSI: 2.4GHz: 1, 2, 3, 4, 5, 6, 7, 8, 9, 10, 11, 12, 13 (13 Channels) 5GHz: 36, 40, 44, 48, 52, 56, 60, 64, 100, 104, 108, 112, 116, 120,124,128,132, 136, 140 (19 Channels) Operating Channels FCC: 2.
User Manual of WDAP-C1800AX &WDAP-1800AX 802.11ac HT40 802.11ac HT80 802.11ax HT20 802.11ax HT40 802.
User Manual of WDAP-C1800AX &WDAP-1800AX System Log supports remote syslog server VLAN Self-healing *IEEE 802.
User Manual of WDAP-C1800AX &WDAP-1800AX Chapter 2. Physical Descriptions 2.1 Product Outlook WDAP-C1800AX Dimensions: 186 x 186 x 35.
User Manual of WDAP-C1800AX &WDAP-1800AX LED Definition LED PWR SYS STATUS FUNCTION On ( Red ) The access point is on. Off System is operating. On Wireless LAN is initializing. Blinking (Cyan/Green) Rear View -6- 2.4GHzHz/5GHzHz wireless LAN is working.
User Manual of WDAP-C1800AX &WDAP-1800AX Bottom Panel Port definition Object 12V DC Description 12V DC port for the power adapter( DC-Jack 5.5 x 2.1mm ) LED The access point is on. PoE LAN port with Power over Ethernet (PoE) IN LAN LAN port connecting to the network equipment. Reset To restore to the factory default setting, press and hold the Reset Button for about 15 seconds, and then release it.
User Manual of WDAP-C1800AX &WDAP-1800AX WDAP-1800AX Dimensions: 231 x 80 x 295mm Weight: 2500 ±5GHz Apperance -1-
User Manual of WDAP-C1800AX &WDAP-1800AX Port & Connector Hardware Interface Definition Object Description Antenna Connectors 4 N-type (female) antenna connectors PoE LAN Port 10/100/1000Mbps RJ45 port, auto MDI/MDI-X 802.3at PoE+ supported, 48VDC In Reset Button Grounding Terminal Press and hold the Reset button for over 5 seconds to return to the factory default setting. The grounding wire must be attached to this port to prevent damage to the AP from direct lightning strike.
User Manual of WDAP-C1800AX &WDAP-1800AX Chapter 3. Preparation Before getting into the device’s web UI, user has to check the network setting and configure PC’s IP address. 3.1 System Requirements Broadband Internet Access Service (Cable/xDSL/Ethernet connection) One IEEE 802.3at PoE switch (supply power to the WDAP-C1800AX) PCs with a working Ethernet adapter and an Ethernet cable with RJ45 connectors PCs running Windows 98/ME, NT4.
User Manual of WDAP-C1800AX &WDAP-1800AX 3.2 Hardware Installation Installing the AP Before installing the AP, make sure your PoE switch is connected to the Internet through the broadband service successfully at this moment. If there is any problem, please contact your local ISP. Please install the AP according to the following steps. Don't forget to pull out the power plug and keep your hands dry. Step 1.
User Manual of WDAP-C1800AX &WDAP-1800AX Figure 3-2 Connecting the Ethernet Cable Step 3. Plug the other end of the Ethernet cable into the PoE switch.
User Manual of WDAP-C1800AX &WDAP-1800AX 3.3 Manual Network Setup -- TCP/IP Configuration The default IP address of the WDAP-C1800AX is 192.168.1.253. And the default subnet mask is 255.255.255.0. These values can be changed as you want. In this guide, we use all the default values for description. Connect the WDAP-C1800AX with your PC by plugging one end of an Ethernet cable in the LAN port of the AP and the other end in the LAN port of PC. The WDAP-C1800AX is powered by a PoE switch.
User Manual of WDAP-C1800AX &WDAP-1800AX Figure 3-4 TCP/IP Setting Now click OK to save your settings. Now, you can run the ping command in the command prompt to verify the network connection between your PC and the AP. The following example is in Windows 10 OS. Please follow the steps below: 1. Click on Start > Run. 2. Type “cmd” in the Search box.
User Manual of WDAP-C1800AX &WDAP-1800AX Figure 3-5 Windows Start Menu 3. Open a command prompt, type ping 192.168.1.253 and then press Enter. If the result displayed is similar to Figure 4-3, it means the connection between your PC and the AP has been established well.
User Manual of WDAP-C1800AX &WDAP-1800AX Figure 3-6 Successful Result of Ping Command If the result displayed is similar to Figure 4-4, it means the connection between your PC and the AP has failed. Figure 3-7 Failed Result of Ping Command If the address is 0.0.0.0, check your adapter installation, security settings, and the settings on your AP. Some firewall software programs may block a DHCP request on newly installed adapters.
User Manual of WDAP-C1800AX &WDAP-1800AX 3.4 Starting Setup in the Web UI It is easy to configure and manage the AP with the web browser. Step 1. To access the configuration utility, open a web-browser and enter the default IP address http://192.168.1.253 in the web address field of the browser. Figure 3-8 Login by Default IP Address Step 1. When the login window pops up, please enter username and password. The default username and password are “admin”. Then click the LOGIN button to continue.
User Manual of WDAP-C1800AX &WDAP-1800AX 3.5 Planet Smart Discovery Utility To easily list the WDAP-C1800AX in your Ethernet environment, the Planet Smart Discovery Utility is an ideal solution. The following installation instructions guide you to running the Planet Smart Discovery Utility. Step 1: Download the Planet Smart Discovery Utility to administrator PC. Step 2: Run this utility and the following screen appears.
User Manual of WDAP-C1800AX &WDAP-1800AX Chapter 4. Web-based Management This chapter delivers a detailed presentation of AP’s functionalities and allows you to manage the AP with ease. (The web GUI and topology below uses the WDAP-C1800AX as an example.) Main Menu Function Menu Figure 4-1 Main Web Page ■ Main Menu The main menu displays the product name, function menu, and main information in the center.
User Manual of WDAP-C1800AX &WDAP-1800AX Object Description System Provides system information of the router. Network Provides WAN, LAN and network configuration of the router. Security Provides firewall and security configuration of the router. Wireless Provides wireless configuration of the router. Maintenance Provides firmware upgrade and setting file restore/backup configuration of the router.
User Manual of WDAP-C1800AX &WDAP-1800AX 4.1 System Use the system menu items to display and configure basic administrative details of the router. The System menu shown in Figure 4-4 provides the following features to configure and monitor system. Figure 4-4: System Menu Object Operation Mode Description The Wizard will guide the user to configuring the router easily and quickly. Dashboard The overview of system information includes connection, port, and system status.
User Manual of WDAP-C1800AX &WDAP-1800AX Remote Syslog Enable Captive Portal on routers Event Log Display Event Log information 4.1.1 Operation Mode The Wizard guides you to configuring the WDAP-C1800AX in a different mode, including AP, gateway and repeater modes. Figure 4-5 Operation Mode The default operation mode is AP Mode.
User Manual of WDAP-C1800AX &WDAP-1800AX 4.1.2 Gateway Mode (Router) Click “Wizard” “Gateway Mode” and the following page will be displayed. This section allows you to configure the Gateway mode. Figure 4-6: Setup Wizard Step 1: Operation Mode Select operation Mode. Step 2: LAN Interface Set up the IP Address and Subnet Mask for the LAN interface as shown in Figure 4-7.
User Manual of WDAP-C1800AX &WDAP-1800AX Figure 4-7: Setup Wizard – LAN Configuration Object Description IP Address Enter the IP address of your router. The default is 192.168.1.1. Subnet Mask An address code that determines the size of the network. Normally use 255.255.255.0 as the subnet mask. DHCP Server Start IP Address By default, the DHCP Server is enabled. If user needs to disable the function, please uncheck the box. By default, the start IP address is 192.168.1.100.
User Manual of WDAP-C1800AX &WDAP-1800AX Figure 4-8: Setup Wizard – WAN 1 Configuration Mode 1 -- Static IP Select Static IP Address if all the Internet port’s IP information is provided to you by your ISP. You will need to enter the IP Address, Netmask, Default Gateway and DNS Server provided to you by your ISP. Each IP address entered in the fields must be in the appropriate IP form, which are four octets separated by a dot (x.x.x.x).
User Manual of WDAP-C1800AX &WDAP-1800AX Default Gateway Enter the Gateway assigned by your ISP. DNS Server The DNS server information will be supplied by your ISP. Next Press this button for the next step. Previous Press this button for the previous step. Cancel Press this button to undo any changes made locally and revert to previously saved values. Mode 2 -- DHCP Client Select DHCP Client to obtain IP Address information automatically from your ISP. The setup is shown in Figure 4-10.
User Manual of WDAP-C1800AX &WDAP-1800AX Figure 4-11: Network Setup Step 5: Security Setting Set up the Security Settings as shown in Figure 4-12.
User Manual of WDAP-C1800AX &WDAP-1800AX Object Description The SPI Firewall prevents attack and improper access to network SPI Firewall resources. The default configuration is enabled. SYN Flood is a popular attack way. DoS and DDoS are TCP Block SYN Flood protocols. Hackers like using this method to make a fake connection that involves the CPU, memory, and so on. The default configuration is enabled.
User Manual of WDAP-C1800AX &WDAP-1800AX Figure 4-13: Setup Wizard – Setup Completed Object Description Finish Press this button to save and apply changes. Previous Press this button for the previous step.
User Manual of WDAP-C1800AX &WDAP-1800AX 4.1.3 Dashboard The dashboard provides an overview of system information including connection, port, and system status as shown in Figure 4-14. Figure 4-14: Dashboard Port Status Object Description Ethernet port is in use. Ethernet port is not in use. Wireless Status Object Description Wireless is in use. Wireless is not in use.
User Manual of WDAP-C1800AX &WDAP-1800AX CPU Display the CPU loading Memory Display the memory usage 4.1.4 System Status This page displays system information as shown in Figure 4-15.
User Manual of WDAP-C1800AX &WDAP-1800AX 4.1.5 System Service This page displays the number of packets that pass through the router on the WAN and LAN. The statistics are shown in Figure 4-16. Figure 4-16: Service 4.1.6 Statistics This page displays the number of packets that pass through the router on the WAN and LAN. The statistics are shown in Figure 4-17.
User Manual of WDAP-C1800AX &WDAP-1800AX Figure 4-17: Statistics 4.1.7 Connection Status The page will show the DHCP Table and ARP Table. The status is shown in Figure 4-18.
User Manual of WDAP-C1800AX &WDAP-1800AX 4.1.8 RADIUS Remote Authentication Dial-In User Service (RADIUS) is a security authentication client/server protocol that supports authentication, authorization and accounting. The RADIUS Server page is shown in Figure 4-19. Figure 4-19: RADIUS Object Description Disable or enable the RADIUS function. RADIUS The default configuration is disabled. Default: 1812 Server Port 4.1.
User Manual of WDAP-C1800AX &WDAP-1800AX ■ Customizing the Custom Captive Portal Web Page 1. Click Custom 2. After configure and upload image, click Apply Settings button 3.
User Manual of WDAP-C1800AX &WDAP-1800AX 4.1.10 SNMP This page provides SNMP setting of the router as shown in Figure 4-21. Figure 4-21: SNMP Object Enable SNMP Description Disable or enable the SNMP function. The default configuration is enabled. Read/Write Community Allows entering characters for SNMP Read/Write Community of the router. System Name Allows entering characters for system name of the router. System Location Allows entering characters for system location of the router.
User Manual of WDAP-C1800AX &WDAP-1800AX 4.1.11 NMS The CloudViewer Server – Internet screens – is shown in Figure 4-22. Figure 4-22: CloudViewer Server Object 4.1.
User Manual of WDAP-C1800AX &WDAP-1800AX 4.1.
User Manual of WDAP-C1800AX &WDAP-1800AX 4.2 Network The Network function provides WAN, LAN and network configuration of the router as shown in Figure 4-25. Figure 4-25: Network Menu Object Description WAN Allows setting WAN interface. LAN Allows setting LAN interface. UPnP Routing RIP OSPF IGMP Disable or enable the UPnP function. The default configuration is disabled. Allows setting Route. Disable or enable the RIP function. The default configuration is disabled.
User Manual of WDAP-C1800AX &WDAP-1800AX 4.2.1 WAN This page is used to configure the parameters for Internet network which connects to the WAN port of the router as shown in Figure 4-26. Here you may select the access method by clicking the item value of WAN access type.
User Manual of WDAP-C1800AX &WDAP-1800AX Figure 4-26: WAN Object Description Please select the corresponding WAN Access Type for the Internet, and fill out the correct parameters from your local ISP in the fields which appear below. Select Static IP Address if all the Internet ports’ IP information is provided to you by your ISP (Internet Service Provider). You will need to enter the IP address, Netmask, Gateway, and DNS Server provided to you by your ISP.
User Manual of WDAP-C1800AX &WDAP-1800AX Object Description Enter the Gateway assigned by your ISP. DNS Server The DNS server information will be supplied by your ISP. DHCP Select DHCP Client to obtain IP Address information automatically from your ISP. Select PPPOE if your ISP is using a PPPoE connection PPPoE and provide you with PPPoE user name and password info. PPTP L2TP Enable or disable PPTP to pass through PPTP communication data.
User Manual of WDAP-C1800AX &WDAP-1800AX 4.2.3 UpnP Figure 4-28: UpnP Object Description Set the function as enable or disable UpnP 4.2.4 Routing Please refer to the following sections for the details as shown in Figures 4-30 and 31. Figure 4-29: Routing table Figure 4-30: Routing setup Routing tables contain a list of IP addresses. Each IP address identifies a remote router (or other network gateway) that the local router is configured to recognize.
User Manual of WDAP-C1800AX &WDAP-1800AX remote device will accept. Object Description There are two types: Host and Net. Type When the Net type is selected, user does not need to input the Gateway. Destination The network or host IP address desired to access. Net Mask The subnet mask of destination IP. The gateway is the router or host’s IP address to which packet was Gateway sent. It must be the same network segment with the WAN or LAN port.
User Manual of WDAP-C1800AX &WDAP-1800AX 4.2.5 RIP Figure 4-31 RIP Object Description Dynamic Route Disable or enable the RIP function RIP Versions Set RIP Versions 4.2.6 OSPF Figure 4-32: OSPF Object Description OSPF Enable the OSPF function.
User Manual of WDAP-C1800AX &WDAP-1800AX 4.2.7 IGMP Figure 4-33: IGMP Object Description IGMP Enable the IGMP function. IGMP Versions Select the GMP Versions 4.2.8 IPv6 This page is used to configure parameter for IPv6 internet network which connects to WAN port of the router as shown in Figure 4-35. It allows you to enable IPv6 function and set up the parameters of the router’s WAN. In this setting you may change WAN connection type and other settings.
User Manual of WDAP-C1800AX &WDAP-1800AX Figure 4-34: IPv6 WAN setup Object Description Connection Type Select IPv6 WAN type either by using DHCP or Static. IPv6 Address Enter the WAN IPv6 address. Subnet Prefix Length Enter the subnet prefix length. Default Gateway Enter the default gateway of the WAN port. IPv6 DNS Server 1 Input a specific DNS server IPv6 DNS Server 2 Input a specific DNS server 4.2.
User Manual of WDAP-C1800AX &WDAP-1800AX Figure 4-35: DHCP Object Description By default, the DHCP Server is enabled, meaning the router will DHCP Service assign IP addresses to the DHCP clients automatically. If user needs to disable the function, please set it as disable. Start IP Address By default, the start IP address is 192.168.1.100. Please do not set it to the same IP address of the router.
User Manual of WDAP-C1800AX &WDAP-1800AX 4.2.10 DDNS The router offers the DDNS (Dynamic Domain Name System) feature, which allows the hosting of a website, FTP server, or e-mail server with a fixed domain name (named by yourself) and a dynamic IP address, and then your friends can connect to your server by entering your domain name no matter what your IP address is. Before using this feature, you need to sign up for DDNS service providers such as PLANET DDNS (http://www.planetddns.
User Manual of WDAP-C1800AX &WDAP-1800AX Figure 4-36: PLANET DDNS Object DDNS Service Interface Description By default, the DDNS service is disabled. If user needs to enable the function, please set it as enable. User is able to select the interface for DDNS service. By default, the interface is WAN 1. There are three options: DDNS Type 1. PLANET DDNS: Activate PLANET DDNS service. 2. DynDNS: Activate DynDNS service. 3. NOIP: Activate NOIP service.
User Manual of WDAP-C1800AX &WDAP-1800AX 4.3 Security The Security menu provides Firewall, Access Filtering and other functions as shown in Figure 4-37. Please refer to the following sections for the details. Figure 4-37: Security menu Object Description Firewall Allows setting DoS (Denial of Service) protection as enable. MAC Filtering Allows setting MAC Filtering. IP Filtering Allows setting IP Filtering. Web Filtering Allows setting Web Filtering.
User Manual of WDAP-C1800AX &WDAP-1800AX 4.3.1 Firewall A "Denial-of-Service" (DoS) attack is characterized by an explicit attempt by hackers to prevent legitimate users of a service from using that service. The router can prevent specific DoS attacks as shown in Figure 4-38.
User Manual of WDAP-C1800AX &WDAP-1800AX The SPI Firewall prevents attack and improper access to network SPI Firewall resources. The default configuration is enabled. SYN Flood is a popular attack way. DoS and DDoS are TCP Block SYN Flood protocols. Hackers like using this method to make a fake connection that involves the CPU, memory, and so on. The default configuration is enabled.
User Manual of WDAP-C1800AX &WDAP-1800AX Enable the function to allow the web server access of the router from Remote Management the Internet network. The default configuration is disabled. Temporarily block when login failed The default is 0. (0 means no limit) IP blocking period The default is 0. (0 means permanent blocking) Blocked IP 0.0.0.0 FTP ALG Set the function as enable or disable TFTP ALG Set the function as enable or disable RTSP ALG Set the function as enable or disable H.
User Manual of WDAP-C1800AX &WDAP-1800AX 4.3.2 MAC Filtering Entries in this table are used to restrict certain types of data packets from your local network or Internet through the router. Use of such filters can be helpful in securing or restricting your local network as shown in Figure 4-39. Figure 4-39: MAC Filtering Object Description Set the function as enable or disable. Enable MAC Filtering When the function is enabled, the router will block traffic of the MAC address on the list.
User Manual of WDAP-C1800AX &WDAP-1800AX 4.3.4 IP Filtering IP Filtering is used to deny LAN users from accessing the public IP address on internet as shown in Figure 4-40. To begin blocking access to an IP address, enable IP Filtering and enter the IP address of the web site you wish to block. Figure 4-40: IP Filtering Object Description IP Filtering Set the function as enable or disable. Add IP Filtering Rule Go to the Add Filtering Rule page to add a new rule.
User Manual of WDAP-C1800AX &WDAP-1800AX Object Anywhere (of source IP Address) Description Check the box if you want to control all LAN users. Destination IP Address Input the IP address of web site which you want to block. Anywhere (of destination Check the box if you want to control all web sites, meaning the LAN IP Address) user can’t visit any web site. Destination Port Protocol Input the port of destination IP Address which you want to block.
User Manual of WDAP-C1800AX &WDAP-1800AX 4.3.6 Web Filtering Web filtering is used to deny LAN users from accessing the internet as shown in Figure 4-43. Block those URLs which contain keywords listed below. Figure 4-41: Web Filtering Object Description Web Filtering Set the function as enable or disable. Add Web Filtering Rule Go to the Add Web Filtering Rule page to add a new rule.
User Manual of WDAP-C1800AX &WDAP-1800AX 4.3.8 Port Forwarding Entries in this table allow you to automatically redirect common network services to a specific machine behind the NAT firewall as shown in Figure 4-43. These settings are only necessary if you wish to host some sort of server like a web server or mail server on the private local network behind your Router's NAT firewall. Figure 4-43: Port Forwarding Object Description Port Forwarding Set the function as enable or disable.
User Manual of WDAP-C1800AX &WDAP-1800AX Object Description the service. If the service uses a single port number, enter it in both the start and finish fields. Virtual Server IP Address Enter the local IP address. Enter local ports you want to control. For TCP and UDP Services, Internal Service Port enter the beginning of the range of port numbers used by the service. If the service uses a single port number, enter it in both the start and finish fields.
User Manual of WDAP-C1800AX &WDAP-1800AX 4.3.
User Manual of WDAP-C1800AX &WDAP-1800AX 4.3.11 DMZ A Demilitarized Zone is used to provide Internet services without sacrificing unauthorized access to its local private network as shown in Figure 4-46.Typically, the DMZ host contains devices accessible to Internet traffic, such as Web (HTTP) servers, FTP servers, SMTP (e-mail) servers and DNS servers. Figure 4-46: DMZ Object Description Set the function as enable or disable.
User Manual of WDAP-C1800AX &WDAP-1800AX 4.4 Wireless The Wireless menu provides the following features for managing the system Figure 4-47: Wireless Menu Object Description Repeater Allow to configure Repeater. 2.4G Wi-Fi Allow to configure 2.4G Wi-Fi. 5G Wi-Fi Allow to configure 5G Wi-Fi. MAC ACL Allow configure MAC ACL. Wi-Fi Advanced Allow to configure advanced setting of Wi-Fi. Wi-Fi Statistics Display the statistics of Wi-Fi traffic. Connection Status Display the connection status.
User Manual of WDAP-C1800AX &WDAP-1800AX Figure 4-48: Repeater Object Description Select Radio Select “2.4GHz” or “5GHz” wireless LAN. SSID (Wireless Name ) Enter the root AP’s SSID or press “Scan” to select. Lock BSSID Enable/disable to lock the root AP’s MAC address. BSSID The root AP’s MAC address Encryption Select the wireless encryption of root AP. The default is “Open” 4.4.2 2.4G Wi-Fi This page allows the user to define 2.4G Wi-Fi. Figure 4-49: 2.
User Manual of WDAP-C1800AX &WDAP-1800AX “PLANET_2.4G” Hide SSID Allows user to enable or disable SSID Wireless Mode Select the operating wireless mode Channel It shows the channel of the CPE. Default 2.4GHz is channel 6. Encryption Select the wireless encryption. The default is “Open” Wi-Fi Multimedia Enable/Disable WMM (Wi-Fi Multimedia ) function VLAN ID Setting VLAD ID 4.4.3 5G Wi-Fi This page allows the user to define 5G Wi-Fi.
User Manual of WDAP-C1800AX &WDAP-1800AX 4.4.4 MAC ACL This page allows the user to define MAC ACL.
User Manual of WDAP-C1800AX &WDAP-1800AX 4.4.5 Wi-Fi Advanced This page allows the user to define advanced setting of Wi-Fi. Figure 4-52: Wi-Fi Advanced Object 2.4GHz Maximum Associated Description The maximum users are 75 Clients 5GHz Maximum Associated The maximum users are 75 Clients 2.4G Coverage Threshold The coverage threshold is to limit the weak signal of clients occupying session.
User Manual of WDAP-C1800AX &WDAP-1800AX RTS Threshold Enable or Disable RTS/CTS protocol. It can be used in the following scenarios and used by Stations or Wireless AP. 1) When medium is too noisy or lots of interferences are present. If the AP/Station cannot get a chance to send a packet, the RTS/CTS mechanism can be initiated to get the packet sent. 2) In mixed mode, the hidden node problem can be avoided. The default value is 2347 4.4.6 Wi-Fi Statistics This page shows the statistics of Wi-Fi traffic.
User Manual of WDAP-C1800AX &WDAP-1800AX Figure 4-53: Wi-Fi Statistics 4.4.7 Connection Status This page shows the host names and MAC address of all the clients in your network Figure 4-54: Connection Status Object Description Name Display the host name of connected clients. MAC Address Display the MAC address of connected clients. Signal Display the connected signal of connected clients. Connected Time Display the connected time of connected clients.
User Manual of WDAP-C1800AX &WDAP-1800AX 4.5 Maintenance The Maintenance menu provides the following features for managing the system Figure 4-55: Maintenance Object Description Administrator Allows changing the login username and password. Date & Time Allows setting Date & Time function. Save/Restore Export the router’s configuration to local or USB sticker. Configuration Restore the router’s configuration from local or USB sticker.
User Manual of WDAP-C1800AX &WDAP-1800AX Figure 4-56: Administrator Object Description Username Input a new username. Password Input a new password. Confirm Password Input password again. 4.5.2 Date and Time This section assists you in setting the system time of the router. You are able to either select to set the time and date manually or automatically obtain the GMT time from Internet as shown in Figure 4-57.
User Manual of WDAP-C1800AX &WDAP-1800AX NTP Client Update NTP Server Once this function is enabled, router will automatically update current time from NTP server. User may use the default NTP sever or input NTP server manually. 4.5.3 Saving/Restoring Configuration This page shows the status of the configuration.
User Manual of WDAP-C1800AX &WDAP-1800AX Figure 4-59: Firmware upgrade Object Description Choose File Press the button to select the firmware. Upgrade Press the button to upgrade firmware to system. 4.5.5 Reboot / Reset This page enables the device to be rebooted from a remote location. Once the Reboot button is pressed, users have to re-log in the Web interface as Figure 4-60 is shown below: Figure 4-60: Reboot/Reset Object Description Reboot Press the button to reboot system.
User Manual of WDAP-C1800AX &WDAP-1800AX 4.5.6 Auto Reboot Figure 4-61: Auto Reboot Object Description Auto Reboot Disable or enable the Auto Reboot function. Reboot Type Set the function type. Time Select reboot time for clock 4.5.7 Diagnostics The page allows you to issue ICMP PING packets to troubleshoot IP connectivity issues. After you press “Ping”, ICMP packets are transmitted, and the sequence number and roundtrip time are displayed upon reception of a reply.
User Manual of WDAP-C1800AX &WDAP-1800AX Figure 4-62: Ping Object Description Interface Select an interface of the router. Target Host The destination IP Address or domain. Number of Packets Set the number of packets that will be transmitted; the maximum is 100. Ping The time of ping.
User Manual of WDAP-C1800AX &WDAP-1800AX Figure 4-63: Trace Route Object Description Target Host The destination IP Address or domain. Trace The time of ping. Be sure the target IP address is within the same network subnet of the router, or you have to set up the correct gateway IP address.
User Manual of WDAP-C1800AX &WDAP-1800AX Chapter 5. Quick Connection to a Wireless Network In the following sections, the default SSID of the WDAP-C1800AX is configured to “default”. 5.
User Manual of WDAP-C1800AX &WDAP-1800AX Figure 5-1 Choosing a Wireless Network Step 4: Enter the encryption key of the wireless AP (1) The Wireless Network Connection box will appear (2) Enter the encryption key that is configured in section 5.7.2.
User Manual of WDAP-C1800AX &WDAP-1800AX Figure 5-3 Choosing a Wireless Network -- Connected Some laptops are equipped with a “Wireless ON/OFF” switch for the internal wireless LAN. Make sure the hardware wireless switch is switched to “ON” position. 5.2 Windows 7/8/10 (WLAN AutoConfig) WLAN AutoConfig service is built-in in Windows 7 that can be used to detect and connect to wireless network. This built-in wireless network connection tool is similar to wireless zero configuration tool in Windows XP.
User Manual of WDAP-C1800AX &WDAP-1800AX (2) Click the [Connect] button Figure 5-5 WLAN AutoConfig If you will be connecting to this Wireless AP in the future, check [Connect automatically]. Step 4: Enter the encryption key of the wireless AP (1) The Connect to a Network box will appear. (2) Enter the encryption key that is configured in section 5.7.2.1 (3) Click the [OK] button.
User Manual of WDAP-C1800AX &WDAP-1800AX Figure 5-6 Typing the Network Key Figure 5-7 Connecting to a Network - 74 -
User Manual of WDAP-C1800AX &WDAP-1800AX Step 5: Check if “Connected” is displayed.
User Manual of WDAP-C1800AX &WDAP-1800AX 5.3 Mac OS X 10.x In the following sections, the default SSID of the WDAP series is configured to “default”. Step 1: Right-click on the network icon displayed in the system tray The AirPort Network Connection menu will appear. Figure 5-9 Mac OS – Network Icon Step 2: Highlight and select the wireless network (SSID) to connect (1) Select and SSID [default]. (2) Double-click on the selected SSID.
User Manual of WDAP-C1800AX &WDAP-1800AX Step 4: Enter the encryption key of the wireless AP (1) Enter the encryption key that is configured in section 5.7.2.1 (2) Click the [OK] button. Figure 5-11 Enter the Password If you will be connecting to this Wireless AP in the future, check [Remember this network].
User Manual of WDAP-C1800AX &WDAP-1800AX Step 5: Check if the AirPort is connected to the selected wireless network. If “Yes”, then there will be a “check” symbol in front of the SSID.
User Manual of WDAP-C1800AX &WDAP-1800AX There is another way to configure the MAC OS X wireless settings: Step 1: Click and open the [System Preferences] by going to Apple > System Preference or Applications Figure 5-13 System Preferences Step 2: Open Network Preference by clicking on the [Network] icon - 79 -
User Manual of WDAP-C1800AX &WDAP-1800AX Figure 5-14 System Preferences -- Network Step 3: Check Wi-Fi setting and select the available wireless network (1) Choose the AirPort on the left menu (make sure it is ON) (2) Select Network Name [default] here If this is the first time to connect to the Wireless AP, it should show “No network selected”.
User Manual of WDAP-C1800AX &WDAP-1800AX 5.4 iPhone/iPod Touch/iPad In the following sections, the default SSID of the WDAP series is configured to “default”. Step 1: Tap the [Settings] icon displayed in the home screen Figure 5-16 iPhone – Settings icon Step 2: Check Wi-Fi setting and select the available wireless network (1) Tap [General] \ [Network] (2) Tap [Wi-Fi] If this is the first time to connect to the Wireless AP, it should show “Not Connected”.
User Manual of WDAP-C1800AX &WDAP-1800AX Figure 5-18 Wi-Fi Setting – Not Connected Step 3: Tap the target wireless network (SSID) in “Choose a Network…” (1) Turn on Wi-Fi by tapping “Wi-Fi” (2) Select SSID [default] Figure 5-19 Turning on Wi-Fi - 82 -
User Manual of WDAP-C1800AX &WDAP-1800AX Step 4: Enter the encryption key of the Wireless AP (1) The password input screen will be displayed. (2) Enter the encryption key that is configured in section 5.7.2.1 (3) Tap the [Join] button.
User Manual of WDAP-C1800AX &WDAP-1800AX Step 5: Check if the device is connected to the selected wireless network. If “Yes”, then there will be a “check” symbol in front of the SSID.
User Manual of WDAP-C1800AX &WDAP-1800AX Appendix A: DDNS Application Configuring PLANET DDNS steps: Step 1: Visit DDNS provider’s web site and register an account if you do not have one yet. For example, register an account at http://planetddns.com Step 2: Enable DDNS option through accessing web page of the device. Step 3: Input all DDNS settings.
User Manual of WDAP-C1800AX &WDAP-1800AX Appendix B: FAQs Q1: How to Set Up the AP Client Connection Topology: - 86 -
User Manual of WDAP-C1800AX &WDAP-1800AX Step 1. Use static IP in the PCs that are connected with AP-1(Site-1) and AP-2(Site-2). In this case, Site-1 is “192.168.1.100”, and Site-2 is “192.168.1.200”. Step 2. In AP-2, change the default IP to the same IP range but different from AP-1. In this case, the IP is changed to 192.168.1.252. Step 3. In AP-1, go to “Wizard” to configure it to AP Mode. In AP-2, configure it to Repeater Mode.
User Manual of WDAP-C1800AX &WDAP-1800AX AP-2 Step 4. In AP-2, press “Scan “ to search the AP-1. You can also enter the MAC address, SSID, encryption and bandwidth if you know what they are. Step 5. Click “Next” to finish the setting.
User Manual of WDAP-C1800AX &WDAP-1800AX Step 6.Setup Completed Step 7. Use command line tool to ping each other to ensure the link is successfully established. From Site-1, ping 192.168.1.200; and in Site-2, ping 192.168.1.100.
User Manual of WDAP-C1800AX &WDAP-1800AX Step 8. Configure the TCP/IP settings of Site-2 to “Obtain an IP address automatically”.
User Manual of WDAP-C1800AX &WDAP-1800AX Step 9. Use command line tool to ping the DNS (e.g., Google) to ensure Site-2 can access internet through the wireless connection. The following hints should be noted: 1) The encryption method must be the same as that of both sites if configured. 2) Both sites should be Line-of-Sight. 3) For the short distance connection less than 1km, please reduce the "RF Output Power" of both sites.
User Manual of WDAP-C1800AX &WDAP-1800AX Appendix C: Troubleshooting If you find the AP is working improperly or stop responding to you, please read this troubleshooting first before contacting the dealer for help. Some problems can be solved by yourself within a very short time. Scenario Solution The AP is not responding to a. Please check the connection of the power cord and me when I want to access it the Ethernet cable of this AP. All cords and cables by Web browser.
User Manual of WDAP-C1800AX &WDAP-1800AX Scenario Solution something wrong with their service. f. If you just can’t connect to one or more website, but you can still use other internet services, please check URL/Keyword filter. g. Try to reset the AP and try again later. h. Reset the device provided by your Internet service provider too. i. Try to use IP address instead of host name. If you can use IP address to communicate with a remote server, but can’t use host name, please check DNS setting.
User Manual of WDAP-C1800AX &WDAP-1800AX Appendix D: Glossary 802.11ax - 802.11ax is a wireless networking standard in the 802.11 family by adding OFDMA, MU-MIMO (which is marketed under the brand name Wi-Fi 6), developed in the IEEE Standards Association process, providing high-throughput wireless local area networks (WLANs) on the 5GHz band 20、40、80、160MHz. 802.11ac - 802.11ac is a wireless networking standard in the 802.
User Manual of WDAP-C1800AX &WDAP-1800AX TCP/IP parameters for the all the PC(s) that are connected to a DHCP server. DMZ (Demilitarized Zone) - A Demilitarized Zone allows one local host to be exposed to the Internet for a special-purpose service such as Internet gaming or videoconferencing. DNS (Domain Name System) - An Internet Service that translates the names of websites into IP addresses. Domain Name - A descriptive name for an address or group of addresses on the Internet.
User Manual of WDAP-C1800AX &WDAP-1800AX EC Declaration of Conformity English Hereby, PLANET Technology Corporation, declares that this 11ac Wireless AP is in compliance with the essential requirements and other relevant provisions of Directive 2014/53/EU. Lietuviškai Šiuo PLANET Technology Corporation,, skelbia, kad 11ac Wireless AP tenkina visus svarbiausius 2014/53/EU direktyvos reikalavimus ir kitas svarbias nuostatas.