Internet Broadband Router XRT-401E User’s Manual 1
Copyright Copyright (C) 2005 PLANET Technology Corp. All rights reserved. The products and programs described in this User’s Manual are licensed products of PLANET Technology, This User’s Manual contains proprietary information protected by copyright, and this User’s Manual and all accompanying hardware, software, and documentation are copyrighted.
Trademarks The PLANET logo is a trademark of PLANET Technology. This documentation may refer to numerous hardware and software products by their trade names. In most, if not all cases, these designations are claimed as trademarks or registered trademarks by their respective companies. Revision User’s Manual for PLANET Internet Broadband Router: Model: XRT-401E Rev: 1.0 (Jan. 2005) Part No.
TABLE OF CONTENTS Chapter 1 Introduction..............................................................1 1.1 Features...................................................................................................... 1 1.2 Minimum Requirements .............................................................................. 1 1.3 Package Contents....................................................................................... 1 1.4 Get to know XRT-401E ..................................................
Glossary ..................................................................................
Chapter 1 Introduction Congratulations on purchasing PLANET XRT-401E. This Broadband Router is a cost-effective IP Sharing Router that enables multiple users to share the Internet through an ADSL or cable modem. Simply configure your Internet connection settings in XRT-401E and plug your PC to the LAN port and you're ready to share files and access the Internet. As your network grows, you can connect another hub or switch to the router’s LAN ports, allowing you to easily expand your network.
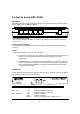
1.4 Get to know XRT-401E Back Panel The diagram below shows XRT-401E’s back panel. The router’s back panel is divided into three sections, LAN (1, 2, 3, 4), WAN and Reset: 1) Local Area Network (LAN) XRT-401E’s 4 LAN ports are where you connect your LAN’s PCs, printer servers, hubs and switches etc. 2) Wide Area Network (WAN) The WAN port is the segment connected to your xDSL or Cable modem and is linked to the Internet. 3) Reset The Reset button allows you to do one of two things.
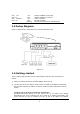
LAN 100 (Port 1-4) LAN LNK/ACT (Port 1-4) ON OFF ON OFF Flashing LAN port 100Mbps is connected LAN port 10Mbps is connected LAN is connected No LAN connection LAN port has Activity (ACT), data being sent 1.5 Setup Diagram Figure 1.2 below shows a typical setup for a Local Area Network (LAN). Figure 1.2 1.6 Getting started This is a step-by-step instruction on how to start using the router and get connected to the Internet. 1) Setup your network as shown in the setup diagram above (fig 1.2).
automatically for either Windows 95/98/Me, 2000 or NT operating systems. For other operating systems (Macintosh, Sun, etc.), follow the manufacturer’s instructions. The following is a step-by-step illustration on how to configure your PC to obtain an IP address automatically for 2a) Windows 95/98/Me, 2b) Windows XP, 2c) Windows 2000 and 2d) Windows NT. 2a) Windows 95/98/Me 1: Click the Start button and select Settings, then click Control Panel. The Control Panel window will appear.
8: Reboot the PC. Your PC will now obtain an IP address automatically from your Broadband Router’s DHCP server. ? Note: Please make sure that XRT-401E’s DHCP server is the only DHCP server available on your LAN. Once you’ve configured your PC to obtain an IP address automatically, please proceed to Step 3 2b) Windows XP 1: Click the Start button and select Settings, then click Network Connections. The Network Connections window will appear. 2: Double-click Local Area Connection icon.
5: Click OK to confirm the setting. Your PC will now obtain an IP address automatically from your Broadband Router’s DHCP server. ? Note: Please make sure that XRT-401E’s DHCP server is the only DHCP server available on your LAN. Once you’ve configured your PC to obtain an IP address automatically, please proceed to Step 3. 2c) Windows 2000 1: Click the Start button and select Settings, then click Control Panel. The Control Panel window will appear. 2: Double-click Network and Dial-up Connections icon.
6: Click OK to confirm the setting. Your PC will now obtain an IP address automatically from your Broadband Router’s DHCP server. ? Note: Please make sure that XRT-401E’s DHCP server is the only DHCP server available on your LAN. Once you’ve configured your PC to obtain an IP automatically, please proceed to Step 3. 2d) Windows NT 1: Click the Start button and select Settings, then click Control Panel. The Control Panel window will appear. 2: Double-click Network icon. The Network window will appear.
6: Check each of the tabs and verify the following settings: · IP Address: Select Obtain an IP address from a DHCP server. · DNS: Let all fields are blank. · WINS: Let all fields are blank. Routing: Let all fields are blank. · 7: Click OK to confirm the setting. Your PC will now obtain an IP address automatically from your Broadband Router’s DHCP server. ? Note: Please make sure that XRT-401E’s DHCP server is the only DHCP server available on your LAN.
5) The login screen below will appear. Enter the “User Name” and “Password” and then click to login. Note: By default the user name is “admin” and the password is “admin”. For security reasons it is recommended that you change the password as soon as possible (in General setup/system/password, see chapter 3) 6) Click on Wizard (see chapter 2) to start configuring settings required by your ISP so that you can start accessing the Internet.
Chapter 2 Wizard The Wizard section is designed to get you using XRT-401E as quick as possible. In the Wizard you are required to fill in only the information necessary to access the Internet. Once you click on the Wizard in the web page, you should see the screen below. Step 1) Host settings The Host Settings allows your router to set up Host name and Domain name, it also can set up its Time Zone and Daylight Saving Time, these will affect functions such as Log entries and Firewall settings.
Step 2) WAN settings In this section you have to select one of these types of connections that you will be using to connect your XRT-E Router’s WAN port to your ISP (see screen below). ? Note: Different ISP’s require different methods of connecting to the Internet, please check with your ISP as to the type of connection it requires. Menu Description 2.1 Cable Modem Your ISP will automatically give you an IP address 2.2 Fixed-IP xDSL Your ISP has given you an IP address already 2.
2.1 Cable Modem Choose Cable Modem if your ISP will automatically give you an IP address. Some ISP’s may also require that you fill in additional information such as MAC address (see screen below). ? Note: The MAC address section is optional and you can skip this section if your ISP does not require these settings for you to connect to the Internet. Parameter Description MAC Cloning If you want to clone your PC’s MAC address to XRT-401E, you must enable it first.
Parameter Description IP address assigned by your ISP This is the IP address that your ISP has given you. Subnet Mask Enter the Subnet Mask provided by your ISP (e.g. 255.255.255.0) ISP Gateway Address This is the ISP’s IP address gateway. 2.3 Dial-Up xDSL (PPPoE) Select Dial-Up xDSL (PPPoE) if your ISP requires the PPPoE protocol to connect you to the Internet. Your ISP should provide all the information required in this section.
Parameter Description User Name Enter the User Name provided by your ISP for the PPPoE connection. Password Enter the Password provided by your ISP for the PPPoE connection. Retype Password Re-enter the Password for confirmation. Service Name This is optional. Enter the Service name should your ISP requires it, otherwise leave it blank. Maximum Idle Time You can specify an idle time threshold (seconds) for the WAN port.
PPTP Password Enter the Password provided by your ISP for the PPTP connection. Retype Password Re-enter the Password for confirmation. Service IP Address Specify PPTP Server IP address that you want to connect to. My IP Address This is the IP address that your ISP has given you to establish a PPTP connection. My Subnet Mask Enter the Subnet Mask provided by your ISP. 255.255.255.0) (e.g. Connection ID This is the ID given by ISP. This is optional.
Parameter Description L2TP Account Enter the L2TP Account provided by your ISP for the PPTP connection. L2TP Password Enter the Password provided by your ISP for the L2TP connection. Retype Password Re-enter the Password for confirmation. Service IP Address Specify L2TP Server IP address that you want to connect to. My IP Address This is the IP address that your ISP has given you to establish a L2TP connection. My Subnet Mask Enter the Subnet Mask provided by your ISP. (e.g. 255.255.255.
Parameter Description Static DNS Server Select “Enabled” to allow configuring DNS manually. Primary DNS Address This is the ISP’s DNS server IP address that they gave you; or you can specify your own preferred DNS server IP address. Secondary DNS Address This is optional. You can enter another DNS server’s IP address as a backup. The secondary DNS will be used if the above DNS fail. Click when you have finished the configuration above.
Chapter 3 Advance Features If you have already configured the Wizard, you do NOT need to configure anything for you to start using the Internet. Advance features that allow you to configure the router to meet your network’s needs such as: Special Applications, Port Mapping, DMZ, Virtual Servers, ALG, and Firewall option. Below is a general description of what advance functions are available for this broadband router. Menu Description 3.
Parameters System Settings 3.1.1 System Status Description 3.1.2 System Settings This section Includes Host Name, Domain Name, Time Zone, Daylight Saving and NAT enable/disable. 3.1.3 Administrator Settings Allows you to set user name, password and the idle time out, you can specify a Host IP address that can perform remote management functions. 3.1.4 Firmware Upgrade This section allows you to upgrade the router’s firmware and display the concurrent firmware version. 3.1.
Parameter Description INTERNET This item shows XRT-401E’s current device settings. It displays XRT-401E LAN port’s current LAN IP Address, Subnet Mask, Gateway, DNS and Connection Type. GATEWAY This item displays XRT-401E current device settings, including IP Address, Subnet Mask, DHCP Server, NAT and Firewall Status. INFORMATION This item displays XRT-401E hardware device settings, including Connected Clients, Runtime Code Version and MAC Address. 3.1.
Daylight Saving The XRT-401E can also take Daylight savings into account. If you wish to use this function, you must select the enable box to enable your daylight saving configuration. NAT Select to enable or disable NAT function. 3.1.3 Administrator Settings The Administrator Settings function allows you to design user name, password and the idle time, it also can allow you to configure Remote Management function.
Idle Time Out If the inactive time exceeds the setting, XRT-401E will logout automatically. 0 means No timeout. Remote Management Enable To enable Remote Management function. IP Address This is the IP address of the host in the Internet that will have management/configuration access to XRT-401E from a remote site. If the IP Address is 0.0.0.0, this means anyone can access the router’s web console from a remote location Port The port number of remote management web interface. 3.1.
3.1.5 Configuration Tool The Configuration Tools screen allows you to save (Backup) the router’s current configuration setting. Saving the configuration settings provides an added protection and convenience, if the problems occur with the router and you have to reset to factory default. When you save the configuration setting (Backup) you can re-load the saved configuration into the router through the Restore selection.
3.1.6 System Log The Logs record various types of activity on XRT-401E. This data is useful for troubleshooting, but enabling all logs will generate a large amount of data and adversely affect performance. Since only a limited amount of log data can be stored in XRT-401E, log data can also be Emailed to your PC or sent to a Syslog Server.
Parameters Description System Log The Log records the router operating of activity on XRT-401E. Security Log The Log shows the current security log of XRT-401E. At the top of the content, the security log can be saved. Remote Log Setting Remote Log Select to allow saving the log to Syslog Server. Send Log to Enter the IP address of your Syslog Server. Email Log Select to allow mailing the log to specific user.
3.2.3 PPPoE Your ISP requires PPPoE connection. 3.2.4 PPTP Your ISP requires you to use a Point-to-Point Tunneling Protocol (PPTP) connection. 3.2.5 L2TP Your ISP requires L2TP connection. 3.2.1 Dynamic IP Choose the Dynamic IP selection if your ISP will automatically give you an IP address. Some ISP’s may also require that you fill in additional information such as MAC address (see chapter 2 “Cable Modem” for more detail).
Parameters Does ISP provide more IP addresses? Description Select if your ISP provide more than one IP address. More IP address Type the other IP address that ISP provide to you, this IP address will be useful in DMZ function. 3.2.3 PPPoE (PPP over Ethernet) Select PPPoE if your ISP requires the PPPoE protocol to connect you to the Internet. Your ISP should provide all the information required in this section.
Connection Mode Select the desired option: Keep-alive (maintain connection) The connection will never be disconnected by this device. If disconnected by your ISP, the connection will be re-established immediately. (However, this does not ensure that your Internet IP address will remain unchanged.) Auto-Connect An Internet connection is automatically made when required, and disconnected when idle for the time period specified by the "Maximum Idle Time (60~3600)".
WAN Interface Settings Dynamic IP To configure WAN Interface IP The ISP requires you to obtain an IP address by DHCP before connecting to the PPTP server. MAC Cloning Select to allow replacing the WAN MAC address with a specific MAC address. MAC Address Your ISP may require a particular MAC address in order for you to connect to the Internet. This MAC address is the PC’s MAC address that your ISP had originally connected your Internet connection to.
You must manually establish and terminate the connection. MPPE Select to enable “Microsoft Point to Point Encryption” ability. 3.2.5 L2TP Select L2TP if your ISP requires the L2TP protocol to connect you to the Internet. Your ISP should provide all the information required in this section. Parameter Description WAN Interface Settings Dynamic IP To configure WAN Interface IP The ISP requires you to obtain an IP address by DHCP before connecting to the L2TP server.
Your ISP may require a particular MAC address in order for you to connect to the Internet. This MAC address is the PC’s MAC address that your ISP had originally connected your Internet connection to. Type in this MAC address in this section or use the “Clone MAC Address” button to replace the WAN MAC address with the MAC address of that PC. Static IP L2TP Settings L2TP Account The ISP gives you a static IP to be used to connect to the PPTP server.
3.3 LAN The LAN Port screen below allows you to specify a private IP address for your router ’s LAN ports as well as a subnet mask for your LAN segment. Parameters Default Description LAN Settings IP address 192.168.0.1 This is the router’s LAN port IP address (Your LAN clients default gateway IP address) IP Subnet Mask 255.255.255.0 Specify a Subnet Mask for your LAN segment DHCP Server Enabled You can enable or disable the DHCP server.
Lease Time DNS Proxy DHCP Client List The DHCP when enabled will temporarily give your LAN clients an IP address. In the Lease Time setting you can specify the time period that the DHCP lends an IP address to your LAN clients. The DHCP will change your LAN client’s IP address when this time threshold period is reached Select that all DNS requests to a specific Domain Name will be routed to the XRT401E’s IP address.
3.4.5 DMZ The DMZ function allows you to re-direct all packets going to your WAN port IP address to a particular IP address in your LAN. 3.4.1 Virtual Server Use the Virtual Server function when you want different servers/clients in your LAN to handle different service/Internet application type (e.g. Email, FTP, Web server etc.) from the Internet. Computers use numbers called port numbers to recognize a particular service/Internet application type.
Comment The description of this setting. Enable To enable the rule of Virtual Server. 3.4.2 Special Applications Some applications require multiple connections, such as Internet games, video conferencing, Internet telephony and others. In this section you can configure the router to support multiple connections for these types of applications.
Example: Special Applications If you need to run applications that require multiple connections, then specify the port (outbound) normally associated with that application in the "Trigger Port" field. Then select the protocol type (TCP or UDP) and enter the public ports associated with the trigger port to open them up for inbound traffic. Example: ID Trigger Port Trigger Type Public Port Public Type Comment 1 28800 UDP 2300-2400, 47624 TCP MSN Game Zone 2 6112 UDP 6112 UDP Battle.
Parameter Description Server IP This is the private IP of the server behind the NAT firewall. Note: You need to give your LAN PC clients a fixed/static IP address for Port Forwarding to work properly. Mapping Ports The range of ports to be forward to the private IP. Type This is the protocol type to be forwarded. You can choose to forward “TCP” or “UDP” packets only or select “both” to forward both “TCP” and “UDP” packets. Comment The description of this setting.
3.4.5 DMZ If you have a local client PC that cannot run an Internet application (e.g. Games) properly from behind the NAT firewall, then you can open the client up to unrestricted two-way Internet access by defining a DMZ Host. The DMZ function allows you to re-direct all packets going to your WAN port IP address to a particular IP address in your LAN. The difference between the virtual server and the DMZ function is that the virtual server re-directs a particular service/Internet application (e.g.
2.5.3 URL Filtering URL Filtering allow you to specify which URLs can not be accessed by users. 2.5.4 MAC Control MAC Control allows you to specify which hosts users can or cannot access to Internet by MAC address. 3.5.1 Firewall Options XRT-401E's firewall can block common hacker attacks, including Denial of Service, Ping of Death, Port Scan and Sync Flood. If Internet attacks occur the router can log the events.
Parameters Description Firewall Options Enable Hacker Attack Protect Select it to enable Firewall Options function. Discard Ping From WAN The router’s WAN port will not respond to any Ping requests Unallow to Ping the Gateway The router’s LAN port will not respond to any Ping requests Drop Port Scan Packets Protection the router from Port Scan. Allow to Scan Security Port (113) Select to allow Identification Protocol (Port 113) to be scanned.
Parameters Description Enable Client Filter Select to enable “Client Filtering” function. IP Enter the IP address range that you wish to apply this rule. Port You can assign the specific port ranges. The router will block clients from accessing Internet services that use these ports. Type This allows you to select UDP, TCP or both protocols that you want to block. Block Time Select router will block the access forever.
Time Select a certain time in a day that you want to block. Comment The description of this setting. Enable To enable the rule of Client Filtering 3.5.3 URL Filtering You can block access to some Web sites from particular PCs by entering a full URL address or just keyword of the Web site. Parameters Description Enable URL Blocking Enable/disable URL Blocking IP Enter the IP address range that you wish to apply this rule.
Parameters MAC Address Control MAC Address Control Description Check “Enabled” to enable MAC Filtering. Select Filter out or only accept the following MAC address connects to Internet. Configure MAC Address MAC Address Fill in or “MAC Address” and “Comment” of the PC, or select the MAC Address from “Action”, and then click “Add”. 3.6 Routing This section allows you to set XRT-401E’s static route and check the current routing table.
Parameters Description Destination LAN IP, Subnet Mask Specify the destination LAN IP where the packets will be routing to. Gateway Specify the other gateway IP that will route the packets to the destination. 3.7 UPnP With UPnP, all PCs in you Intranet will discover this router automatically. So you do not have to do any configuration for your PC and can access the Internet through this router easily.
3.8 DDNS DDNS allows you to map the static domain name to a dynamic IP address. You must get an account, password and your static domain name from the DDNS service providers. Parameters Description Enable/Disable Enable/Disable the DDNS function of this router Host Name Your static domain name that use DDNS. DDNS Server Select a DDNS service provider. User Name The account that your DDNS service provider assigned to you. Password The password you set for the DDNS service account above.
Appendix A How to Manually find your PC’s IP and MAC address 1) In Window’s open the Command Prompt program 2) Type ipconfig /all and 46
· · · Your PC’s IP address is the one entitled IP address (192.168.0.7) The router’s IP address is the one entitled Default Gateway (192.168.0.
Glossary Default Gateway (Router): Every non-router IP device needs to configure a default gateway’s IP address. When the device sends out an IP packet, if the destination is not on the same network, the device has to send the packet to its default gateway, which will then send it out towards the destination. DHCP: Dynamic Host Configuration Protocol. This protocol automatically gives every computer on your home network an IP address.
ISP Gateway Address: (see ISP for definition). The ISP Gateway Address is an IP address for the Internet router located at the ISP's office. ISP: Internet Service Provider. An ISP is a business that provides connectivity to the Internet for individuals and other businesses or organizations. LAN: Local Area Network. A LAN is a group of computers and devices connected together in a relatively small area (such as a house or an office). Your home network is considered a LAN.
Subnet Mask: A subnet mask, which may be a part of the TCP/IP information provided by your ISP, is a set of four numbers (e.g. 255.255.255.0) configured like an IP address. It is used to create IP address numbers used only within a particular network (as opposed to valid IP address numbers recognized by the Internet, which must be assigned by InterNIC). TCP/IP, UDP: Transmission Control Protocol/Internet Protocol (TCP/IP) and Unreliable Datagram Protocol (UDP).