IEEE 802.
Foreword Explanation of the signals In order to let you set up and use this product correctly, please pay attention when reading or browsing the manual as you see these signals listed below. Warning/ Danger Users should read the explanation carefully and understand it completely, otherwise users might be in danger or even be injured. Caution/ Be Careful Remind users to be careful when setting up the product and to avoid damaging the product or its system programs.
FCC Certifications Federal Communication Commission Interference Statement This equipment has been tested and found to comply with the limits for a Class B digital device, pursuant to Part 15 of the FCC Rules. These limits are designed to provide reasonable protection against harmful interference in a residential installation.
Table of Contents FCC Certifications....................................................................................................................................3 Package Contents....................................................................................................................................5 Key Features .....................................................................................................................................6 Physical Description .......................
Package Contents 1. 2. 3. 4. 5. 6. CS-W02G2 x1 2dBi Antenna x1 Quick Installation Guide x1 CD-ROM(User’s Manual/Driver & Utility) x1 UTP Cable x1 Camera Mounting Bracket (Circular Foundation x1, Sustaining Pole x1, Universal Joint x1, Screwx3, Plastic Bolt x3) 7. AC Adapter x1 8.
Overview The CS-W02G2 wireless/wired network camera is a compact-size, easy-to-use and cost-effective solution ideal for home security and entertainment. With 1.3M pixel CMOS sensor technology, CS-W02G2 provides excellent image quality with digital pan/tilt/zoom monitoring capability. CS-W02G2 comes with a built-in web server that can be viewed via a standard browser such like Internet Explorer or Netscape browser.
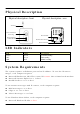
Physical Description Physical description - front Physical description - rear Antenna Lens and manual focus ring Reset button Power indicator LAN indicator RJ-45 LAN connector Power connector LED Indicators LED Power LAN LAN Color Green Green Red Description System ready LAN ready WLAN ready System Requirements The system requires an Ethernet port and an IP address. To view the IP camera images, each computer requires: Microsoft Windows 98, ME, NT4.0, 2000, XP or 2003. Mac or Linux based machine.
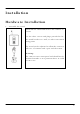
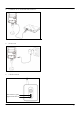
Installation Hardware Installation 1. Assemble the stand Assemble the stand and fix it to the camera as shown. Use the three screws and plugs provided to fix the stand bracket to a wall, or other convenient fixing point. The stand can be adjusted to allow the camera a full 360º of rotation and a pan and tilt action. Warning: The camera is not waterproof and should not be mounted outside or in a position where it could become wet.
2. Connect to a network hub/router 3. Power on 4.
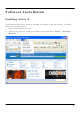
Software Installation Enabling Active X Your browser must have Active X enabled to connect to the IP camera. To enable Active X on your browser: 1. Open your internet browser. 2. Click on the tool bar at the top of the screen and select “Tools”→“Internet Options...
3. Select “Security” tab from the internet options menu. 4. Click “Custom Level” button and enable all the Active X features in the list and then choose “Medium” level from the “Reset to” list.
PC Cam Driver and Java Environment Installation 1. Run setup program from software CD Press “OK” to continue setup. If your system has not been installed of Java Run-time Environment, the setup program will install it first and then back to following steps. 2. Click “Next” 3.
4. Click “Install” 5. Click the check box to launch the network search tool and then click “Finish” 6.
7. Login in as “admin”. The default password is “0000”. 8. Use focus ring to manually adjust the frame to the intended focus.
Using IP Camera with MSN messenger Open MSN, select “Tools” and then “Audio and Video setup…” Click “Next”.
Click next to “Step 3: Webcam Setup”. Scroll down the list and select “Network Camera” and then click “Finish”. The default screen is blank. Click “Options…” to search the IP Camera.
Select the IP Camera which you want to use and then click “OK”. If the screen successfully reflects the viewing image of the IP camera, click “Finish”.
Using IP Camera with Skype Open Skype, select “Tools” and click “Options…”. Select “Video (Beta)” tab and scroll down the list to select “Network Camera”. Click “Test Webcam”.
Click “Webcam Settings”. Select the IP Camera which you want to use and then click “OK”.
Click “Close”.
Using IP Camera with Yahoo! Messenger In Yahoo! Messenger, select “Messenger” and click “My Webcam”.
Click “OK”. Select “File” and click “Preferences”.
Select “Webcam” on the menu and click “Camera Source…”. Scroll down the list and select “Network Camera” and click “OK”.
Click “Camera Settings…”.
Select the IP Camera which you want to use and click “OK”. Click “OK” to finish.
If successfully setting up CS-W02G2, My Webcam screen will show video from CS-W02G2.
Using IP Camera with Windows Movie Maker Launch Windows Movie Maker from “Start”→“Programs”→“Accessories”.
Select “capture from video device”. Select “Network Camera” and click “Configure…”.
Click “Camera Settings”. Select the IP Camera which you want to use and then click “OK”.
Click “Next”. Click “Next”.
Click “Start Capture” to start recording, “Stop Capture” to stop, and “Finish” when finished.
System Definitions Login Window Default user/password is admin/0000 Auto: detected automatically ActiveX: used for IE browser Jave: used for Netscape (and FireFox) browser 32
View Window Digital Pan/Tilt Snapshots (to c:\webcam) Logout IP Cam Settings Digital Zoom-in/ Zoom-out Image Setting On-screen display (OSD) (time stamp) CMOS sensor Refresh rate Status: resolution/number of user/frame rate Note: if displayed in red, it means motion detection occurs Recording (left click and then right click) in viewing area Status: IP Camera boot time File format File length File path Pre-file name 33
System Camera Camera Name Setting 34
User Existing user listing Input old password to confirm Input new user name Input new password Confirm new password Login user listing NTP Synchronize to local PC or time server Time zone setting 35
Motion Detection Enable/disable motion detection Enable e-mail when motion detected Intervals between two successive mail E-mail address and SMTP server settings Enable ftp when motion detected Intervals between two successive ftp FTP server related settings DDNS Step 1、Example of Creating an Account 1. First, please go to www.dyndns.org and create an account there. 2. After creating an account with your preferred e-mail, go to DNS Services, Dynamic DNS.
Step 2、Login to CS-W02G2 Configuration Page 1. 2. 3. 4. Login to your IP camera with the local IP address. And enter “System”→ “DDNS”. Check the check box to enable DDNS function. Choose the DDNS provider. (Currently only supports DynDNS server) Enter the Hostname, for example “webcam.dynalias.net”. And enter your Account/Username and Password. 5. Click “Save” to save the settings.
Network LAN Settings Chceked: DHCP Unchecked: Fixed IP Network settings IP Camera control and video port.
Wireless LAN Settings Enter the SSID of the wireless AP Select infrastructure or adhoc type Select open system or share key Select 802.
Technical Specification Specifications Models i-Watch 130L i-Watch 130W: With additional wireless interface Supported protocols TCP/IP, SMTP client, HTTP server, FTP client, DHCP client, NTP client, DDNS Image Sensor 1/4" Progressive Scan CMOS sensor 1.3M pixels. Minimum illumination: 2.0 lux @ F2.0 Reset button Use stick to touch reset button to restore factory default settings Lens Fixed focal (6.0 mm, F2.