PLANON PRINTSTIK 900 SERIES USER GUIDE PlanOn System Solutions Inc.
TABLE OF CONTENTS Thanks from PlanOn……………………………………………………….. Introducing the PRINTSTIK…………………………………………………... PRINTSTIK Specifications……………………………………………………. PRINTSTIK Contents………………………………………………………….. Charging the PRINTSTIK……………………………………………………... PRINTSTIK Main Hardware Control Panel…………………………………… Personal Computer Software Installation………………………………….. PRINTSTIK Personal Computer Software Usage……………………………... PRINTSTIK Personal Computer Bluetooth Pairing……………………………. Windows Printing Preferences……………………………………………..
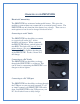
THANKS FROM PLANON Hello my name is Douglas Verkaik, CEO of PlanOn System Solutions Inc. I wanted to personally thank you for your purchase of our PRINTSTIK 900 series Bluetooth Printer.
INTRODUCING THE PRINTSTIK “The future of Printing will never be the same again…nor will the mobile office” PLANON has created a technical marvel. At barely over 11” long and only 1.5 pounds in weight, the Bluetooth enabled PRINTSTIK is the ultimate traveling companion. The PRINTSTIK is a fully self-contained and most convenient printer complete with paper and battery making it the smallest in the market.
PRINTSTIK SPECIFICATIONS Type 900 Series Size Approx 25mm x 48mm x 280mm (~ 1” x 1.9” x 11”) Weight 1lb. (460 g) including paper cartridge Resolution 200x100dpi, 200x200dpi, 200x400dpi Method Direct Thermal Printing Speed Up to three pages per minute Paper sizes (Roll) Paper Cartridge 8.5" wide 20 pages Interface Wireless Bluetooth + Standard USB 2.
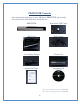
PRINTSTIK Contents After opening the packaging of your 900 Series PRINTSTIK, please make sure you have the following items inside the box: PRINTSTIK Retractable USB Cable Hard Case Wall Charger ** ** Car Adapter Charger Quick Start Guide * Travel Case Installation CD NEED PIC *These items are included only in the 950 series PRINTSTIK **These items are only included in the 910 series PRINTSTIK 6
CHARGING YOUR PRINTSTIK Electrical Connectivity The PRINTSTIK has an internal rechargeable battery. This gives the mobility to print without any connection to an external power source. The PRINTSTIK can only function if the battery has a charge. There are two main options to how it can be charged discussed below: Connecting to an AC Outlet The PRINTSTIK has the ability to connect to a typical wall outlet (AC) via the included wall charger. When connected the PRINTSTIK battery symbol light will turn RED.
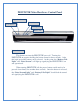
PRINTSTIK Main Hardware Control Panel Paper Feed Button Data Stream Power Button Printing Status Battery Life Power Button Power Button This button can turn the PRINTSTIK on or off. Turning the PRINTSTIK on requires holding the button down for three seconds. After this brief period the button can be released. At this point, the “Battery Life Light” and “Data Stream” will light up signifying the PRINTSTIK is on and operational.
Paper Feed Button The main function of the “Paper Feed Button” is to insert paper into the PRINTSTIK and to release paper. Inserting paper is important for loading a thermal paper roll, paper cartridge or single sheet (For more information see Page 22). Releasing paper is useful to provide spacing after printing and for paper removal. PRINTSTIK Print Testing The PRINTSTIK has a convenient method to test its printing ability quickly.
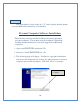
Data Stream This light which is in the shape of a “Z” letter signifies that the printer is on and Bluetooth connectivity is established. Personal Computer Software Installation *The following software installation Bluetooth printing through a personal computer. This requires that the computer is Bluetooth enabled whether internally or externally upgraded for Bluetooth capability. 1. Open your PRINTSTIK installation CD 2. Select the “Install PRINTSTIK.exe” file 3. The following page will appear.
4. The next screen (shown below) reveals that the installation process is ready to begin. Clicking on the “next” button at this point will begin the actual installation. Choose “Install” to begin installation 5. As depicted below, installation has begun and its status is shown by the blue bar that progressively extends as the PRINTSTIK driver files are being installed. The files from the CD are being copied into the designated area of your computer automatically. Once completed left click “Finish”.
Installing the PRINTSTIK USB driver 1. Select the “SetupApp.exe” file 2. The following page will appear, click “next”. Choose “Next” to begin 3. At this point a search will begin to check whether your computer already contains the USB driver, click "next" after search complete.
4. When this window appears, select the "install" option and then choose "next". Choose the Install option. Click “Next” to install driver 5. When this window pops up click the “finish” tab to complete the installation. Click “Finish” to complete FINAL STEP: 1. Plug in your PRINSTIK via USB cable into your PC or Laptop. 2. Your PC or Laptop’s operating system will search and locate the driver automatically and complete the installation or it will walk you through its installation instructions.
PRINTSTIK Personal Computer Software Usage The PRINTSTIK driver is now installed into the computer. This means that it can now be chosen for printing any time printing is required as seen in the screen shot shown below. To change printing preferences with the PRINTSTIK, the “Properties” button can be chosen with the PRINTSTIK selected to adjust printing preferences (ie. resolution settings). The PRINTSTIK can be chosen as an option for printing. Choose to set printing preferences.
Selecting the “Advanced...” button opens the screen below with options available for paper size, number of copies, print quality, and advanced printing features. Once these are set, “OK” can be chosen. *for detailed information regarding the various settings of these preferences, please refer to the Windows instructional manual that addresses printing.
The address on the PRINTSTIK icon will be in the following form: “PrintStik 00XXXX” Double click the mouse on the PRINTSTIK icon. The window below should appear. Double click the Serial Port icon. Double Click the Serial Port icon. Next, in order to complete the pairing of the PRINTSTIK, the “Bluetooth security code” will be requested. An example is shown below of this kind of request. (This can be carried out in different ways depending on the Bluetooth device’s software being used).
Windows Printing Preferences After printing has been chosen, there will be an icon of a printer shown at the bottom right of computer screen. Printing preferences can be accessed and adjusted accordingly through this screen. It can be clicked on to look at the printing queue status of the PRINTSTIK (when it has been chosen to print): This is a part of the windows configuration. It can also be accessed through the “Control Panel” found in the start menu of windows.
Printing with USB cable 1. Make sure PRINTSTIK is off 2. Connect the USB zip cable to computer 3. Turn on PRINTSTIK 4. Select the PRINTSTIK to print Thermal Paper The PRINTSTIK uses special printing technology to print on specially designed paper known as thermal paper. It is recommended that the thermal paper used with it should only be those that PlanOn has approved. Currently available through PlanOn are 8.5” by 11” and 8.5” by 14” thermal paper sheets.
2. Release the cartridge lock by pressing down on the small snap: 3.
4. Raise cartridge completely up as depicted below 5. The cartridge can now be pulled from its metal arms as shown.
6. Completely remove the cartridge from the metal arms. 7. Once the cartridge has been detached from the metal arms, the paper can be torn to separate the cartridge from the PRINTSTIK. 8. Press the paper feed button to remove remaining paper that is within the PRINTSTIK.
PlanOn PRINTSTIK Cartridge Loading PRINTSTIK removed from Each cartridge has a paper “leader" at the beginning of the paper roll. 1.
Paper lengthened from cartridge and cut in 4-6 inch triangle for insertion 2. Guide the tip of the paper roll with the paper “leader" through the insertion slight Each cartridge has a "paper leader" at the beginning of the paper roll.
Paper Inserted 3. Once you placed the paper through the insertion slight, have the PRINTSTIK laid down. Now press the paper feed button to draw the paper in.
4. As the paper is drawn through, guide it to make sure it’s centered with a result as depicted below. 5.
6. Metal arms can now be lined up with the slots on the PRINTSTIK cartridge as depicted in the picture. This will slide the cartridge into place.
7. Once the cartridge is fully inserted with the metal arms. Slightly pull the paper as depicted below.
8. Now you can close the cartridge down into the printer as shown below 9.
10. Now the snap is locked in with the printer and the cartridge is secure. 11. Now you are ready to print! NOTE: After installing paper cartridge and printing, try and avoid taking out cartridge, and re-installing cartridge again, if needed to do so, please see instructions in FAQ section (question 1).
BlackBerry Driver Installation Guide 1. Download latest version of BlackBerry Desktop Manager and install on your computer. Copy the following link to download this program: http://na.blackberry.com/eng/services/desktop/ 2. Use the BlackBerry USB data cable to connect your Smartphone Device and computer. 3. After you have installed BlackBerry desktop manager, Run it. 4. The following screen will appear 5. Double click the icon “Application Loader” to run.
6. Choosing the “Application Loader” leads to the screen below. Click “Next” to continue. Click “Next” to continue 7.
8. After clicking the add button, the window below should appear. Choose the files settingManager, PRINTSTIKDriver, FileExplorer and finally the com_rim_demores file. Chose '"open" to copy the files you select. 1. Click “open” 9. Once this window appears click "next".
10. Click on "finish" to start the loading process Click “Finish” 11. Click the “Close” button to close the loading application.
12. Check the BlackBerry phone to make sure it is back to normal status. If not, please allow some time for it to be back in normal status (This should only take a few minutes). 13. After the installation, the phone should be checked for the following applications modules: “PrinterDriver settingManger” “PRINTSTIKDriver” “BlackBerry FileExplorer” 14. Configure the PrinterDriver.
16. From your applications, choose Bluetooth application to add your Bluetooth printer while the PRINTSTIK is turned on. The Bluetooth code to be used when pairing is “0000”. 17.
Printing example 3: 18. To print images, you must click on the “Blackberry File Explorer” icon. You will see the directory named “store/” click on it, and choose “store/home/”, then choose “store/home/user/”. Once you are in the “store/home/user/” directory you will find all images that have been saved onto your Blackberry device. From this point, choose the image you want, press the “track ball” key on your Blackberry device, and select print. Printing example 4: 19.
Frequently Asked Questions 1. What should be done if thermal paper is jammed within the PRINTSTIK rollers? Turn off the PRINTSTIK printer. Pull the cartridge out; (please see pgs 18-21 for cartridge removal). Now cut off the jammed paper and do the following: A) After pulling out the cartridge, tear or cut off the remaining jammed paper, have 4-6 inches of paper pulled out then cut a triangular shape with a pair of scissors, as shown below.
B) Guide paper with tip of triangular cutout of paper into the insertion slight. C) Once the paper is in the printer, pull some paper in; guide the paper so it is centered and insert the cartridge into the metal arms on the printer. Close the cartridge and lock it into the printer.
2. How can the PRINTSTIK be kept cleaning and maintained? The PRINTSTIK should not be used in overly moist environment nor be directly exposed to water. Although, it is okay to lightly dampen a cloth in order to wipe it down. 3. What if printer stops printing? The PRINTSTIK can stop printing for numerous reasons which can be addressed below: 1. It may need to be recharged and has run out of battery life. 2. It may be too far away from the Bluetooth device.
pairing and be sure to refer to the manual of Bluetooth connectivity of the personal computer being paired with the PRINTSTIK. 8. My PRINTSTIK will not print from my personal computer. How can this be fixed? In order to address this, you want to first make sure that the PRINTSTIK has been properly paired and that the serial port is connected. Refer to information regarding this stated earlier in this instruction manual. Make sure the PRINTSTIK is close enough to be receiving the Bluetooth signal. 9.
It would take 180 minutes to fully charge the PRINTSTIK. Refer to the color of the battery life symbol to understand the level of battery life it would currently have. 14. Can the PRINTSTIK be used while it is being charged? The PRINTSTIK does have the ability to work while it is being charged. However, it is recommended to disconnect the PRINTSTIK from being charged when it is being used. It should only be connected to a power source to charge. 15.
Radio Frequency related Information CAUTION: Changes or modifications to this equipment not expressly approved by Planon for compliance could void the user’s authority to operate this equipment. Ordering Information If you would like to purchase additional PRINTSTIK products please visit the website: www.planon.