USER GUIDE_ PLANTRONICS EXPLORER™ 300 Series BLUETOOTH® HEADSET 72357-01 (04-06)
TABLE OF CONTENTS Package Contents & Features 3 Charging & Powering 5 Pairing 6 Adjusting Fit 7 Using Your Headset 8 Indicator Lights 9 Accessories 10 Troubleshooting 12 Product Specifications 12 Technical Assistance 13 Warranty 13 Regulatory Notices 14 WELCOME Thank you for purchasing a Plantronics headset. Let us provide you with the best possible service and technical support.
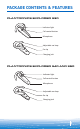
PACKAGE CONTENTS & FEATURES PLANTRONICS EXPLORER 330 Indicator light Call control button Microphone Adjustable ear loop Ear tip Charging jack PLANTRONICS EXPLORER 340 AND 350 Indicator light Call control button Microphone Adjustable ear loop Ear tip Charging jack 3
PACKAGE CONTENTS & FEATURES PLANTRONICS EXPLORER 330 & 340 AC power adapter PLANTRONICS EXPLORER 350 Cradle Mount Options In-car charging cradle (shown with vent clip) Vehicle charging adapter 4 Dash mount USB headset charger Vent clip
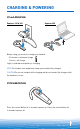
CHARGING & POWERING CHARGING Explorer 330 & 340 Explorer 350 2 2 1 1 Before using, you must first charge your headset. 20 minutes = minimum charge 2 hours = full charge Light is solid red when battery is charging. NOTE For the best user experience, keep your headset fully charged. CAUTION Do not use headset while charging and do not connect the charger while the headset is in use. POWERING Press the control button for 2 seconds to power on. Press the control button for 3 seconds to power off.
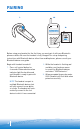
PAIRING 1. 2. 3. Before using your headset for the first time, you must pair it with your Bluetooth® phone or device. Be sure the headset is fully charged. For set up and pairing instructions with Bluetooth devices other than mobile phones, please consult your Bluetooth device user guide. Begin with headset turned off. 1. Press call control button for 6 seconds. Release button when indicator light flashes blue and red. Headset is ready to pair with Bluetooth device.
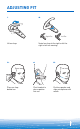
ADJUSTING FIT 1. 2. Left Ear Right Ear Lift ear loop. Swivel ear loop to the right or left for right or left ear wearing. 3. 4. 5. Place ear loop behind ear. Pivot headset to place speaker into ear. Position speaker and align microphone with mouth.
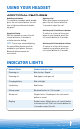
USING YOUR HEADSET ANSWERING/ENDING/MAKING CALLS For best performance, position your mobile phone on the same side of your body as the headset. To answer or end a call, briefly press the call control button. To make a call, enter number on your phone, press send, and the call is automatically transferred to headset; no need to press call control button. ADJUSTING THE VOLUME Briefly push up or down on the call control button for incremental volume steps.
USING YOUR HEADSET ADDITIONAL FEATURES Redialing Last Number Rejecting a Call To activate last number redial, double press the call control button. You will hear a high tone after each double key press. When receiving an incoming call, press the call control button for 2 seconds to reject the call. Switching a Call From Phone to Headset Using Voice Dialing With the headset on, press the call control button for 2 seconds to activate the voice dialing.
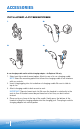
ACCESSORIES INCLUDED ACCESSORIES 1. 2. 3. 4. In-car charging cradle and in-vehicle charging adapter – for Explorer 350 only 1. Select vent clip or dash mount option. Attach to rear of in-car charging cradle. NOTE Select the mounting option that allows the charging cradle to not interfere with car controls. 2. Insert charging plug into slot on bottom of charging cradle. Be sure to slide to top of slot. 3. Attach charging cradle to dash mount or vent. IMPORTANT Clip onto lowest vent slot.
ACCESSORIES AVAILABLE FOR PURCHASE 69520-01 Vehicle charging adapter 69519-01 USB headset charger 72321-01 Desktop charging cradle 72323-01 In-car charging cradle (can be used with Explorer 340) To order, please contact your Plantronics supplier or go to www.plantronics.com.
TROUBLESHOOTING PROBLEM SOLUTION My headset does not work with my phone. Headset was not in pairing mode when mobile phone menu selections were made. See page 6 “Bluetooth Pairing”. Incorrect menu selections were made on your mobile phone. See page 6 “Bluetooth Pairing”. I did not enter my passkey. Your phone did not locate the headset. Repeat the pairing process on page 6. Incorrect menu selections were made on your mobile phone. Repeat the pairing process on page 6.
TECHNICAL ASSISTANCE Visit our Web site at www.plantronics.com/support for technical support including frequently asked questions, compatibility and accessibility information. The Plantronics Technical Assistance Center (TAC) is also ready to assist you on 866-363-BLUE (2583). WARRANTY LIMITED WARRANTY • This warranty covers defects in materials and workmanship of products manufactured, sold or certified by Plantronics which were purchased and used in the United States.
REGULATORY NOTICES US FCC REQUIREMENTS PART 15 This device complies with Part 15 of the FCC Rules. Operation is subject to the following two conditions: 1. This device may not cause harmful interference, and 2. This device must accept any interference received, including interference that may cause undesired operation. This equipment has been tested and found to comply with the limits for a Class B digital device, pursuant to Part 15 of the FCC Rules.
Plantronics, Inc. 345 Encinal Street Santa Cruz, CA 95060 USA Tel: (800) 544-4660 www.plantronics.com © 2006 Plantronics, Inc. All rights reserved. Plantronics, the logo design, Plantronics Explorer and Sound Innovation are trademarks or registered trademarks of Plantronics, Inc. The Bluetooth word mark and logo are owned by Bluetooth SIG, Inc. and any use of such marks by Plantronics, Inc. is under license. All other trademarks are the property of their respective owners. Patents U.S.
Plantronics, Inc. 345 Encinal Street Santa Cruz, California, EE.UU. Teléfono: (800) 544-4660 www.plantronics.com © 2006 Plantronics, Inc. Todos los derechos reservados. Plantronics, el diseño del logotipo, Plantronics Explorer y Sound Innovation, son marcas comerciales o marcas registradas de Plantronics, Inc. El nombre Bluetooth y las marcas comerciales Bluetooth son propiedad de Bluetooth SIG, Inc., y Plantronics, Inc. las utiliza en virtud de una licencia.
AVISOS SOBRE NORMATIVA REQUISITOS DE LA FCC (SECCIÓN 15) Este dispositivo cumple lo establecido en la sección 15 de las normas de la FCC. El funcionamiento está sujeto a las siguientes dos condiciones: 1. Este dispositivo no debe causar interferencias peligrosas. 2. Este dispositivo debe aceptar cualquier interferencia recibida, incluidas las interferencias que puedan causar un funcionamiento no deseado.
ASISTENCIA TÉCNICA Si desea obtener asistencia técnica y consultar el archivo de las preguntas más frecuentes e información sobre compatibilidad y accesibilidad, visite nuestro sitio web en la dirección www.plantronics.com/support. También puede ponerse en contacto con el centro de asistencia técnica de Plantronics (TAC) en el 866-363-2583.
RESOLUCIÓN DE PROBLEMAS PROBLEMA El auricular no funciona con el teléfono. No introduje la clave. La persona que llama no me oye o no puedo oír el tono de llamada o a la persona que llama. SOLUCIÓN El auricular no se encontraba en modo de emparejamiento cuando seleccionó las opciones del menú del teléfono celular. Consulte “Emparejamiento” en la página 6. Las opciones seleccionadas del menú del teléfono celular no son correctas. Consulte“Emparejamiento” en la página 6.
ACCESORIOS TAMBIÉN DISPONIBLES 72323-01 Horquilla de carga para el automóvil (puede utilizarse con el modelo Explorer 340) 72321-01 Horquilla del adaptador de carga de sobremesa 69519-01 Cargador USB para el auricular 69520-01 Adaptador de carga para el automóvil Para realizar un pedido, póngase en contacto con el proveedor de Plantronics o visite www.plantronics.com.
ACCESORIOS ACCESORIOS INCLUIDOS 4. 3. 2. 1. Horquilla y adaptador de carga para el automóvil (sólo para el modelo Explorer 350) 1. 2. 3. 4. Seleccione la pieza para el montaje en la rejilla de ventilación o en el tablero. Una la pieza seleccionada a la horquilla de carga para el automóvil. NOTA: seleccione una opción de montaje para la horquilla de carga que no impida el manejo de los controles del vehículo.
USO DEL AURICULAR CARACTERÍSTICAS ADICIONALES Para rechazar una llamada entrante, presione el botón de control de llamada durante dos segundos. Para activar la función de llamada al último número marcado, presione dos veces el botón de control de llamada. Oirá un tono agudo cada vez que presione el botón. Rechazo de una llamada Último número marcado Uso de la marcación por voz Si el auricular está encendido, presione el botón de control de llamada durante dos segundos para activar la marcación por voz.
USO DEL AURICULAR REALIZACIÓN, RESPUESTA Y FIN DE LLAMADAS Para obtener el máximo rendimiento, lleve el teléfono celular en el mismo lado del cuerpo que el auricular. Para contestar o poner fin a una llamada, presione brevemente el botón de control de llamada. Para realizar una llamada, marque el número en el teléfono y presione el botón de envío. La llamada se transferirá automáticamente al auricular sin necesidad de presionar el botón de control de llamada.
AJUSTE 1. 2. Oreja derecha Right Ear Levante el gancho. 3. Gire el auricular e introduzca el altavoz en la oreja. Oreja izquierda Left Ear Haga girar el gancho hacia la derecha o izquierda para adaptarlo a la oreja en la que irá colocado el auricular. 4. 5. Coloque el gancho detrás de la oreja. Ajuste el altavoz y alinee el micrófono con la boca.
EMPAREJAMIENTO 1. 2. 3. Antes de utilizar el auricular por primera vez deberá emparejarlo con un teléfono o dispositivo Bluetooth®. Asegúrese de que el auricular esté totalmente cargado. Si desea emparejar el auricular con un dispositivo Bluetooth distinto a un teléfono celular, consulte la guía del usuario del dispositivo Bluetooth. Para empezar, asegúrese de que el auricular esté apagado. 1. Presione el botón de control de llamada durante 6 segundos.
CARGA Y ALIMENTACION CARGA Explorer 330 y 340 Explorer 350 2 2 1 1 Recargue el auricular antes de utilizarlo. El tiempo de carga mínimo es de 20 minutos. El tiempo de carga total es de dos horas Mientras se carga la batería, se enciende una luz en rojo. NOTA: para conseguir el rendimiento óptimo, el auricular debe estar totalmente cargado. PRECAUCIÓN: para no utilice el auricular mientras se carga ni conecte el cargador mientras utiliza el auricular.
CONTENIDO DEL PAQUETE Y CARACTERÍSTICAS AURICULAR EXPLORER 330 Y 340 DE PLANTRONICS Transformador de CA AURICULAR EXPLORER 350 DE PLANTRONICS Opciones de montaje de la horquilla Horquilla de carga para el automóvil (con clip para rejilla de ventilación) Montaje en el tablero Adaptador de carga para el automóvil Clip para rejilla de ventilación Cargador USB para el auricular 4
CONTENIDO DEL PAQUETE Y CARACTERÍSTICAS AURICULAR EXPLORER 330 DE PLANTRONICS Luz indicadora Botón de control de llamada Micrófono Gancho ajustable Extremo del auricular Conector de carga AURICULAR EXPLORER 340 Y 350 DE PLANTRONICS Luz indicadora Botón de control de llamada Micrófono Gancho ajustable Extremo del auricular Conector de carga 3
ÍNDICE 9 Luces indicadoras 8 Uso del auricular 7 Ajuste 6 Emparejamiento 5 Carga y alimentación 3 Contenido del paquete y características 14 Avisos sobre normativa 13 Garantía 13 Asistencia técnica 12 Especificaciones del producto 12 Resolución de problemas 10 Accesorios BIENVENIDO Gracias por adquirir un auricular de Plantronics. Nuestra intención es proporcionarle el mejor servicio y asistencia técnica.
GUÍA DEL USUARIO_ PLANTRONICS EXPLORER™ Serie Explorer 300 de Plantronics AURICULAR BLUETOOTH® 72357-01 (04-06)