Savi Office WO201 ® Wireless Headset System with Optional HL10™ Lifter User Guide
Welcome Congratulations on purchasing your new Plantronics product. This guide contains instructions for setting up and using your Savi Office WO201 (WO1 Base and WH200/WH210 Headset) Wireless Headset System. Please refer to the separate safety instructions for important product safety information prior to installation or use of the product. Refer to the CD for Animated Set Up instructions.
Contents 1 Package Contents and Features............................ 4 Conferencing In Up to Three Additional Headsets....... 15 1.1 Savi Base.................................................................. 4 Setting Default Line to Desk Phone or PC.................... 16 1.2 Savi Headset............................................................. 5 Toggling On/Off Over-the-Air Subscription................... 16 1.3 HL10 Lifter (Optional)................................................
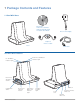
1 Package Contents and Features 1.
1.
1.
2 Base Set Up 2.1 Attaching Charge Cradle to Base 2.3 Connecting Power Supply to Base 1 Connect the headset charge cradle to the base. Push 1 Connect the base power supply into the power jack on firmly on the cradle until the cradle snaps in to place. the base. 2 Connect the power supply to outlet. 2.2 Connecting Base to Desk Phone 1 Connect the telephone interface cable to the telephone interface cable jack on the base. 2 Disconnect the handset coil cord from the desk phone. 2.
3 Headset Set Up 3.1 Fitting Headset The headset comes with a pre-installed eartip. To install a different eartip see the following: 5 The headset can be converted for wearing on left ear as follows: a. Rotate the microphone boom up. 1 Remove the pre-installed eartip by pushing in and turning the eartip CLOCKwise, then pull firmly. b. Turn microphone boom around. 2 Choose the size and style of eartip that fits most comfortably. Align eartip tabs with notches in headset.
4 Configure and Test Call 4.1 Checking Configuration 7 If the dial tone still does not sound clear, adjust the Configuration Switch until the dial tone sounds the best. 1 If your desk phone has a volume control set it to midrange. 2 On the base, ensure the Configuration Switch is set to “A” and the Desk Phone Speaking Volume and Desk Phone Listening Volume are both set to 3. Note Multiple settings might work with your phone; however, only one is the optimal position.
5 Lifter Set Up (Optional) 5.1 Installing Lifter 7 Gently place the lifter on the desk phone in the predetermined position. 8 Press firmly to adhere. Handset Lifter Power Cord 1 Firmly press the handset lifter power cord into the handset lifter jack. 2 While wearing your headset, slide the handset lifter arm under the handset until the lifter base touches the side of the phone. 3 Slide the lifter up to where it nearly touches the handset 5.
5.3 Additional Parts (If Required) Ringer Microphone Extender Arm 2 1 3 1 Stabilizers 2 2 Use ringer microphone when the telephone speaker is not located directly under the handset. 1 Remove cover from ringer microphone jack on back of lifter. 2 Connect ringer microphone plug. Use extender arm when the handset lifter needs additional stability lifting and returning handset to cradle. 3 Place ringer microphone over phone speaker. Remove adhesive tape and attach.
6 PC Set Up 6.1 Installing USB Cable 7 To end the test call, press the call control button on the headset. For your safety, do not use headset at high volumes for extended periods of time. Doing so can cause hearing loss. Always listen at moderate levels. For more information on headsets and hearing visit: plantronics.com/healthandsafety. * Consult Microsoft Office Communicator Help for more information 6.
7 Using Your Savi Office Wireless Headset System Important It is highly recommended that you install the Plantronics software. Though your Savi Office system will operate without the software it will limit the system’s full capabilities. Call Control Button Powering Up Headset If the headset battery is charged the headset is automatically on. The headset does not have an on/off button.
Placing, Answering, and Ending Calls - Other Softphones With Plantronics Software* Without Plantronics Software To place a call 1. Dial number from the supported softphone application 1. Short press call control button on headset** or short press base PC talk button 2. Dial number from softphone application To answer a call 1. Short press call control button on headset or short press base PC talk button 1. Short press call control button on headset** or short press base PC talk button 2.
Muting the Headset You can mute/unmute the headset the following ways: Headset Base Press the volume down button (at least 1½ seconds) until the base talk button indicator light for the active call becomes solid red. Short press (less than one second) of a red desk phone or PC talk button on the base will unmute the headset. You cannot mute the headset using the desk phone or PC talk buttons. Subscribing a Master Headset The headset and base are subscribed to each other at the factory.
Setting Default Line to Desk Phone or PC The Savi Office system ships with the desk phone as the default outbound line. This means any call initiated from the headset with the call control button will open desk phone audio. You can change your default outbound line from the base talk buttons. While the system is in idle mode, press and hold the PC talk button or the desk phone talk button for three seconds to select that device as your default outbound line.
Talk Time Headset Indicator Light The Savi Office system will provide up to 6 hours of talk time. Talk time will be reduced when operating in wideband mode and/or if the headset is used consistently at a far distance from the base. Headset Status Headset Indicator Light Headset charging Off Checking Headset Battery Level Headset fully charged Off When the system is idle, short press the Base subscribe button once to get feedback on the headset battery level.
8 Plantronics Software Platform Softphone Support Plantronics Update Manager Download Plantronics software for remote call answer/end with supported softphones at plantronics.com/software. All required software for Savi Office system can be remotely updated when updates are available. Start Plantronics Update Manager from Windows Start Programs menu to change settings such as automatic or manual check for updates.
Plantronics Control Panel User preferences and various device settings can be changed using the Plantronics Control Panel. To start this program, click Start>Programs>Plantronics then open Plantronics Control Panel. Battery Life At the lower left corner of the screen (and for all software screens), you will see one of the following icons indicating the approximate charge left in the headset battery.
Device Settings – Headset General Feature Settings Default Mute Tone Standard/Low/Off Standard Deskphone Ringtone Sound 1/Sound 2/Sound 3 Sound 1 Deskphone Volume Standard/Low/Off Standard PC Ringtone Sound 1/Sound 2/Sound 3 Sound 2 PC Volume Standard/Low/Off Standard System Tones Standard/Low/Off Standard Second Inbound Call Ring Continuously/Ring Once/Ignore Ring Continuously Feature Settings Default Audio Limiting 80 dB/85 dB/off Off Hours on phone per day 2/4/6/8 8 Ant
Preferences Tab The Preferences Tab allows you to set preferences for the media player as well as other general settings. Media Player General Feature Settings Default Action to Media Player – When a call begins – When a call ends Mute/pause/do nothing Unmute/play/do nothing Pause Play Launch audio devices control panel (Provides a shortcut to the Windows Sounds and Audio Devices control panel.) Default Softphone (Displays the default softphone.
Help for Device Settings - Base Range* Range can be minimized to help with PC buzzing, improve user density, or restrict range of users. High When Range is set to HIGH a user will have up to 300 feet of range. When Range is set to MEDIUM a user will have up to 150 feet of range. When Range is set to LOW a user will have up to 50 feet of range. Auto Answer Auto answer saves the user a button press to establish the radio link between headset and adapter.
9 Troubleshooting and Common Questions I can’t hear a dial tone at the headset. Make sure your headset is charged. Make sure your headset is subscribed to base. See Subscribing a Master Headset on page 15. Press the call control button on your headset. Make sure the lifter is lifting the handset high enough to operate the hookswitch; set to a higher setting if necessary. Adjust the configuration switch on the base until a dial tone is heard. Fine tune the listening volume with the call control button.
I can no longer hear any audio through my PC Speakers. For Windows XP Systems: Refer to the “Audio” tab of the “Sounds and Audio Devices” option in your PC Control Panel. • Under “Sound playback” change the default setting from Savi Office to your PC speakers. Click “OK” to confirm your change. For Windows Vista Systems: Refer to the “Sound” option in your PC Control Panel. • Under the “Playback” tab change the default setting from “Speakers Savi Office” to your PC speakers.
Plantronics, Inc. 345 Encinal Street Santa Cruz, CA 95060 United States Tel: 800-544-4660 plantronics.com For product support contact us at plantronics.com/support. © 2010 Plantronics, Inc. All rights reserved. Plantronics, the logo design, HL10, Savi, Sound Innovation are trademarks or registered trademarks of Plantronics, Inc. Windows is a registered trademark of Microsoft Corporation. Nortel is a trademark of Nortel Networks. Skype is a registered trademark of Skype Limited.