VOYAGER 510 BLUETOOTH® HEADSET SYSTEM User Guide
WELCOME Voyager 510 Bluetooth® Wireless Headset System User Guide Thank you for selecting the Voyager 510 Bluetooth® Headset System from Plantronics. The Voyager™ 510 system offers wireless, hands-free headset convenience and workspace mobility. This user guide provides instructions on the installation and usage of your system. www.plantronics.
DIAGRAMS 8 10 9 1 12 18 11 HEADSET 23 22 20 19 21 24 25 2
DIAGRAMS BASE UNIT 16 5 13 17 15 7 14 3 4 6 2 3
WELCOME DIAGRAM KEY BASE UNIT HEADSET 1 Tx Slide Switch (A-D) 2 Rx Slide Switch (1-4) 19 Microphone 20 Earpiece 3 Speak Volume Adjust UP 21 Call Control Button (Headset) 4 Speak Volume Adjust DOWN 22 Listen Volume Adjust +/- 5 Call Control Button (Base) 23 Power/Mute Button 6 IntelliStandTM Switch ON/OFF 24 Status Indicator 7 Configuration Dial 25 Charge Contacts 8 AC Power Adapter 9 AC Power Adapter Port 10 Handset Cable Port 11 Telephone Cable Port 12 Accessory Port 13 Headset Do
CONNECTING YOUR VOYAGER 510 SYSTEM OPTION – HANDSET LIFTER 5
INFORMATION This User Guide provides instructions on the installation and usage of your Voyager 510 Bluetooth® Headset System. For safety and regulatory information, please refer to the separate “Important Safety and Operational Information” booklet. Detailed technical information and a copy of the Declaration of Conformity can be found at www.plantronics.com/documentation CHARGING YOUR HEADSET The Status Indicator will be illuminated red while charging and change to blue when the headset is fully charged.
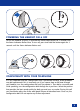
? WELCOME 45cm 30cm 15cm POSITIONING YOUR SYSTEM Positioning: Recommended separation distance. Important: Incorrect positioning can cause problems with noise and interference.
POWERING THE HEADSET ON & OFF To turn the headset on press in and hold the Power/Mute Button for 3 seconds until the Status Indicator flashes blue. To turn off, press and hold the button again for 3 seconds until the Status Indicator flashes red. COMPATIBILITY WITH YOUR TELEPHONE It is very important that the Configuration Dial is positioned correctly. Audio problems may be experienced if this is incorrectly set.
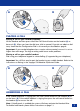
A B PLACING A CALL Placing a call on your corded telephone: Lift the handset and then press either the Call Control button on the headset (A) or base unit (B). When you hear the dial tone, dial as normal. If you do not obtain a dial tone, check that the Configuration Dial is set correctly as described on page 8. Important: If your corded telephone has a receive volume control, ensure it is set no higher than mid-range. Too high a setting could cause audio problems.
A B LISTEN VOLUME A: Adjust the Listen Volume (how others sound to you) to a comfortable level. B: If you cannot find a comfortable Listen level, try different settings on the Rx Slide Switch (1-4) as shown until a satisfactory sound level is experienced. Note: This setting only adjusts the headset listen level on calls placed using the corded telephone and cannot adjust the headset Listen Volume when used with a mobile handset. Important: Too high a Listen Volume can cause audio problems.
MUTE BUTTON To mute a call, short press (<1 sec) the Power/Mute Button once. To take the call off mute, short press (<1 sec) the button again.
OPERATION WITH THE HANDSET LIFTER ACCESSORY The Plantronics Handset Lifter is an accessory that can be purchased for use with Plantronics Wireless Headset Systems. It has two functions: 1. To automatically notify you when an incoming call is detected even when you are away from your desk. 2. To lift the telephone handset from its cradle at your command even when you are away from your desk. The installation of the Handset Lifter is described in the user guide that is supplied with it.
SWITCHING FROM HEADSET TO HANDSET WHEN USING THE LIFTER If during a call you are using your headset and want to switch to the telephone handset, remove the handset from the Lifter, then press the Call Control Button on either your headset or the base unit. The Lifter will lower and you will then be able to continue the call using the handset.
AUDIBLE WARNINGS OUT OF RANGE WARNING As you walk away from the base unit you will eventually reach the system operating range limit. The system will issue audible warnings at the operating limit. If not in a call: One low tone when edge of range reached. One high tone when back in range. If in a call: One low tone when edge of range reached.
PAIRING The Voyager 510 Bluetooth® Headset System is supplied with the Headset and Base Unit factory paired to each other. However, if you have purchased a Voyager 510 System Base Unit or if you wish to use a replacement headset with your existing base unit the units must be paired as follows: 1. Press and hold both the Speak Volume Adjust Buttons (3 & 4) on the base unit until the indicator in the Call Control Button (5) starts to flash. 2.
OPTIONAL PARTS & ACCESSORIES There are a range of Plantronics accessories designed to enhance the functionality of your Voyager 510 Bluetooth® Headset System. Please contact your Plantronics Supplier for further details. 1. HL10 Telephone Handset Lifter 2. On-Line Indicator 3. On-Line Indicator Extension Cable 4. Accessory Converter Cable 5. AC Power Adapter (UK only) 6. AC Power Adapter (Europe excluding UK) 7. US Power Adapter 8. CLA Charger 9. USB Charger 10. Beltpack Carry Pouch 11.
MODEL AND COUNTRY INFORMATION See package for product model number and refer to the table below for approved used. 67890-07 67892-07 AUT, BEL, DEU, DNK, ESP, FRA, GBR, GRC, ITA, IRL, LUX, NLD, PRT, SWE, FIN, CYP, CZE, EST, HUN, LVA, LTU, MLT, POL, SVK, SVN.
TROUBLESHOOTING PROBLEM I plugged everything in but the lights won’t come on. Possible Cause Solution No power Check that the AC Power Adapter is connected to the base unit. Check that the AC Power Adapter is connected to the mains supply. Check that the AC Power Adapter is the model supplied by Plantronics. PROBLEM My headset does not work with the base unit.
PROBLEM Callers cannot hear me. Possible Cause Solution Mute is selected Press the Power/Mute Button once as described on page 11. Headset microphone boom is incorrectly positioned Align the headset boom with your mouth Speak volume is too low Increase the Speak Volume by adjusting the Speak Volume Controls on the base unit as described on page 10. If the volume is still too low, select another Tx Slide Switch setting as described on page 10.
PROBLEM Receive sounds distorted. Possible Cause Solution Speak volume is too high Reduce speak volume by changing the Tx Slide Switch Setting as described on page 10. Listen volume too high on your telephone If your telephone has a receive volume control, lower this until the distortion disappears. If the distortion is still present, lower the Listen Volume Adjust Control on the headset. If the distortion persists, select another Rx Slide Switch setting as described on page 10.
Plantronics Ltd Wootton Bassett, UK Tel: 0800 410014 +44 (0)1793 842200 Plantronics B.V. Hoofddorp, Nederland Tel: (0)0800 PLANTRONICS 0800 7526876 (NL) 00800 75268766 (BE/LUX) Plantronics Sarl Noisy-le-Grand, France No Indigo: 0825 0825 99 0 , 15 € TTC / mn +33 (0)1 41 67 41 41 Plantronics GmbH Hürth, Deutschland Tel: 0800 9323400 +49 22 33 3990 Österreich: 0800 242 500 Schweiz: 0800 932 340 Plantronics Acoustics Italia Srl Milano, Italia Numero Verde: 800 950934 +39 02951 1900 Plantronics Iberia, S.L.