Savi Office WO200 Wireless headset system ™ with Optional HL10™ lifter User guide
Welcome Congratulations on purchasing your new Plantronics product. This guide contains instructions for setting up and using your Savi Office WO200 (WO1 base and WH200/WH210 headset) wireless headset system. Please refer to the separate safety instructions for important product safety information prior to installation or use of the product. Refer to the CD for Animated set up instructions.
Contents 1 Package Contents and Features............................ 4 1.1 Savi Base................................................................. 4 7 Using Your Savi Office Professional Wireless Headset System .................................................. 13 1.2 Savi Headset............................................................ 5 Powering up Headset................................................... 13 1.3 HL10 Lifter (Optional)................................................
1 Package contents and features 1.
1.
1.
2 Base set-up 2.1 Attaching charging cradle to base 2.3 Connecting power supply to base 1 Connect the headset charging cradle to the base. Push 1 Connect the base power supply into the power jack on firmly on the cradle until the cradle snaps into place. the base. 2 Connect the power supply to outlet. 2.2 Connecting base to desk phone 1 Connect the telephone interface cable to the telephone interface cable jack on the base. 2 Disconnect the handset coil cord from the desk phone. 2.
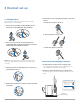
3 Headset set-up 3.1 Fitting headset The headset comes with a pre-installed ear tip. To install a different ear tip, see the following: 5 The headset can be converted for wearing on left ear as follows: a. Rotate the microphone boom up. 1 Remove the pre-installed ear tip by pushing in and turning the ear tip CLOCKwise, then pull firmly. b. Turn microphone boom around. 2 Choose the size and style of ear tip that fits most comfortably. Align ear tip tabs with notches in headset.
4 Configuration and test call 4.1 Checking configuration 7 If the dial tone still does not sound clear, adjust the Configuration Switch until the dial tone sounds the best. 1 If your desk phone has a volume control set it to midrange. 2 On the base, ensure the Configuration switch is set to “A” and the Desk phone speaking volume and Desk phone listening volume are both set to 3. Note Multiple settings might work with your phone; however, only one is the optimal position.
5 Lifter set-up (optional) 5.1 Installing lifter 7 Gently place the lifter on the desk phone in the pre-determined position. 8 Press firmly to adhere. Handset lifter power cord 1 Firmly press the handset lifter power cord into the handset lifter jack. 2 While wearing your headset, slide the handset lifter arm under the handset until the lifter base touches the side of the phone. 3 Slide the lifter up to where it nearly touches the handset 5.
5.3 Additional parts (if required) Ringer microphone Extender arm 2 1 3 1 Stabilisers 2 2 Use ringer microphone only when the telephone speaker is not located directly under the handset. 1 Remove cover from ringer microphone jack on back of lifter. 2 Connect ringer microphone plug. Use extender arm when the handset lifter needs additional stability lifting and returning handset to cradle. 3 Place ringer microphone over phone speaker. Remove adhesive tape and attach.
6 PC set-up 6.1 Installing USB cable 6.3 Making a test call with PC 1 Ensure the PerSono Suite software is running on your PC. You will see a headset icon in the lower right-hand portion of the PC tray bar when PerSono Suite software is running. 2 With your headset on, press the PC talk button on the base. 3 Dial the number using your softphone application. 4 Adjust listening and speaking volume over the PC as follows: 1 Connect the USB cable to the USB port on the back of the base.
7 Using your Savi Office wireless headset system Important It is highly recommended that you install the PerSono Suite software. Though your Savi Office system will operate without the software, running it without the software will limit the system's full capabilities. Call control button Powering up headset If the headset battery is charged, the headset is automatically on. The headset does not have an on/off button.
Placing, answering and ending calls with PC With PerSono Suite software* Without PerSono Suite software To place a call 1. Dial number from the supported softphone application*** 1. Briefly press call control button on headset** or briefly press base PC talk button 2. Dial number from softphone application To answer a call 1. Briefly press call control button on headset or briefly press base PC talk button 1. Briefly press call control button on headset** or briefly press base PC talk button 2.
Muting the headset You can mute/unmute the headset in the following ways: Headset Base PerSono Suite software* Press the volume down button (at least 1½ seconds) until the base talk button indicator light for the active call becomes solid red. Briefly pressing (less than one second) a red desk phone or PC talk button on the base will unmute the headset. You cannot mute the headset using the desk phone or PC talk buttons. Click the green headset icon.
Setting default line to desk phone or PC Placing the headset in sleep mode The Savi Office system is supplied with the desk phone as the default outbound line. This means any call initiated from the headset with the call control button will open desk phone audio. You can change your default outbound line from the base talk buttons.
Talk time Headset indicator light The Savi WO200 Office system will provide up to 6 hours of talk time. Talk time will be reduced when operating in wideband mode and/or if the headset is used consistently at a far distance from the base.
8 PerSono Suite software It is highly recommended that you install the PerSono Suite software. Though your Savi Office system will operate without the software, running it without the software will limit the system's capabilities. • When you click a green PC or desk phone icon, it will turn red and start to blink, indicating the device has been put on hold. Clicking a blinking red PC or desk phone icon will turn it back to green, indicating the device is active again.
When you are listening to multimedia through a supported media player on your PC, and there are no calls that are active or onhold, a music note will replace the PC icon. 3 Launch your media player on your PC and start playing multimedia.
Softphone support For a list softphones supported by PerSono Suite refer to www. plantronics.com/SoftphoneCompatibility. PerSono Suite software supports all the softphones on the list with no additional steps by the user except Skype™. To allow Skype to be a supported softphone in PerSono Suite please follow these steps: 1 Ensure PerSono Suite software is running on your PC. You will see a headset icon in the lower right portion of the PC tray bar when PerSono Suite software is running.
Settings screen – headset and base The Settings screen allows you to customise the base and headset to your preference. The Savi Office system is supplied with the default settings and can be changed as described in the Settings column below. NOTE Some parameters may appear as grayed out. PerSono Suite automatically grays out parameters that do not apply to a particular Plantronics device.
Help for base settings Default settings Auto answer Off Auto answer saves the user a button press to establish the radio link between headset and base unit. When auto answer is set to OFF, you must press the headset call control button or base PC/desk phone talk button to answer an incoming call.* When auto answer is set to ON, an incoming call will be answered when the headset is removed from the charging cradle.
Help for base settings Default Settings Anti-startle Anti-startle provides advanced hearing protection against sudden loud sounds. When Anti-startle is set to ON, the system identifies and eliminates sudden loud sounds and rapidly reduces them to a comfortable level. When Anti-startle is set to OFF, the headset caps sound levels at 118 dBA to protect your hearing. Off Audio limiting Off Audio Limiting provides advanced hearing protection for daily noise exposure.
PC panel screen Security screen • Choose whether you want PerSono Suite software to launch when you login to Windows. PerSono Suite software allows the base settings to be locked so another user cannot change the settings. This requires the creation of a password for the system. To create a password so you can lock/unlock base settings complete the following: • See a list of supported softphones running on your PC.
Support screen The support screen provides on-line access to this printable user guide, frequently asked questions, how to contact Plantronics, and software upgrade information. The current version of software and firmware currently running on your system is also shown here. Updates All the required software and firmware for your Plantronics device can be remotely updated if and when updates are available. You can control how frequently the system will check for available updates.
9 Troubleshooting and common questions I can't hear a dial tone at the headset. Make sure your headset is charged. Make sure your headset is subscribed to base. See Subscribing a master headset on page 15. Press the call control button on your headset. Make sure the lifter is lifting the handset high enough to operate the hookswitch; set to a higher setting if necessary. Adjust the configuration switch on the base until a dial tone is heard.
I can no longer hear any audio through my PC speakers. For Windows XP Systems: Refer to the “Audio” tab of the “Sounds and Audio Devices” option in your PC Control Panel. • Under “Sound playback” change the default setting from Savi Office to your PC speakers. Click “OK” to confirm your change. For Windows Vista Systems: Refer to the “Sound” option in your PC Control Panel. • Under the “Playback” tab change the default setting from “Speakers Savi Office” to your PC speakers.
Plantronics, Inc. 345 Encinal Street Santa Cruz, CA 95060 United States www.plantronics.com For product support, contact us at www.plantronics.com/support. © 2010 Plantronics, Inc. All rights reserved. Plantronics, the logo design. HL10, Persono Suite, Savi, and Sound Innovation are trademarks or registered trademarks of Plantronics, Inc. Windows is a registered trademark of Microsoft Corporation. Nortel is a trademark of Nortel Networks. Skype is a registered trademark of Skype Limited.