
Instructions / Assembly


28
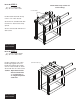
3"
14"
33¹|₂"
16"
17"
16"
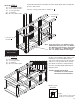
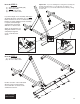
Items for STEP 7:
(5) ³₈" x 4" hex bolts
(10) ³₈" washers
(
5) lock nuts
L
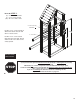
ift assembly onto saw horses as shown.
Note: If you do not have saw horses,
r
est beam on ground and rotate
A-Frame Assembly and single
4" x 4" Assembly simultaneously
to the other side (requires two
adults). Single 4" x 4" Assembly
must be supported at all times to
keep the bracket from bending.
Complete Step 7
. Rotate back to
original position and proceed
with step Step 8.
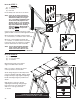
Use the holes in the bottom board as a drill
guide and drill ³₈" holes back through both boards.
On the A-Frame Assembly end attach three
³₈" x 4" hex bolts, ³₈" washers and ³₈" lock nuts.
On the 4" x 4" Assembly end attach two
³₈" x 4" bolts, ³₈" washers and ³₈" lock nuts.
Leave hole closest to end open as it will be
used to attach beam to tower assembly.
Note: Cut off all protruding threaded
ends of bolts with a hack saw
flush to the end of the nut and
remove sharp edges with a metal file.
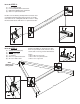
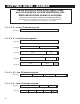
Mark the top board, on the bottom
edge, at the dimensions shown.
Drill a ¹⁄₄" hole 2¹⁄₂" deep in the center
of the top board at each location.
Screw swing hangers into board by hand
(a long screwdriver will help). Tighten swing
hanger until loop is tight against adjoining
board and swing hanger is positioned as
shown.
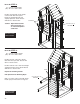
Drill another ¹⁄₄" hole 2¹⁄₂" deep in
adjoining board through swing hanger
loop and secure each swing hanger
with one ³₈" x 3" lag screw and
³₈" washer.
Items for STEP 8:
(4) swing hangers
(4) ³₈" x 3" lag screws
(4) ³₈" washers
Front View
Install Bronco Rider Brackets here
(see Instructions included with the Bronco Rider for details)
Leave hole
open