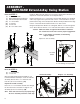
Play Action® ® Safety Guide & Building Instructions Right-Hand Assembly Shown Shown with components purchased separately: (2) Swing Seats (PS 7948) (1 pr) Gym Rings (PS 7836) (3 pr) Swing Hangers (PS 7676) Left-Hand Extend-A-Bay Swing Station Right-Hand Extend-A-Bay Swing Station Free-Standing Swing Station (2) Extend-A-Bay/Swing Station Kits required Purchase Separately Left-Hand and Right-Hand Extend-A-Bay Swing Station (2) 4" x 4" x 8' (2) 2" x 6" x 10' (1) 2" x 6" x 8' We’re Here To Help! (24) #8
SAFETY • Follow the instructions provided, do not alter its design in any way. • This product is intended for single-family residential use only, by children ages two to ten and a maximum weight of 105 pounds. Any recommendation over 10 years of age or 105 pounds exceeds the upper limits specified in the American Society for Testing and Materials (ASTM) Home Playground Safety Standard. In order for PlayStar to comply with the ASTM Standard, we cannot recommend anyone above these limits.
SAFETY INSTALLATION: 1. Follow the instructions provided, do not alter its design in any way. 2. Place the playset on level ground, not less than 6' (1.8m) from any structure or obstruction such as a fence, garage, house, overhanging branches, laundry lines or electrical wires. If the area where you will be installing your playset is not level, you must make it level. 3. Playsets must be anchored to the ground. Follow the anchoring instructions provided with your building kit.
CONTENTS TOOLS REQUIRED ® Extend-A-Bay /Swing Station Kit Contains: (1 pr.
CUTTING GUIDE Left-Hand or Right-Hand Extend-A-BaySwing Station Use boards purchased with this Extend-A-Bay Kit, together with boards from your existing PlayStar Playset to give you the following boards needed to build the left-hand or right-hand Extend-A-Bay Swing Station.
ASSEMBLY LEFT-HAND Extend-A-Bay Swing Station Items for STEP 1: (5) (2) (3) (10) (20) (10) (10) 4" x 4" x 96" boards Right-hand Sturdy-Frame Bracket Left-hand Sturdy-Frame Brackets ³ ₈" x 4" hex bolts ³ ₈" washers ³ ₈" lock nuts #8 x 1¹⁄₄" deck screws Install two Right-hand (R) and three Left-hand (L) Sturdy-Frame Brackets onto separate 4" x 4" boards. (Brackets are stamped R and L) Position bracket flat on a 4" x 4" board as shown.
Items for STEP 3: (1) (1) (1) (4) 2" x 6" x 65¹⁄₄" board Left-hand Sturdy-Frame Connector Right-hand Sturdy-Frame Connector #14 x 1¹⁄₄" pan head screws } from existing PlayStar Playset Position one Left-hand (L) Sturdy-Frame Connector and one Right-hand (R) Sturdy-Frame Connector as shown. Use Connector as a drill guide and drill ¹⁄₈" holes 1" deep into the board. Secure with #14 x 1¹⁄₄" pan head screws.
Items for STEP 5: (1) (1) (2) (2) (8) Step 2A Assembly 2" x 6" x 71" Board ³ ₈" x 3" lag screws ³ ₈" washers #8 x 2¹⁄₂" deck screws Position assembly and board as shown. Secure with #8 x 2¹⁄₂" deck screws and ³ ₈" x 3" lag screws with ³ ₈" washers. Note: Brackets are facing down. 2" Detail of Screw Placement "x x6 25" " 71 93¹⁄₂" 25" Predrill – 1/8" Dia. for #8 x 21/2" deck screws 1/4" Dia.
Items for STEP 7: (1) 2" x 6" x 96" board (8) #8 x 2¹⁄₂" deck screws Position 2" x 6" x 96" board directly on top of 2" x 6" x 120" board as shown. Secure with #8 x 2¹ ₂" deck screws at dimensions shown. 2" x 6" x 30" 96 " 18" 18" 18" 12" Items for STEP 8: (1) Step 4 Assembly (1) 2" x 6" x 96" board (2) #8 x 1¹⁄₄" deck screws Dr ill Lay out the Step 4 Assembly elevated on 3" of scrap lumber. Position one 2" x 6" x 96" board under brackets as shown.
Items for STEP 9: (1) 2" x 6" x 120" board (12) #8 x 2¹⁄₂" deck screws Position 2" x 6" x 120" board directly on top of 2" x 6" x 96" board as shown. Secure with #8 x 2¹ ₂" deck screws at dimensions shown. 18" 18" 2" x 35" 6" x 12 0" 12" 11¹|₄" Items for STEP 10: (4) #8 x 2¹⁄₂" deck screws ³|₄" Position assemblies as shown. Pull ends tightly together while making sure the beams are in a straight line. Secure with #8 x 2¹ ₂" deck screws at dimensions shown.
Items for STEP 11: Leave hole open (8) ³ ₈" x 4" hex bolts (16) ³ ₈" washers (8) ³ ₈" lock nuts Lift assembly onto saw horses as shown. Note: If you do not have saw horses, rest beam on ground and rotate A-Frame Assemblies and single 4" x 4" Assembly simultaneously to the other side (requires two adults). Single 4" x 4" Assembly must be supported at all times to keep the bracket from bending. Complete Step 11. Rotate back to original position and proceed with Step 12.
STURDY-FRAME BRACE INSTALLATION STEP 1: Remove the top ³⁄₈" x 4" hex bolt, washers and lock nut from the post support as shown. (Save these parts because they will be used in Step 3.) ³⁄₈" x 4" hex bolt Note: It is easiest to remove this bolt by continuing to rotate in a counterclockwise direction. Items for STEP 2: (1) (1) (2) (1) Sturdy-Frame Brace 4¹ ₂" hex bolt ³ ₈" washers ³ ₈" lock nut Install the Sturdy-Frame Brace as shown and secure with ³⁄₈" x 4¹⁄₂" hex bolt, washers and lock nut.
ASSEMBLY RIGHT-HAND Extend-A-Bay Swing Station Items for STEP 1: (5) (3) (2) (10) (20) (10) (10) 4" x 4" x 96" boards Right-hand Sturdy-Frame Brackets Left-hand Sturdy-Frame Bracket ³ ₈" x 4" hex bolts ³ ₈" washers ³ ₈" lock nuts #8 x 1¹⁄₄" deck screws Install three Right-hand (R) and two Left-hand (L) Sturdy-Frame Brackets onto separate 4" x 4" boards. (Brackets are stamped R and L) Position bracket flat on a 4" x 4" board as shown.
Items for STEP 3: (1) (1) (1) (4) 2" x 6" x 65¹⁄₄" board Left-hand Sturdy-Frame Connector Right-hand Sturdy-Frame Connector #14 x 1¹⁄₄" pan head screws } from existing PlayStar Playset Position one Left-hand (L) Sturdy-Frame Connector and one Right-hand (R) Sturdy-Frame Connector as shown. Use Connector as a drill guide and drill ¹⁄₈" holes 1" deep into the board. Secure with #14 x 1¹⁄₄" pan head screws.
Items for STEP 5: (1) (1) (2) (2) (8) Position assembly and board as shown. Secure with #8 x 2¹⁄₂" deck screws and ³ ₈" x 3" lag screws with ³ ₈" washers. Step 2A Assembly 2" x 6" x 71" Board ³ ₈" x 3" lag screws ³ ₈" washers #8 x 2¹⁄₂" deck screws Note: Brackets are facing down. 2" Detail of Screw Placement "x x6 25" " 71 93¹⁄₂" 25" Predrill – 1/8" Dia. for #8 x 21/2" deck screws 1/4" Dia.
Items for STEP 7: (1) 2" x 6" x 96" board (8) #8 x 2¹⁄₂" deck screws Position 2" x 6" x 96" board directly on top of 2" x 6" x 120" board as shown. Secure with #8 x 2¹ ₂" deck screws at dimensions shown. 2" "x x6 30" 18" 18" 18" 12" Items for STEP 8: (1) Step 4 Assembly (1) 2" x 6" x 96" board (2) #8 x 1¹⁄₄" deck screws Lay out the Step 4 Assembly elevated on 3" of scrap lumber. Position one 2" x 6" x 96" board under brackets as shown.
Items for STEP 9: (1) 2" x 6" x 120" board (12) #8 x 2¹⁄₂" deck screws Position 2" x 6" x 120" board directly on top of 2" x 6" x 96" board as shown. Secure with #8 x 2¹ ₂" deck screws at dimensions shown. 18" 2" "x x6 0" 12 18" 35" 12" 11¹|₄" ³|₄" Items for STEP 10: (4) #8 x 2¹⁄₂" deck screws Position assemblies as shown. Pull ends tightly together while making sure the beams are in a straight line. Secure with #8 x 2¹ ₂" deck screws at dimensions shown.
Items for STEP 11: Lift assembly onto saw horses as shown. Leave hole open (8) ³ ₈" x 4" hex bolts (16) ³ ₈" washers (8) ³ ₈" lock nuts Note: If you do not have saw horses, rest beam on ground and rotate A-Frame Assemblies and single 4" x 4" Assembly simultaneously to the other side (requires two adults). Single 4" x 4" Assembly must be supported at all times to keep the bracket from bending. Complete Step 11. Rotate back to original position and proceed with Step 12.
STURDY-FRAME BRACE INSTALLATION STEP 1: Remove the top ³⁄₈" x 4" hex bolt, washers and lock nut from the post support as shown. (Save these parts because they will be used in Step 3.) ³⁄₈" x 4" hex bolt Note: It is easiest to remove this bolt by continuing to rotate in a counterclockwise direction. Items for STEP 2: (1) (1) (2) (1) Sturdy-Frame Brace 4¹ ₂" hex bolt ³ ₈" washers ³ ₈" lock nut Install the Sturdy-Frame Brace as shown and secure with ³⁄₈" x 4¹⁄₂" hex bolt, washers and lock nut.
CUTTING GUIDE Free-Standing Swing Station Before starting to build your Playset, make sure all boards are cut and identified by size. Stack identical size boards in neat piles. (If you do not want to mark on lumber, use masking tape or chalk.) This will improve your building time greatly because you will already know the size of each board as the instructions call for them.
ASSEMBLY FREE-STANDING Swing Station Items for STEP 1: (4) (2) (2) (8) (16) (8) (8) 4" x 4" x 96" boards Right-hand Sturdy-Frame Brackets Left-hand Sturdy-Frame Brackets ³ ₈" x 4" hex bolts ³ ₈" washers ³ ₈" lock nuts #8 x 1¹⁄₄" deck screws Install two Right-hand Sturdy-Frame Brackets and two Left-hand SturdyFrame Brackets onto separate 4" x 4" boards. (Brackets are stamped R and L) Position bracket flat on a 4" x 4" board as shown.
Items for STEP 3: (2) (2) (4) (4) (16) Step 2 Assemblies 2" x 6" x 71" Boards ³ ₈" x 3" lag screws ³ ₈" washers #8 x 2¹⁄₂" deck screws Position assembly and board as shown. Secure with #8 x 2¹⁄₂" deck screws and ³ ₈" x 3" lag screws with ³ ₈" washers. Repeat for second assembly. Note: Brackets are facing down. 2" Detail of Screw Placement "x x6 25" " 71 93¹⁄₂" 25" Predrill – 1/8" Dia. for #8 x 21/2" deck screws 1/4" Dia.
Items for STEP 5: (1) 2" x 6" x 144" board (14) #8 x 2¹⁄₂" deck screws Position second 2" x 6" x 144" board directly on top of first board and secure with #8 x 2¹ ₂" deck screws at dimensions shown. ³|₄" 23¹|₄" 36" x 2" 6" " 44 x1 18" 18" 36" ³|₄" 11¹|₄" Items for STEP 6: (6) ³ ₈" x 4" hex bolts (12) ³ ₈" washers (6) lock nuts Lift assembly onto saw horses as shown. Note: If you do not have saw horses, rest beam on ground and rotate A-Frame Assemblies to the other side (requires two adults).
Items for STEP 7: Mark the top board, on the bottom edge, at the dimensions shown. (6) swing hangers (6) ³ ₈" x 3" lag screws (6) ³ ₈" washers Drill a ¹⁄₄" hole 2¹⁄₂" deep in the center of the top board at each location. Screw swing hangers into board by hand (a long screwdriver will help). Tighten swing hanger until loop is tight against adjoining board and swing hanger is positioned as shown.
STURDY-FRAME BRACE INSTALLATION STEP 1: Remove the top ³⁄₈" x 4" hex bolt, washers and lock nut from the post support as shown. (Save these parts because they will be used in Step 3.) ³⁄₈" x 4" hex bolt Note: It is easiest to remove this bolt by continuing to rotate in a counterclockwise direction. Items for STEP 2: (1) (1) (2) (1) Sturdy-Frame Brace 4¹ ₂" hex bolt ³ ₈" washers ³ ₈" lock nut Install the Sturdy-Frame Brace as shown and secure with ³⁄₈" x 4¹⁄₂" hex bolt, washers and lock nut.
ANCHORING At locations shown screw Playset Anchors into ground by hand (a long screwdriver will help). Use the anchor as a drill guide and drill a ¹⁄₄" hole 2¹⁄₂" deep into the board. Attach with ³ ₈" x 3" lag screw and ³ ₈" washer. Note: If soil conditions permit anchors to be pulled out easily, such as in sandy soil conditions, cementing is required.
ANCHORING Left-Hand Extend-A-Bay Swing Station 1 3 5 2 4 Right-Hand Extend-A-Bay Swing Station 1 3 5 2 4 27
Thank You for choosing PlayStar. Because it is our intention to make this a positive family experience, we have taken great care in preparing this product. Should you have any questions, or if we can assist you in any way, please call our friendly Customer Service Department for immediate action. Do not return to the store. Please call us Toll Free at 1-888-PLAYSTAR (752-9782) Monday through Friday, 8:00 A.M. to 5:00 P. M. C.S.T. Ask for Customer Service.