
Instructions / Assembly


6
ASSEMBLY -
LEFT-HAND Extend-A-Bay Swing Station
Items for STEP 1:
(5) 4" x 4" x 96" boards
(2)
Right-hand Sturdy-Frame Bracket
(3)
Left-hand Sturdy-Frame Brackets
(10) ³₈" x 4" hex bolts
(20) ³₈" washers
(10) ³₈" lock nuts
(10) #8 x 1¹⁄₄" deck screws
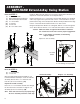
Install two Right-hand (R) and three Left-hand (L) Sturdy-Frame Brackets onto
separate 4" x 4" boards. (Brackets are stamped R and L)
Position bracket flat on a 4" x 4" board as shown. Slide bracket over and down
until it stops against the top and the side of the 4" x 4" board. When correctly
positioned, the edge of the Sturdy-Frame Bracket will be parallel with the edge
of the 4" x 4" board. Attach bracket with #8 x 1¹⁄₄" deck screws.
Using the Sturdy-Frame Bracket as a drill guide, drill two ³₈" holes through the
4" x 4" board. Secure with two ³₈" x 4" hex bolts with washers and lock nuts.
Caution: Make sure bolts are tight and the threads of each bolt
are at least flush to the nut to ensure proper engagement.
Note: If your lumber is oversized, counterboring
may be required.
Repeat for each assembly.
Rear View of bracket and
4" x 4" showing correct position.
Left-hand
Shown
Stop
Stop
Mate one Right-hand Bracket Assembly to one
Left-hand Bracket Assembly to create an A-Frame
Assembly. Secure with ³₈" x ³₄" hex bolts and
lock nuts (do not use washers). (2A)
Repeat for second assembly.
Place two ³₈" x ³₄" hex bolts and lock nuts through
the two lower holes of bracket on single 4" x 4"
Assembly (do not use washers). (2B)
Note: These bolts are necessary to properly align
the 4"x4" Assembly to beam at a later step.
Items for STEP 2:
(6) ³₈" x ³₄" hex bolts
(6) ³₈" lock nuts
Lef
t
-
hand
R
i
ght-hand
(2A)
(2B)
4
"
x
4
"
4"
x
4"
A-Frame Assembly Single 4" x 4" Assembly