
Instructions / Assembly

14
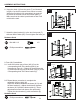
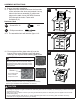
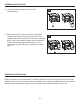
8. Door (M,O) installation
8-1. Insert the bottom peg of door (left) (O) to the
corresponding hole of the bottom plate (I) as
illustrated in gure 8-1. Slightly lift the door bracket
(L) and insert the top peg of the door (left) (O) to the
corresponding hole of the door bracket (L).
8-1
ASSEMBLY INSTRUCTIONS
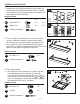
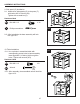
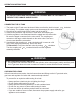
6. Hang the chain (H) from the posts (F) as illustrated
in gure 6 so that it connects from corner to corner.
When the re table is fully assembled, the tank will
be placed in the tank hole on the bottom plate (I).
Make sure that the chain is positioned so that it will
not block the tank.
4
L
Q
6
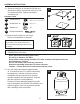
8-2 Repeat above procedure to complete the
assembly of door (right) (M).
Adjust the distance between the doors (M, O) and
the door bracket (L). Adjust the distance between
the doors (M, O) and the bottom plate (I). These
adjustments ensure both doors can open easily.
Tighten the door bracket (L) with screwdriver (II).
8-2
F
H
O
O
F
Hardware Used
Hardware Used
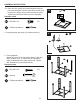
7. Attach the door bracket (L) to the two front posts (F)
with two M6X12 bolts (AA). Do not tighten the bolts yet.
6
E
AA
Bolt M6 X 12 X 2
II
II
Phillips screwdriver
Phillips screwdriver
DD
7
AA
F
L
L
L
I
I
M
TOP PEG
BOTTOM PEG
I