
Assembly Instructions


23
OPERATION
FOR YOUR SAFETY
READ BEFORE LIGHTING
WARNING: If you do not follow these instructions exactly, a re or explosion may
result causing property damage, personal injury or loss of life.
A. This appliance has a pilot which must be lighted by the electronic ignitor. When lighting the pilot,
follow these instructions exactly.
B. BEFORE LIGHTING smell all around the appliance area for gas. Be sure to smell next to the oor
because some gas is heavier than air and will settle on the oor.
WHAT TO DO IF YOU SMELL GAS
• Do not try to light any appliance.
• Do not touch any electrical switch; do not use any phone in your building.
• Immediately call your gas supplier from a neighbor’s phone. Follow the gas supplier’s instructions.
• If you cannot reach your gas supplier, call the re department
C. Use only your hand to push in or turn the gas control knob. Never use tools. If the knob will not
push in or turn by hand, don’t try to repair it, call a qualied service technician. Forced or attempted
repair may result in re or explosion.
D. Do not use this appliance if any part has been under water. Immediately call a qualied service
technician to inspect the appliance and to replace any part of the control system and any gas control
which has been under water.
BATTERY INSTRUCTIONS
• Batteries are included.
• Remove batteries when depleted.
• Install/replace the batteries according to the type and quantity stated in table below.
• Do not mix old and new batteries. New batteries should be the same brand for best results.
• Be sure to observe proper polarity (+/-) when installing or replacing the batteries. Damage due to
improper battery installation may void the warranty on the product.
• For long periods of non-operation, remove batteries from all components for safety.
Component Type of Battery Battery Qty.
Ignitor AAA 1
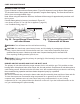
Fig. 2
BATTERY INSTALLATION
1. Locate the Battery Ignitor on the
front face of the burner.
2. Step 2 – Unscrew the cap on
the Electronic Push Button ignitor
with your ngers by turning it
counterclockwise. (Fig. 2)
3. Insert the battery with the
positive (+) side facing forward.
4. Replace the cap by turning it
clockwise until the cap is nger
tight.
Ignitor Base
Ignitor Cap
AAA Battery
(Positive Side Facing Outward)