
Installation Guide


18
INSTALLATION
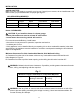
Fig. 16 - Attaching Flexible Gas Line
to Equipment Shuto Valve
Flexible Gas Line or
Black Pipe to Heater
Cabinet Regulator
To Regulator
Installation Items Needed (Not Provided)
• 8'' Adjustable Wrench
• 8'' Pipe Wrench
• 1/2'' Flexible Gas Line (24'' Min.) or 1/2'' Black Pipe
• 90 Deg. 1/2 NPT x 3/8'' Flare Fitting or 3/8 NPT x 1/2 NPT' Street Elbow
• Sealant (Resistant to Propane (LP) Gas)
• Shut O Valve
• Allen Wrench
1) A variety of options are possible for routing the Gas Connection Lines depending on where
your Gas Supply line is located.
NOTICE: Most building codes do not permit concealed gas connections. Check your local build-
ing code prior to using a Flexible Gas Line for this installation.
2) Identify the gas inlet on the Heater that corresponds to the fuel type for your installation. Re-
move the threaded plug by turning counterclockwise.
Install a 90 degree tting - not included). Be sure to use a gas resistant sealant on the 3/8 NPT
tting. Position the tting so the inlet line can be attached without binding.
3) Install the Gas Line to the 90 Deg. tting and attach to the Shut O Valve.
4) Check all connections for gas leaks.
CAUTION: Use pipe joint sealant that is resistant to gas (PROPANE or NG). We
recommend that you install a sediment trap in a supply line. Locate sediment trap
where it is within reach for cleaning and not likely to freeze. Install in the piping
system between fuel supply and heater. A sediment trap traps moisture and contaminants.
This keeps them from going into heater controls. If sediment trap is not installed or is
installed incorrectly, heater may not run properly.
CAUTION: Avoid damage to regulator. Hold gas regulator with wrench when
connecting into gas piping and/or ttings. NG Models: 6 in. to 14 in. W.C. Gas
supplier provides external regulator for natural gas.
Propane (LP) Regulator
Gas Inlet
Natural Gas (NG)
Regulator Inlet
Caution: Two gas line installations at the same time are
prohibited.