VENTED NATURAL GAS LOGS MODELS VL-WO18D / VL-WO24D / VL-WO30D VL-AA18D / VL-AA24D / VL-AA30D VL-NO18D / VL-NO24D / VL-NO30D VL-SA18D / VL-SA24D / VL-SA30D VL-CA18D / VL-CA24D / VL-CA30D 0418GL012S Complies with ANSI Z21.842012, Standard for Manually lighted, Natural Gas Decorative Gas Appliances for Installation in Solid-Fuel Burning Fireplaces. Complies with ANSI Z21.
TABLE OF CONTENTS Specifications.................................................................................................................................... 2 Important Safety Information ............................................................................................................3 Product Identification......................................................................................................................... 5 Product Features............................................
SAFETY INFORMATION IMPORTANT: Read this owner’s manual carefully and completely before trying to assemble, operate, or service this log set. Improper use of this log set can cause serious injury or death from burns, fire, explosion, electrical shock, and carbon monoxide poisoning. Only a qualified installer, service agent, or local gas supplier may install and service this product. WARNING: Do not store or use gasoline or other flammable vapors or liquids in the vicinity of this or any other appliance.
SAFETY INFORMATION 1. This appliance is only for use with the type of gas indicated on the rating plate. 2. Do not place propane/LP supply tank(s) inside any structure. Locate propane/LP supply tank(s) outdoors. 3. If you smell gas • shut off gas supply • do not try to light any appliance • do not touch any electrical switch; do not use any phone in your building • immediately call your gas supplier from a neighbor’s phone.
PRODUCT IDENTIFICATION Cover Plate* Log Risers Pilot Bracket Screw (4) 8X3/8PPHTS-B Burner Manifold Burner Clamp* Grate Burner Pan *Uses (4) 8X3/8PPHTS-B Screws 5 Burner Inlet
PRODUCT FEATURES The State of Massachusetts requires that the chimney flue damper, when used with decorative gas log sets, be welded open or completely removed. In the State of Massachusetts, this appliance must be installed by a licensed plumber or gasfitter. In the State of Massachusetts the gas cock must be a T-handle type. The State of Massachusetts requires that a flexible appliance connector cannot exceed three feet in length. LOCAL CODES Install and use log set with care. Follow all codes.
PREPARING FOR INSTALLATION AIR FOR COMBUSTION AND VENTILATION WARNING: If the area in which the log set may be operated does not meet the required volume for indoor combustion air, combustion and ventilation air shall be provided by one of the methods described in the National Fuel Gas Code, ANSI Z223.1/NFPA 54, the International Fuel Gas Code, or applicable local codes. Today's homes are built more energy efficient than ever.
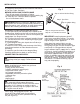
INSTALLATION Fig. 2 INSTALLATION Damper PREPARE DAMPER Damper "Opened Position" The chimney damper must be fixed open in a manner which will maintain the minimum permanent vent opening at all times. This may be accomplished by installing a screw or bolt in the edge of the damper to prevent the damper from closing, by drilling a hole or holes in the damper blade or by installing the supplied damper clamp on the edge of the damper blade (see Figure 2).
INSTALLATION In compliance with ANSI Z21.60•CGA2.26 and National Fuel Gas Code, Section 6. Fig. 5 BEFORE INSTALLING THE APPLIANCE - Turn off gas supply to fireplace or firebox. - Clean fireplace floor and chimney before installing log set. Seal any ash. Clean out doors to protect the unit from down drafts.
INSTALLATION CHECKING GAS CONNECTIONS WARNING: Test all gas piping and connections for leaks after installing or servicing. Correct all leaks immediately. WARNING: Never use an open flame to check for a leak. Apply a mixture of liquid soap and water to all joints. If bubbles form, there may be a leak. Correct all leaks immediately. Pressure Testing Gas Supply Piping System Test Pressures In Excess Of 1/2 PSIG ( 3.5kPa ) 1.
INSTALLATION ADDING PAN MATERIAL WARNING: Apply loose material (embers and lava rock [cinders]) per instruction manual. DO NOT apply extra material not supplied with this appliance. All previously applied loose material (embers) must be removed prior to reapplication. 1. Open bags of ash bed material (vermiculite), and spread evenly across burner pan to the top. It is ok to cover the connecting hardware and the burner pan, but DO NOT cover the gas valve. 2.
ASSEMBLING LOGS VL-WO18D/VL-WO24D/VL-WO30D/VL-SA18D/VL-SA24D/VL-SA30D WARNING: Failure to position the parts in accordance with these diagrams or failure to use only parts specifically approved with this log set may result in property damage or personal injury. CAUTION: After installation and periodically thereafter, check to ensure that no yellow flame comes in contact with any log. With the log set set to High, check to see if yellow flames contact any log.
ASSEMBLING LOGS VL-AA18D/VL-NO18D/VL-CA18D WARNING: Failure to position the parts in accordance with these diagrams or failure to use only parts specifically approved with this log set may result in property damage or personal injury. CAUTION: After installation and periodically thereafter, check to ensure that no yellow flame comes in contact with any log. With the log set set to High, check to see if yellow flames contact any log.
ASSEMBLING LOGS VL-AA24D/VL-AA30D/VL-NO24D/VL-NO30D/VL-CA24D/VL-CA30D WARNING: Failure to position the parts in accordance with these diagrams or failure to use only parts specifically approved with this log set may result in property damage or personal injury. CAUTION: After installation and periodically thereafter, check to ensure that no yellow flame comes in contact with any log. With the log set set to High, check to see if yellow flames contact any log.
OPERATION FOR YOUR SAFETY READ BEFORE LIGHTING WARNING: If you do not follow these instructions exactly, a fire or explosion may result causing property damage, personal injury or loss of life. A. This appliance requires ignition by match lighting. When lighting the appliance, follow these instructions exactly. B. BEFORE LIGHTING smell all around the appliance area for gas. Be sure to smell next to the floor because some gas is heavier than air and will settle on the floor.
OPERATION LIGHTING INSTRUCTIONS MATCH LIGHT UNITS 1. STOP! Read the safety information as noted above. WARNING: BE SURE THAT THE CHIMNEY DAMPER IS FULLY OPEN. 2. Read all warnings and safety information in this manual. 3. Turn keyed shutoff valve to the "OFF" position (see Figure 30). 4. Wait five (5) minutes to clear out any gas. If you smell gas, STOP! Follow the safety instructions on the previous page named "WHAT TO DO IF YOU SMELL GAS". If you do not smell gas, continue onto the next step. 5.
CARE AND MAINTENANCE BURNER FLAME PATTERN Figure 31 shows a correct burner flame pattern. Figure 32 shows an incorrect burner flame pattern. The incorrect burner flame pattern shows sporadic, irregular flame tipping. The flame should not be dark or have an orange/reddish tinge. Note: When using the log set the first time, the flame will be orange for approximately one hour until the log cures. If burner flame pattern is incorrect, as shown in Figure 32.
CARE AND MAINTENANCE • Keep the area around the log set clean and clear of debris. • Once every year a qualified agency or certified chimney sweep should examine and clean the venting system of the fireplace. At the beginning of each season, the system should be checked as follows: 1. Check the chimney flue/vent pipe to ensure that the flue is drawing properly. This will also check if any vent pipe connections are tight. 2. Check to see that the chimney/vent termination have no blockages. 3.
TROUBLESHOOTING WARNING: If you smell gas: • Shut off gas supply. • Do not try to light any appliance. • Do not touch any electrical switch; do not use any phone in your building. • Immediately call your gas supplier from a neighbor’s phone. Follow the gas supplier’s instructions. • If you cannot reach your gas supplier, call the fire department. IMPORTANT: Operating log set where impurities in air exist may create odors.
TROUBLESHOOTING PROBLEM POSSIBLE CAUSE CORRECTIVE ACTION Log set produces a 1. Metal expanding while heating or contracting while clicking/ticking noise cooling. just after burner is lit or shut off. Log set produces unwanted odors. 1. Log Set burning vapors from paint, hair spray, glues, cleaners, chemicals, new carpet, etc. (See IMPORTANT statement page 19). 2. Gas leak. See Warning statement page 19. 1. This is common with most log sets. If noise is excessive, contact qualified service person. 1.
REPLACEMENT PARTS For replacement parts, call our Technical Service Department at 1-877-447-4768, 8:30 a.m. –4:30 p.m., CST, Monday – Friday. 12 11 7 10 8 6 14 13 1-5 1-2 9 1-4 1-3 1-1 15 1-6 VL-WO18D / VL-WO24D / VL-WO30D ITEM No. 1 DESCRIPTION QTY VL-WO18D PART NO.
REPLACEMENT PARTS For replacement parts, call our Technical Service Department at 1-877-447-4768, 8:30 a.m. –4:30 p.m., CST, Monday – Friday. 12 11 7 10 8 6 14 13 1-5 1-3 1-6 1-6 1-3 1-4 1-4 1-7 3 1-7 1-5 9 15 1-1 1-2 VL-AA18D/VL-NO18D/VL-CA18D 1-2 1-1 VL-AA24D/VL-AA30D/VL-NO24D/VL-NO30D/VL-CA24D/VL-CA30D PART NO. ITEM NO.
This limited warranty is extended to the original retail purchaser of this heater and warrants against any two 2 years two 2 years 33 23
GHP Group, Inc. 6440 W Howard St Niles, IL 60714-3302 Tel: (877) 447-4768 www.ghpgroupinc.com GHP Group, Inc.
VENTILACIÓN NATURAL LEÑOS A GAS NÚM. DE MODELO VL-WO18D / VL-WO24D / VL-WO30D VL-AA18D / VL-AA24D / VL-AA30D VL-NO18D / VL-NO24D / VL-NO30D VL-SA18D / VL-SA24D /VL-SA30D VL-CA18D / VL-CA24D / VL-CA30D 0418GL012S Cumple con la norma ANSI Z21.842012, Standard de forma manual con luz, Gas Natural decorativo Aparatos de gas para la instalación en De combustible sólido La quema chimeneas. Cumple con la norma ANSI Z21.
TABLA DE CONTENIDO Especificaciones............................................................................................................................................................... 2 Información de seguridad importante............................................................................................................................... 3 Identificación del producto...........................................................................................................................
INFORMACIÓN DE SEGURIDAD IMPORTANTE: Por favor, lea cuidadosa y completamente este manual del propietario antes de intentar ensamblar, operar o darle servicio a este conjunto de leños. El uso inapropiado de este conjunto de leños puede causar lesiones graves o la muerte por quemaduras, incendio, explosión, choque eléctrico y envenenamiento por monóxido de carbono. Solamente un instalador calificado, un agente de servicio o el proveedor local de gas puede instalar y darle servicio a este producto.
INFORMACIÓN DE SEGURIDAD 1. Este aparato es solo para ser usado con el tipo de gas indicado en la placa de características. 2. No coloque el(los) tanque(s) de suministro de propano/PL dentro de ninguna estructura. Coloque el(los) tanque(s) de suministro de propano/PL en exteriores. 3.
IDENTIFICACIÓN DEL PRODUCTO Placa de la cubierta* Plataformas de leños Tornillo Soporte piloto (4) 8X3/8PPHTS-B Distribuidor del quemador Abrazadera del quemador* Rejilla Bandeja del quemador *Usos (4) 8X3/8PPHTS-B Tornillos 5 Entrada del quemador
CARACTERÍSTICAS DEL PRODUCTO El Estado de Massachusetts exige que el regulador de tiro del conducto de la chimenea, cuando se usa con conjuntos de leños a gas decorativos, esté soldado abierto o se retire por completo. En el Estado de Massachusetts, este aparato debe ser instalado por un fontanero o instalador de gas certificado. En el Estado de Massachusetts la válvula de cierre del gas debe ser del tipo mango en T.
PREPARACIÓN PARA LA INSTALACIÓN AIRE PARA LA COMBUSTIÓN Y VENTILACIÓN ADVERTENCIA: Si el área en la cual el conjunto de leños puede ser operado no cumple con el volumen requerido para aire de combustión de interiores, el aire de combustión y ventilación será proporcionado por uno de los métodos descritos en el National Fuel Gas Code, ANSI Z223.1/NFPA 54, el International Guel Gas Code, o los códigos locales aplicables. Las casas de hoy están construidas para que ahorren energía como nunca antes.
INSTALACIÓN INSTALACIÓN Fig. 2 PREPARACIÓN DEL REGULADOR DE TIRO El regulador de tiro El regulador de tiro de la chimenea debe fijarse abierto de tal manera que mantendrá la abertura mínima del respiradero permanente en todo momento.
INSTALACIÓN En cumplimiento de ANSI Z21.60•CGA2.26 y National Fuel Gas Code, Sección 6. Fig. 5 ANTES DE INSTALAR EL APARATO - Cierre el suministro de gas a la chimenea o a la caja de fuego. - Limpie el piso de la chimenea y la chimenea antes de instalar el conjunto de leños. Selle cualquier ceniza. Limpie las puertas para proteger la unidad de corrientes descendentes.
INSTALACIÓN REVISIÓN DE LAS CONEXIONES DE GAS ADVERTENCIA: Pruebe toda la tubería y conexiones de gas en busca de fugas después de la instalación y el servicio. Corrija todas las fugas de inmediato. ADVERTENCIA: Nunca use una llama abierta para revisar en busca de fugas. Aplique una mezcla de jabón líquido y agua en todas las juntas. Si se forman burbujas, puede haber una fuga. Corrija todas las fugas de inmediato.
INSTALACIÓN CÓMO AGREGAR MATERIAL DE LA BANDEJA ADVERTENCIA: Aplique el material flojo (brazas y roca de lava [cenizas]) conforme al manual de instrucciones. NO aplique material extra no suministrado con este aparato. Todo el material flojo aplicado previamente (brazas) debe retirarse antes de la reaplicación. 1. Abra las bolsas de material de la cama de ceniza (vermiculita) y dispérselo uniformemente a través de la bandeja del quemador hasta la parte superior.
MONTAJE DE LEÑOS VL-WO18D/VL-WO24D/VL-WO30D/VL-SA18D/VL-SA24D/VL-SA30D ADVERTENCIA: No colocar las piezas de acuerdo con estos diagramas o no usar solamente piezas específicamente aprobadas con este conjunto de leños puede resultar en daños a la propiedad o lesiones personales. w PRECAUCIÓN: Después de la instalación y a partir de alli periódicamente, revise para asegurarse de que ninguna llama amarilla entre en contacto con los leños.
MONTAJE DE LEÑOS / VL-AA18D/VL-NO18D/VL-CA18D ADVERTENCIA: No colocar las piezas de acuerdo con estos diagramas o no usar solamente piezas específicamente aprobadas con este conjunto de leños puede resultar en daños a la propiedad o lesiones personales. w PRECAUCIÓN: Después de la instalación y a partir de alli periódicamente, revise para asegurarse de que ninguna llama amarilla entre en contacto con los leños.
MONTAJE DE LEÑOS VL-AA24D/VL-AA30D/VL-NO24D/VL-NO30D/VL-CA24D/VL-CA30D ADVERTENCIA: No colocar las piezas de acuerdo con estos diagramas o no usar solamente piezas específicamente aprobadas con este conjunto de leños puede resultar en daños a la propiedad o lesiones personales. w PRECAUCIÓN: Después de la instalación y a partir de alli periódicamente, revise para asegurarse de que ninguna llama amarilla entre en contacto con los leños.
OPERACIÓN PARA SU SEGURIDAD LEA ANTES DEL ENCENDIDO ADVERTENCIA: Si no sigue estas instrucciones exactamente, puede resultar un incendio o explosión ocasionando daños a la propiedad, lesiones personales o la muerte. A. Este aparato requiere ignición por un cerillo . Al encender el aparato, siga estas instrucciones exactamente. B. ANTES DE ENCENDER huela todo alrededor del área del aparato en busca de gas.
OPERACIÓN INSTRUCCIONES DE ENCENDIDO UNIDADES DE ENCENDIDO CON FÓSFORO 1. ¡ALTO! Lea la información de seguridad que se indicó anteriormente. ADVERTENCIA: ASEGÚRESE DE QUE EL CONDUCTO DE LA CHIMENEA ESTÉ COMPLETAMENTE ABIERTO. 2. Lea todas las advertencias e información de seguridad en este manual. 3. Gire la válvula con llave de cierre del gas a la posición «OFF» (vea la Figura 30). 4. Espere cinco (5) minutos para que se vacíe todo el gas.
CUIDADO Y MANTENIMIENTO PATRÓN DE LA LLAMA DEL QUEMADOR La Figura 31 muestra un patrón correcto de la llama del quemador. La Figura 32 muestra un patrón incorrecto de la llama del quemador. El patrón incorrecto de la llama del quemador muestra puntas de llama esporádicas e irregulares. La llama no debe ser oscura ni tener un matiz anaranjado/rojizo. Nota: Cuando use por primera vez el conjunto de leños, la llama será anaranjada durante aproximadamente una hora hasta que los leños fragüen.
CUIDADO Y MANTENIMIENTO • Mantenga el área alrededor del conjunto de leños limpia y libre de desechos. • Una vez cada año, una agencia calificada o deshollinador certificado debe examinar y limpiar el sistema de ventilación de la hoguera. Al comienzo de cada estación, el sistema debe revisarse como sigue: 1. Revise el conducto/tubería de ventilación de la chimenea para asegurarse de que el conducto esté extrayendo adecuadamente. Revise también si alguna tubería de ventilación está hermética. 2.
RESOLUCIÓN DE FALLAS ADVERTENCIA: Si huele a gas: • Apague el suministro de gas • No trate de encender ningún aparato. • No toque ningún interruptor eléctrico; no use ningún teléfono en su edificio. • Llame de inmediato a su proveedor de gas del teléfono de un vecino. Siga las instrucciones del proveedor de gas. • Si no puede contactar a su proveedor de gas, llame al Cuerpo de Bomberos. IMPORTANTE: La operación del conjunto de leños donde existan impurezas en el aire puede crear malos olores.
RESOLUCIÓN DE FALLAS PROBLEMA CAUSA POSIBLE ACCIÓN CORRECTIVA El conjunto de leños produce 1. El metal se expande cuando se calienta o 1. Esto es comúnen la mayoría de conjuntos de leños. Si el un chasquido/tictac justo se contrae cuando se enfría. ruido es excesivo, póngase en contacto con una persona de servicio calificada. después de que el quemador se enciende o apaga. El conjunto de leños produce olores indeseados. 1. El conjunto de leños está quemando 1. Abra el conducto al máximo.
PIEZAS DE REPUESTO Para piezas de repuesto, llame a nuestro departamento de servicio técnico al 1-877-447-4768, de lunes a viernes, de 8:30 a.m. a 4:30 p.m., hora estándar del Centro. 12 11 7 10 8 6 14 13 1-5 1-2 9 1-4 1-3 1-1 15 1-6 VL-WO18D/VL-WO24D/VL-WO30D/VL-SA18D/VL-SA24D/VL-SA30D Núm.
PIEZAS DE REPUESTO Para piezas de repuesto, llame a nuestro departamento de servicio técnico al 1-877-447-4768, de lunes a viernes, de 8:30 a.m. a 4:30 p.m., hora estándar del Centro. 12 11 10 8 6 14 13 1-5 1-6 1-3 1-6 1-4 1-3 1-7 1-1 1-4 1-2 VL-AA18D/VL-NO18D/VL-CA18D 3 1-7 1-5 9 15 1-2 1-1 VL-AA24D/VL-AA30D/VL-NO24D/VL-NO30D/VL-CA24D/VL-CA30D Núm de pieza Núm. de artículo Descripción CAN.
Garantía GARANTÍA LIMITADA: Esta garantía limitada se extiende al comprador original al por menor de este conjunto de calentador y garantiza contra cualquier defecto en materiales y mano de obra durante un periodo de (2) años a par tir de la fecha de venta al por menor. GHP Group, Inc., a su opción, proporcionará piezas de reemplazo o reparará la unidad cuando sea devuelta apropiadamente a la tienda minorista donde se compró o a uno de nuestros centros de servicio como lo indica GHP Group, Inc.
REGISTRO DE LA GARANTÍA IMPORTANTE: Le urgimos que llene su tarjeta de registro de la garantía en el plazo de catorce (14) después de la fecha de compra También puede registrar su garantíaen internet en www.ghpgroupinc.com. Complete el número de serie. Conserve esta porción de la tarjeta para sus registros. GHPGroup, Group, GHP Inc.Inc. 8280 Austin 6440 W Ave. Howard St Morton IL 60053-3207 Niles,Grove, IL 60714-3302 Tel: (877) 447-4768 Tel: (877) 447-4768 www.ghpgroupinc.com www.ghpgroupinc.