
Full Product Manual


24
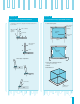
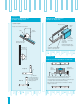
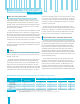
1. Prepare Parts for Cementing.
Scrape edges
1
⁄
4
"-
5
⁄
6
" wide
tape, adhesive
down
1" wide tape to
hold cement
CAUTION: Make sure that the tape
does not affect the hardening or
color of the cement.
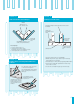
2. Pour Cement.
Overfill to allow for
cement shrinkage as it
hardens.
Keep nozzle of dispenser deep
in joint to insure complete filling.
NOTE: Bottom fillet may not require
finishing in many applications.
Dispenser Motion
Tape folded up to
seal end
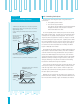
1
⁄
8
"-
3
⁄
16
"
1
⁄
8
"-
3
⁄
16
"
1
⁄
16
"
3
⁄
16
"
or
Position pieces with small
clearance not greater than
.015". This clearance must be
kept to prevent a dry notch.
Paper, small wire, etc., may be
used to position the parts prior
to clamping. Remove spacers
before cementing.
About
3
⁄
32
"
3
⁄
16
" to
1
⁄
4
"
1. Position Parts for Cementing.
2. Pour Cement.
Inside edge of joint is
filled by capillary action.
3. Allow Cement to Harden.
4. Machine Off
Excess Material
(See Figures 11A and 11B).
5. Final Finishing, Sanding, Buffing, etc.
Overfill to allow
for shrinkage.
Open ”V” Joint Polymerizable Cementing
Open ”V” Angle Joint Technique
Dispenser
FIGURE 9A FIGURE 9B