Model PX-M402U MPEG-1/2/4 AND DivX® DIGITAL VIDEO CONVERTER FOR USB 2.
Plextor reserves the right to make improvements in the products described in this manual at any time without prior notice. Plextor makes no representation or warranties with respect to the contents hereof and specifically disclaims any implied warranties of merchantability or fitness for any particular purpose. Further, Plextor Corp. reserves the right to revise this manual and to make changes in its content without obligation to notify any person or organization of such revision or change.
DECLARATION OF CONFORMITY Model Number: PX-M402U Trade Name: PLEXTOR Responsible Party: PLEXTOR Corp. Address: 48383 Fremont Blvd, Suite 120, Fremont, CA 94538-6509, USA Telephone Number: 510-440-2000 This device complies with Part 15 of the FCC Rules. Operation is subject to the following two conditions: (1) This device may not cause harmful interference, and (2) this device must accept any interference received, including interference that may cause undesired operation.
This page intentionally left blank.
Table of Contents 1. Getting Started ..............................................................................1 About this Manual...........................................................................1 Meet Your ConvertX.......................................................................1 What You Can Do with the ConvertX.........................................2 Features of the Plextor ConvertX ................................................3 What You Need to Use the ConvertX .................
Table of Contents Previewing Your Project........................................................... 33 Viewing File Properties ............................................................ 33 Saving Your Project.................................................................. 33 Creating......................................................................................... 34 Deleting a Chapter Mark........................................................... 36 Adding a Chapter Mark......................
1. Getting Started Congratulations! Thank you for purchasing the Plextor® ConvertX™ PX-M402U Digital Video Converter. We appreciate the confidence you have shown in us. Our goal is to put you—and keep you—on the leading edge of video capture and compression technology. About this Manual Please read this manual carefully and keep it handy for easy reference. Use the manual for installation, operation and troubleshooting.
Section 1. Getting Started What You Can Do with the ConvertX Uncompressed full-motion video with sound takes as much as one gigabyte of storage space per minute of video. But with your ConvertX, you can compress that video so that an entire movie fits onto a DVD— or even a CD! The ConvertX PX-M402U Digital Video Converter and the bundled InterVideo® WinDVD Creator™ 2 software let you: • Capture: Capture video and sound from analog or digital sources. • Edit: Modify that video to get just what you want.
Section 1. Getting Started Features of the Plextor ConvertX • Analog-to-digital conversion: Convert analog video from your camcorder or VCR into digital format for a computer. • Archiving video memories: Archive your video on long-lasting CD or DVD discs. • Real-time MPEG-1/2/4 hardware video capture: Select the best format for your quality and speed requirements. • Official DivX Certified™ product: Ready for video capture in the DivX format. • USB connection: Use Hi-Speed USB 2.
Section 1. Getting Started What You Need to Use the ConvertX What You Need: • Computer: Pentium® III, 800-MHz CPU or faster. (Pentium 4, 1.6GHz CPU or faster suggested) • Minimum memory: At least 256 megabytes of memory. • Hard disk size: At least 10 gigabytes of free space recommended. • Monitor resolution: 1024 x 768, 24 bit color. • Video graphics card: With 24-bit resolution capability and DirectX support. • Sound card: Windows-compatible sound card with 48-kHz playback.
Section 1. Getting Started What's in the Box Check the contents of the box. You should have: • ConvertX PX-M402U Digital Video Converter • AC adapter (100–240 V) and power cord • USB 2.
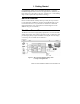
Section 1. Getting Started ConvertX Features and Controls Before proceeding, become familiar with the controls and features of your ConvertX. Front Panel Figure 2: Front panel of the ConvertX PX-M402U Digital Video Converter 6 1 Connector or Indicator Audio Function 2 Video 3 S-Video 4 Record Recording indicator LED: Amber when converting video from analog to digital. 5 Power Power LED: Blue when the AC adapter and USB cable are connected and the computer is turned on.
Section 1. Getting Started Rear Panel Figure 3: Rear panel of the ConvertX PX-M402U Digital Video Converter 1 Connector DC 9V Function Power connector: Connect the AC adapter here. The unit has an automatic power switch controlled by the USB cable from the PC. When the PC power is on, the ConvertX power is also on. CAUTION: Use only the AC adapter shipped with your ConvertX. 2 USB 2.0 USB 2.0 connector: Connect your USB cable here. CAUTION: Use only the USB cable shipped with your ConvertX.
Section 1. Getting Started A Word about MPEG-4 and DivX Together, this version of the ConvertX and WinDVD Creator support two types of MPEG-4 compression: • Real-time MPEG-4 compression, with file extension .avi, is supported by the ConvertX. • DivX compression, with file extension .avi, is also supported by the ConvertX. The ConvertX hardware encoder can capture video and compress it using MPEG-4 or DivX, saving valuable space on your hard disk.
2. Installing Your ConvertX Here’s how to install your ConvertX. Install the ConvertX Video Converter Before installation, Plextor highly recommends that you get the latest updates available for your computer’s operating system. Current service packs and critical updates are available from http://windowsupdate.microsoft.com. If you have a computer with Windows 2000 or Windows XP, use the following procedure to connect your ConvertX USB Digital Video Converter.
Section 2. Installing Your ConvertX Figure 4: Turn on the computer and insert the ConvertX software disc 2. Insert the ConvertX software disc into your CD or DVD drive. You see the Plextor Application Installer screen. (If you don’t see the installer screen right away, use Windows Explorer to navigate to the CD or DVD drive, and double-click the Plextor.exe file.
Section 2. Installing Your ConvertX 3. Select the ConvertX Device Driver button. You may see a window that asks if you want to install DirectX version 9.0b. (If you don’t see this window, you have the correct version of DirectX already installed. Skip to step 9 below.) 4. If you see the DirectX installation window, Select OK. You see a window with the Welcome to setup for DirectX and license agreement. 5. Click the I accept the agreement choice, then select Next. You see the DirectX Setup window. 6.
Section 2. Installing Your ConvertX Figure 6: Location for the installation folder 10. Click Finish. You see a text box asking if you want to create the folder. 11. Click Yes. You see the License Agreement.
Section 2. Installing Your ConvertX 12. When you have read the entire agreement, click Next. You see the driver installation for the ConvertX PX-M402U. Figure 8: Beginning of the driver installation 13. As directed by the driver installation, make sure your ConvertX PX-M402U is not connected to your computer yet. Then click Install. You see a text box indicating the Plextor ConvertX PX-M402U has been installed. Figure 9: When the ConvertX has been installed, select Finish 14. Click Finish.
Section 2. Installing Your ConvertX Install the ConvertX Drivers IMPORTANT NOTE: In the next steps of this procedure, you will be installing driver files into your computer. You’ll see the “Found New Hardware” window more than once, and you may feel like you’re seeing the same dialog over and over again. This is normal. You don’t need to shut down or reboot your computer until all drivers have been installed. 1. You will use a USB cable to connect the ConvertX to your computer as shown in Figure 10.
Section 2. Installing Your ConvertX Turning the ConvertX On and Off Note that there’s no power switch on the ConvertX. When the computer power is on, the ConvertX is on. When the computer power is off, the ConvertX is off. Don’t Forget to Register! Don’t forget to register your ConvertX! In the Plextor Application Installer, select Register Your ConvertX and follow the prompts. Registration means you’ll stay abreast of valuable information about new features, updated drivers, and more.
Section 2. Installing Your ConvertX 3. In System Properties, click the Hardware tab, then click on the Device Manager button. You see the Device Manager. 4. Locate the icon for Sound, video and game controllers, and click the + sign next to it to expand the entry list. 5. Look for an entry for Plextor ConvertX M402U A/V Capture. NOTE: You won’t see the Plextor ConvertX icon unless the ConvertX is connected to your PC. Figure 11: Device Manager shows the ConvertX device 6.
Section 2. Installing Your ConvertX 7. If the ConvertX does not operate even though 1) the sound, audio and game controllers are listed and do not have a yellow diamond with an exclamation point, and 2) the Plextor ConvertX device is listed, in Device Manager double-click the Plextor ConvertX device and then select the Remove button. Then restart your computer. The computer will automatically perform another hardware scan and this time it should install the digital video converter correctly.
Section 2. Installing Your ConvertX • If you want to connect composite video: Use the RCA A/V cables to connect the Line Out or Video/Audio Out connectors from the source to the front-panel Audio and Video connectors of the ConvertX. • If you want to connect S-Video: Use the S-Video cable to connect from the S-Video connector at the source to the front-panel S-Video connector on the ConvertX.
3. Using the ConvertX with WinDVD Creator WinDVD Creator 2 software lets you pull in video from your camcorder or another analog source and feed it to the Plextor ConvertX. WinDVD Creator also lets you capture, edit, create and share video and other content. Install the WinDVD Creator 2 Software To install the WinDVD Creator video capture and authoring software: 1. Turn ON your computer system. 2. Make sure that all applications are turned off.
Section 3. Using the ConvertX with WinDVD Creator 9. Accept the default program folder as the location where the setup program will add WinDVD Creator’s icons, or enter the name of another folder. Then click Next. The setup program installs WinDVD Creator, a process that can take a few minutes. (You may see a Third Party Application Setup window, asking if you want to install Microsoft HTML Help. Click Next to install Microsoft HTML Help.) 10.
Section 3. Using the ConvertX with WinDVD Creator Figure 13. WinDVD Creator task window No. 1 Window Area Create new project 2 Open existing project 3 Create CD/DVD with existing video file 4 Capture video into hard disk 5 Record video directly to DVD disc Function Brings up an Untitled WinDVD Creator main window for you to create a new project. See page 22. Lets you bring up the WinDVD Creator main window with a project you’ve already begun. You see files with the .wcp extension. See page 28.
Section 3. Using the ConvertX with WinDVD Creator Overview of Creating a Personalized CD or DVD Disc When you open a new project or an existing one in WinDVD Creator, you see the main window, with areas for Preview, Media Library, and Story Board. Figure 14: WinDVD Creator’s main window No. 1 Window Area Task buttons 2 3 Help Disc Manager 22 Function Capture, Edit, Author, and Make Movie. These buttons lead you into the four steps you’ll perform to create a CD or DVD. Click here to get help.
Section 3. Using the ConvertX with WinDVD Creator Step 1, Capture: First is the capture step. You take videos from your digital camcorder or VCR, or pictures from your Web camera, and either feed them directly to the ConvertX or save them onto your computer for later use. If you do not need to capture any media content from your devices and already have the files on your computer, you can import the files from your hard drive in either Capture or Edit modes, by using the Import button in the Media Library.
Section 3. Using the ConvertX with WinDVD Creator Capturing To display the Capture window: 1. Ensure that the input device (such as a camera, camcorder, video cassette recorder, etc.) is connected to your computer, and that the device is on. 2. In the WinDVD Creator main window, click on the Capture button . You see the Capture window.
Section 3. Using the ConvertX with WinDVD Creator No. 1 2 Window Area Capture button Preview window 3 Input device list 4 Disk information 5 Media library Function Displays the Capture window. Allows you to preview the media content that you capture from outside devices or that you import from files. Shows a list of input devices that connect to your computer. Those devices allow you to capture video from the Plextor ConvertX, as well as from a television source, camera, or a digital camcorder.
Section 3. Using the ConvertX with WinDVD Creator Figure 16: Control panel for the Plextor ConvertX No. 1 Window Area Record Function Starts and stops recording. button 2 Configuration button Displays the configuration window for this device. 3. In the control panel, use the configuration button to get to tabs and menus that let you change the settings for capture: In the Record tab, select a Format and a Profile for capture.
Section 3. Using the ConvertX with WinDVD Creator In the Device Control tab, select the Video Source (S-Video or Composite) you have connected to the ConvertX. You can also select the Video Standard; set this to match the type of video that is coming into the ConvertX. (In general, NTSC is the TV standard used in North America and Japan, while PAL is used in Europe and South America. SECAM is used in France, Eastern Europe, and some African nations.
Section 3. Using the ConvertX with WinDVD Creator Recording Time and Disc Capacity The table below summarizes the recording capacity and time available with the ConvertX. (Video record times may vary, depending on the selected bit rate, frame size and disc capacity. For more details about recording times and capacities, see page 54 in Appendix A.
Section 3. Using the ConvertX with WinDVD Creator Editing In this section of WinDVD Creator you can trim your project, and add music, titles, and transitions to make your project look fantastic. To display the Edit window: • In the WinDVD main window, click on the Edit button see the Edit window. .
Section 3. Using the ConvertX with WinDVD Creator No. 1 Window Area Edit button Function Displays the Edit window. 2 Preview window 3 Media library 4 Library buttons 5 Storyboard or timeline 6 Storyboard/Timeline button View and listen to your media content. If your project is already arranged, you can preview it by pressing the Play button in the preview window. If you have already placed transitions into your storyboard, the preview window will also play them.
Section 3. Using the ConvertX with WinDVD Creator Adjusting a Video Clip To trim the length of a video clip: 1. In the timeline or storyboard at the bottom of the Edit window, select a video, then right-click. You see a pull-down menu with a selection for Video Manager. Figure 18: Use sliders in Video Manager to trim video clips No. 1 Window Area Sliders 2 Video cut tool Function Use to trim video to the desired length. Cuts video based on slider position. 2. Select Video Manager.
Section 3. Using the ConvertX with WinDVD Creator To divide a video clip into separate segments: 1. In the Edit window’s video library, select the desired clip. 2. Right-click on the clip and select Show Video Scenes from the menu; or left-click on the clip, then click the Show video scenes button in the upper right corner of the video library. You see a window that lets you Auto Detect scene changes or make scene changes By Time. 3. Ensure Auto Detect is selected, then click the right Go arrow button .
Section 3. Using the ConvertX with WinDVD Creator Adding Titles, Audio Effects, and Media Content To add and adjust a title: • From the Title Library, drag and drop a title to the desired location on the storyboard. Double-click on the title in the storyboard, then edit the title text. To format the title, select the text and change the color, alignment, and the font size as desired. Choose F to change the font, or C to change the color.
Section 3. Using the ConvertX with WinDVD Creator Creating Creating means using the Author window to add an interactive menu for your CD or DVD project. You can add a play button and a chapter menu for easy scrolling through your CD or DVD. You can also add a background image that can give a theme to your DVD. To display the Author window: • In the WinDVD Creator main window, click on the Author . You see the Author window.
Section 3. Using the ConvertX with WinDVD Creator No. 1 Window Area Author button Function Displays the Author window. 2 Preview window The top-left section of the Author window is the preview window. You can edit the theme here. 3 Theme library The top-right section is the Theme Library. Here you can select a theme for your project. This section automatically adds a play button and a chapter menu to your project.
Section 3. Using the ConvertX with WinDVD Creator Deleting a Chapter Mark To delete a chapter mark: 1. In the Chapter Board at the bottom of the Author window, right-click on the chapter you wish to remove. You see the Delete Chapter Mark text box. 2. Click to delete the chapter mark. When you remove a chapter mark from the chapter list, subsequent chapters are automatically reordered. If you want only a certain number of chapters in your project, just delete the chapter marks that you don’t want.
Section 3. Using the ConvertX with WinDVD Creator Sharing This is the final step in making your DVD. This is where you select the Make Movie button and choose the format you want to use for your DVD project. You can choose what type of television standard to use, and you can supply a name for your DVD. To display the Make Movie window: • In the WinDVD Creator main window, click on the Make Movie . You see the Make Movie window.
Section 3. Using the ConvertX with WinDVD Creator No. 1 Window Area Make Movie button Function Displays the Make Movie window. 2 Preview window 3 Burning wizard 4 Help The top-left section of the Make Movie window is the preview window. Here you preview your project as it is being burned, ensuring that it is properly displaying and playing. The top-right section is the Burning Wizard, which provides a step-by-step procedure for burning your project onto CD or DVD.
Section 3. Using the ConvertX with WinDVD Creator 3. In the Burning Wizard Format window, choose a TV System. The TV systems are: NTSC: Most commonly used in North America and Japan. PAL: Used in European and Asian countries. 4. In the Volume Name of Disc text field, enter the name for your disc. 5. When you have filled out the Burning Wizard/Format window, click the Next button . You see the Select Media window. Figure 21: Selecting the media for burning 6.
Section 3. Using the ConvertX with WinDVD Creator Write content to hard disk for later burning: Saves the project in a set of files on your hard disk, allowing you to burn the project at a later time. With this option, choose a location to save your project, then press the Next button . The set of files and folders containing the project are automatically created on your hard disk, in a folder labeled IVI_DVD.
Section 3. Using the ConvertX with WinDVD Creator Disc Manager Disc Manager lets you capture video directly onto a recordable DVD disc, without going through WinDVD Creator’s main window. Figure 23. Disc Manager window No. 1 2 3 Window Area Preview window Video library Capture 4 Tools 5 6 7 Authoring Eject DiscView Function View and listen to your media content. Import directly from the video library. Capture video from external devices such as a camcorder or VCR.
Section 3. Using the ConvertX with WinDVD Creator Disc Manager is ideal for recording video directly from your TV set to a DVD, or for archiving videotapes in a one-step operation. Capturing Directly to a DVD Disc You can capture video directly to a recordable or rewritable DVD disc. This is especially useful for capturing video using a digital video (DV) device, a capture card, or a web camera; or for copying VHS tapes to a DVD.
Section 3. Using the ConvertX with WinDVD Creator 6. Start the video source: camcorder, TV, videocassette player, etc., and in the Disc Manager window click Capture. You see the control panel for the capture device. 7. In the control window, use the configuration button to set the parameters for recording: In the Record tab, select a Format and a Profile for capture.
Section 3. Using the ConvertX with WinDVD Creator 9. To stop recording, press the Record button again. You see a window that indicates the disc content is being updated; then recording stops, and you see the Disc Manager preview window blank again. 10. You can continue recording and stopping, or you can simply let the entire video record onto the disc. The DiscView windows show the scenes on the disc.
4. Using the WinDVD Player InterVideo's WinDVD 5 is a simple-to-use DVD player that combines all the features you would expect to find in a standard consumer DVD player. It also has full VCD 2.0 and MPEG-4 support, full precision video decode, and a choice of user interfaces and video display options. Used with your ConvertX, the WinDVD player lets you play all kinds of media: commercial CDs and DVDs, MPEG-4 video CDs, and especially the CDs and DVDs created with WinDVD Creator.
Section 4. Using the WinDVD Player 8. Accept the default destination path proposed by the setup program and click Next. You see the Select Program Folder screen. 9. Accept the default program folder as the location where the setup program will add WinDVD player’s icons, or enter the name of another folder. Then click Next. The setup program installs WinDVD player, a process that can take a few minutes.
Section 4. Using the WinDVD Player Use the WinDVD Controls Once WinDVD is launched and active, use the controls shown on the WinDVD panel to navigate. Note that not all options are available with all CD and DVD titles; if a WinDVD feature is not available with a particular title, it is grayed out and inaccessible. Figure 24: WinDVD plays CDs, DVDs, and media files No.
Section 4. Using the WinDVD Player This page intentionally left blank.
5. Maintenance and Troubleshooting This chapter explains maintenance and troubleshooting procedures for your ConvertX. With proper maintenance, you can prevent problems. If trouble arises, you can often solve many simple problems on your own, rather than wait for assistance from a Plextor representative. Upgrading Your ConvertX Periodically, Plextor makes available updates for the operating program of the ConvertX.
Section 5. Maintenance and Troubleshooting Troubleshooting Hints Use these hints if you have problems with installation or capture. Problems with Installation If you have problems during or right after installation of your ConvertX, use these hints to help solve the problem: • First, make sure to update your version of Windows using Microsoft’s Windows Update. • Also, visit the Plextor web site to find other tips to help find and solve the problem. Problems with Capture • Make sure you are using a USB 2.
Appendix A: Specifications ConvertX Specifications Product Name Plextor ConvertX Product Type MPEG-1/2/4 and DivX Digital Video Converter Product Model PX-M402U System Interface Hi-Speed USB 2.0 Minimum System Requirements Computer Pentium III, 800-MHz CPU (minimum); Pentium 4, 1.6-GHz or faster CPU suggested Minimum Memory 256 MB or higher Hard Disk Size 10 GB free space preferred Interface Hi-Speed USB 2.
Appendix A: Specifications MPEG Specifications Video Compression MPEG-1: ISO/IEC11172-2 MPEG-2: ISO/IEC13818-2 MPEG-4: ISO/IEC14496-2 DivX: Home Theater, Portable profiles Video Bit Rate MPEG-1: 1.
Appendix A: Specifications MPEG Specifications (continued) Aspect Ratio MPEG-1: 1.0950 (NTSC), 0.9157 (PAL) MPEG-2, 4, DivX: 4:3 (All modes) Frame Rate 29.97 (NTSC), 25 (PAL, SECAM) NOTE: PAL, SECAM=PAL Audio Bit Rate 224 Kbps 16-bit stereo 128 Kbps* 16-bit stereo *MPEG-4 SP, LP, EP and DivX Portable Audio Compression PCM (The capture application converts PCM data to MPEG-1 Layer II) Audio Sampling Frequency 44.
Appendix A: Specifications Example Video Resolution and Recording Times Legend: HQ = High quality GQ = Good quality SP = Standard quality LP = Long play quality EP = Extended play quality NOTE: Video recording times can vary depending on the video source. Actual bit rates can vary from the target bit rate, depending on how much motion is in a video.
Appendix A: Specifications Example Video Resolution and Recording Times (continued) MPEG-4 Video Resolutions and Recording Times Profile Video Resolution HQ GQ SP LP EP Full-D1 Full-D1 Full-D1 SIF SIF Video Target Bit Rate (Kbps) 4,000 3,000 2,000 1,500 700 Total Data (MB/s) Data/ Minute (MB) Time (min), 700 MB CD Time (min), 4.3 GB DVD 0.52 0.39 0.26 0.20 0.10 30.94 23.61 15.59 11.92 6.06 22.72 29.77 45.10 58.96 115.92 141.48 185.36 280.83 367.08 721.
Appendix A: Specifications Front Panel Audio R, L RCA audio connectors. Red connector is right channel, white is left channel. Video RCA video connector for composite video S-Video S-Video connector Record Amber when capturing video Power Blue when AC adapter and USB cable are connected to the ConvertX and the computer is turned on. Power AC Adapter Input: 100-240 Vac Output: 9.0 Vdc, 750mA max. (ConvertX is operational at DC +8V min, +15V max.
Appendix A: Specifications Environmental Conditions Operating and Performance Guarantee Temperature 5 to 40 degrees Celsius Operating Humidity 20% to 80% (non-condensing) Storage Temperature –40 to 60 degrees Celsius Storage Humidity 20% to 80% (non-condensing) Vibration, Operating 2.0G0-Pk (5-300Hz), Sine sweep 5 minutes (Normal operation) Shock, Operating 3.
Appendix A: Specifications Approvals, Safety and EMC Standards Country/ Region USA Type Safety Agency UL Standard UL 60950 (AC adapter only) EMC FCC Part 15J Class B Canada Safety UL (C-UL) CSA C22.2 No.
Appendix A: Specifications WinDVD Creator 2 Specifications Input Formats Video: MPEG-1, MPEG-2, AVI Audio: WAV and MP3 Image: BMP, JPEG, GIF Video Output Formats MPEG-1 MPEG-2 DivX WMV AVI Format Support VCD, DVD, DVD+VR, DVD-VR (Supported media include DVD-R, DVD+R, DVD+RW, DVD+VR, DVD-VR) Compatibility Not compatible with .wcp files created by first edition of WinDVD Creator.
Appendix A: Specifications This page intentionally left blank.
Appendix B: Technical Support Store Plextor’s e-mail, web site, phone, and fax numbers in a convenient location. Keep your digital video converter’s serial number and a copy of your sales receipt handy as well. If you experience a problem while installing or operating your ConvertX, please refer first to the relevant sections of this manual regarding setup and installation (Chapters 1–2).
Appendix B: Technical Support How to Contact Plextor Technical Support There are several ways for you to contact Plextor’s Technical Support Department: • Visit our web site (www.plextor.com) for answers to Frequently Asked Questions. • Send us e-mail at support@plextor.com. Include your telephone number and the hours during which you can be reached. Be as detailed as possible in describing your problem.
Appendix B: Technical Support Returns In the unlikely event that you need to return a digital video converter to Plextor, you need an RMA (Returned Materials Authorization) number. You need this number before any Plextor digital video converter can be returned for repair or replacement. Here’s how you get an RMA number and return your digital video converter: 1. Contact Plextor Technical Support. You will receive assistance in troubleshooting your system.
Appendix B: Technical Support Packing Your ConvertX If possible, pack your ConvertX in the original box. Some of our customers have not held on to their boxes and have had to resort to lessthan-secure methods to get their units back to us. If you did not receive a box, we recommend you pay a packaging store (such as Mail Boxes Etc.) to ship your ConvertX.
Appendix C: Warranty PLEXTOR CORP. (“Plextor”) warrants your ConvertX PX-M402U Digital Video Converter against any defect in material and workmanship, under normal use, for a period of one year following its date of purchase. In the event this product is found to be defective within the warranty period, PLEXTOR will, at its option, repair or replace the defective unit.
Appendix C: Warranty All ConvertX units returned to PLEXTOR must be securely packaged and shipped postage prepaid. The ConvertX will be returned to the customer at Plextor’s expense when originating within the United States. For a ConvertX originating outside of the United States, the customer is responsible for shipping costs in both directions. NOTE: Warranty validity is limited to that applicable in the location where the ConvertX was originally purchased. If You’re Outside the U.S.
Index burn to disc · 39 burning CD · 38 device setting window · 39 DVD disc · 38 options · 39 select media window · 39 burning wizard · 38 . .avi files · 8 .
Index connecting · 18 selecting · 43 compression DivX · 28 DivX examples · 55 MPEG-1 · 28 MPEG-1 example · 54 MPEG-2 · 28 MPEG-2 examples · 54 MPEG-4 · 28 MPEG-4 examples · 55 options · 40 rate · 28, 54, 55 specifications · 52 computer changing · 17 required · 4, 51 configuration button · 26 configuration, minimum · 4, 51 connecting the ConvertX · 14 connecting video and audio sources · 17, 18 connector, power · 7 connectors front-panel · 6, 56 rear-panel · 7, 56 control panel, ConvertX · 26 ConvertX block
Index DVD on CD HQ format · 38 DVD±RW drive recommended · 4, 51 DVD-video · 28, 38 controls · 6 indicators · 6 functions, window area · 37 G E edit button · 23, 29, 30 edit window · 30 areas · 29 editing · 23, 29 eject · 47 Disc Manager · 41 electrostatic discharge specification · 57 EMC standards · 58 environmental conditions · 57 F features · 3, 6 adding interactive · 23 file formats · 40 .avi · 8 .
Index USB 2.
Index returns · 63 RMA number · 63, 64 system interface · 51 T S safety standards · 58 saving to file · 40 saving your project · 33 select media window · 39 serial number · 19, 45 sharing project · 23, 37 shipping your drive · 63, 64 shock specification · 57 show video scenes button · 32 SIF · 28 slider · 31 transition · 32 software obtaining · 49 upgrading · 49 WinDVD 5 · 3, 5 WinDVD Creator 2 · 3, 5, 19, 45 sound card required · 4, 51 specifications · 51 ConvertX · 51 WinDVD Creator · 59 startup, WinD
Index transfers · 56 USB cable · 7 connecting · 14 V VCD format · 38 vibration specification · 57 video bit rate · 52 compression · 52 connector · 6, 18, 56 format · 53 input · 3, 17 output format · 53 output format, WinDVD Creator · 59 recording · 27, 43 video clip adjusting · 31 dividing into separate segments · 32 using sliders to trim · 31 video cut tool · 31 video graphics card required · 4, 51 video library · 27 video library, Disc Manager · 41 video manager · 31, 32 video qualities, selecting · 27,
Notes Plextor ConvertX PX-M402U Installation and Users Manual 73
PLEXTOR CORP. 48383 Fremont Blvd. Suite 120 Fremont CA 94538-6509 Phone: Fax: E-mail: www.plextor.com 510-440-2000 800-886-3935 510-651-9755 info@plextor.