PX-MXxxxL Users Guide 1 of 63
Table of Contents Before You Start What’s in the box Putting the batteries in the remote control Front Panel Rear Panel 4 4 5 6 7 Getting Connected 1.0 Connecting to TV 1.1 HDMI 1.2 SCART 1.3 A/V (Composite Video & 2ch Audio) 1.4 Component Video & 2ch Audio 2.0 Connecting to AV Input with an AV device 2.1 SCART Input 2.2 AV Input (Composite Video& 2ch Audio) 3.0 Connecting to a Digital Amplifier 3.1 Coaxial Audio Out 3.2 Optical Audio out 4.0 Connecting to a Computer 5.
Editing 1.0 Editing recorded content stored in REC List section 2.0 Delete 3.0 Rename 4.0 Sorting 5.0 Title Edit 6.0 AB Erase 7.0 Split Title 8.0 Title Merge 9.0 Add Chapter Mark 10.0 Remove Chapter Mark 11.0 Copy to FAT 32 partition 12.0 Tools 13.0 Editing AV files stored in FAT 32 34 34 34 35 35 36 37 37 38 38 38 39 40 41 Time Shift 43 Playback 1.0 AV File Playback 2.0 Playback AV files in network computers 2.0 Playback AV files in network computers 3.0 Setting a LAN connection in My Shortcuts 4.
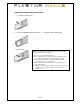
Before You Start What’s in the box Congratulations on purchasing your PleXtor MediaX home media centre. Please confirm that the following accessories are in the box when you open it.
Putting the batteries in the remote control 1. Open the battery cover 2. Insert two AAA/R03 batteries follow the +, – indications inside compartment 3. Close Cover Incorrect use of batteries can result in hazards such as leakage and bursting. Please observe the following: • Don’t mix new and old batteries together. • Don’t use different kinds of batteries together-although they may look similar, different batteries may have different voltages.
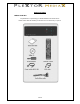
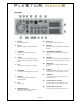
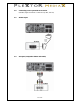
Front Panel Power LED Area that receives signal from remote control Guide To display Guide Menu Arrow Button’s To navigate ◄►▲▼ Ok / Enter To execute a selected function Record LED 6 of 63 Power On / Stand-by
Rear Panel 1. EXT. IR 10. DC In (12V) 2. DV In 11. COAXIAL 3. USB HOST 12. COMPONENT VIDEO OUT 4. USB PC 13.
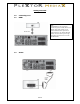
Getting Connected 1.0 1.1 Connecting to TV HDMI Note: Some HDMI TV’s do not support interlaced signal (567i/480i) which is the default video output setting of your PleXtor MediaX. Please press the TV system button on your PleXtor MediaX remote control in order to get the right signal when you connect to a TV with the HDMI cable. HDMI Cable 1.
1.3 A/V (Composite Video & 2ch Audio) 1.
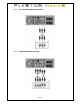
2.0 Connecting to AV Input with an AV device (Satellite, Digital Terrestrial or Cable Set Top Box, VCR etc) 2.1 SCART Input 2.
3.0 Connecting to a Digital Amplifier 3.1 Coaxial Audio Out 3.
4.0 Connecting to a Computer Please connect your PleXtor MediaX to USB 2.0 port in order to get the high speed (up to 480Mps) file transfer. Your PleXtor MediaX will only work at USB 1.1 if connected to a USB 1.1 port on your computer 5.
6.0 Connecting to a Camcorder Camcorder 7.0 Connecting to Local Area Network (LAN) 8.
Remote Control Toggles between TV & PleXtor MediaX When TV is connected with Scart cable POWER.
Initial Settings When you switch on your PleXtor MediaX for the first time you can set your language, Time and Local Area Network (LAN) 1.0 Language The following on screen display will show up Select your language by pressing ▲▼ buttons then Enter to execute 2.0 Date & Time Set the current date and time Set date & time by pressing the Number buttons and the ▲▼ buttons, then press Enter to execute.
3.0 LAN (Local Area Network) Select CANCEL if you do not have a network available or if you want to set it up later Select DHCP IP (Auto) or FIX IP (Manual) According to your IP status by pressing ▲▼ button then press Enter to execute. If you select DHCP IP (Auto) The IP address will be set according to DHCP in your network.
Format your Hard Disc Drive When you format your hard disc, you are given two options Auto format or Manual format. If you choose Auto format your PleXtor MediaX will format the hard disc to its default settings, if you choose Manual format you can choose the amount of hard disc space given to each partition. For your understanding, below is an explanation of the partitions: • Time Shift Buffer: This part of the hard drive is selected to buffer live TV while using Time Shift.
In order to enjoy your PleXtor MediaX fully, it is important that you understand what formatting the hard disc means. Below is some further information. Re-formatting the hard disc at a later date will overwrite all your files and folders (you will lose all your data) so if you reformat at a later date please back up your files first. File System Your PleXtor MediaX supports 3 file systems 1.
After the initial setup the format screen appears 19 of 63
1.0 Auto Format If you select Auto this screen appears Press ►button to select format then press Enter to execute Your PleXtor MediaX will format the HDD.
2.0 Manual Format If you select Manual, this screen appears Time Shift Buffer Capacity Press ▲▼ buttons to set from 1 hour to 4 hours Press ► button to select Next then press Enter Recording & Multimedia disc Capacity Press ▲▼ buttons to select the capacity of Recording & Multimedia, the minimum each can have is 10% Press ► button to select Next then press Enter Multimedia Section Press ▲▼ buttons to select the capacity of FAT 32 and NTFS in the multimedia disc space.
Start Format Press ►button to select format then press Enter to execute Your PleXtor MediaX will format the HDD.
Guide Menu The Guide Menu is the front page of your PleXtor MediaX and you can return to this screen from anywhere within your PleXtor MediaX by simply pressing the Guide button on your remote control, or pressing the touch sensitive Home button on the front of your PleXtor MediaX. Browser In this area you can play and edit media files stored on your PleXtor MediaX, USB Device and LAN. REC List This is where you can play and edit your recorded titles (from TV, camcorder etc).
Getting Media Files onto Your PleXtor MediaX There are various ways of getting your media files on to your PleXtor MediaX 1.0 As an external HDD Connecting your PleXtor MediaX to PC through USB target port Before you connect your PleXtor MediaX to your computer, it is recommended that you stop all functions and turn the power off. 1. Connect your PleXtor MediaX to your computer via the USB cable. 2. After connection, power up your PleXtor MediaX 3.
5. Once you have finished transferring your files and are finished on the computer, please turn off your PleXtor MediaX power and turn it on again after you have connected to your TV. You can connect the USB cable while your PleXtor MediaX is running. The following OSD will appear on your TV Select OK by pressing the Enter button. Select Cancel by pressing the ► then Enter.
Curser will jump back to the Source table so you can choose which file or files you want to copy. Press the ▲▼ buttons to select the file or folder you want to copy then press the PLAY button (this brings up a green tick next to your selection).
Recording to Your PleXtor MediaX You can record Audio Visual (AV) content from a variety of devices such as, TV, Set Top Box, Camcorder, DVD Player and VCR. The default area for storing your recorded titles is in the REC List section, but if you have an attached USB drive you can choose to store your AV titles there (go to Setup, Record, Record Device and set to USB), be sure your USB drive is in FAT32 file system. Recording Quality The default recording quality is SP (Standard Play).
1.0 Basic Recording On the guide menu go to the A/V In section Press the Source button on the remote control (each time you press the Source button your PleXtor MediaX will toggle through SCART and Video1). Each source is shown on the top right hand of the screen (for 2 seconds) Once you have chosen the source you want to record from.
Press the PAUSE button if you want to pause the recording. Press the PAUSE button again to recommence recording.
2.0 Recording from TV You may record and enjoy time shift directly from TV. These functions are only available from a TV that offers an AV output function through SCART. Connect SCART cable from TV to your PleXtor MediaX EURO AV OUT (TV) socket If Audio or Video is distorted it is likely that your TV does not support the AV out function. . To record directly from TV you first have to set the TV as an input. 1. From the Guide menu go to and enter the Set Up section. 2.
If a Set Top Box (Terrestrial, Satellite or Cable) is connected to the AV input of your PleXtor MediaX and you want to record from the Set Top box, please use remote control of the Set Top Box to locate the channel you want to record. 3.0 OTR (One Touch Recording) During basic recording you can set a recording time. Pressing the REC toggles the recording time, each time you press, the recording time will change 30 min, 60 min, 90 min, 120 min, 180 min, 240 min and off. 4.
5.0 Recording from Digital Camcorder You can record from a Digital Camcorder and playback using your PleXtor MediaX remote control (when connected to the DV input). 1. Connect your digital camcorder to the DV input of your PleXtor MediaX 2. Power up the camcorder. 3. Press the DV button on your PleXtor MediaX remote control. You can Playback, Pause, Stop, Fast Rewind and Fast Forward Via your PleXtor MediaX remote control.
6.0 How to see the recorded contents Playing Back from Your PleXtor MediaX HDD By default everything you record will be stored on your PleXtor MediaX hard drive. You can find the recorded content by going to REC List on the Guide menu. 1. Press Guide button on remote control 2. Press ► to REC List, press enter 3. In REC List you will see your recorded content 4. Press ◄► until PLAY is highlighted along the top bar 5. Press ▲▼ to highlight the recording you want to play, then press Enter.
Editing 1.0 Editing recorded content stored in REC List section Enter REC List section 2.0 Delete Press ◄► until Delete is highlighted in the top bar Press ▲▼ until the title you want to delete is highlighted Press Enter If you want to delete Use ▲▼ buttons to select OK Then press Enter to execute If you do not want to delete Use ▲▼ buttons to select Return Then press Enter Note: If you select to delete in the REC List, you cannot undo it.
3.0 Rename Press ◄► until Rename is highlighted in the top bar Press ▲▼ until the title you want to rename is highlighted Press Enter The Virtual Keyboard will show up Select letters& numbers by pressing◄►▲▼ buttons. When a number or letter is highlighted, press Enter Continue until you finish the new name. Select OK and press Enter when finished You can see the name has been changed on the title list 4.
5.0 Title Edit You can edit each recorded title in various ways. Press ◄► until Title Edit is highlighted Press ▲▼ until the title you want to edit is highlighted Press Enter Press ▲▼ button to select how you want to edit the title then press Enter • Return: Go back without editing the title • Set Thumbnail You may have noticed that your recorded titles in the list have a little picture, this is the thumbnail. Here you can change that picture to a snap shot of your favorite part in the recording.
6.0 AB Erase Here you can delete a part of you recording (cut out the parts you don’t want). SET A Delete This This Part Part Delete SET B 1. Choose the starting point at which you want to start erasing from by pressing Enter button on SET A while watching the title (or by pressing Play, ►► ◄◄ and Pause until you find the point at which you want to start erasing, then press Enter) 2.
8.0 Title Merge Here you can merge a title with the title below it in the list 1. Before you bring up the Title Edit menu, select the title you want to merge with the title below it 2. Make sure Title Edit is highlighted in the top bar and press Enter 3. Press ▲▼ to select Merge Title and press Enter 4. Press ▲▼ to Confirm or Cancel and press Enter 5.
11.0 Copy to FAT 32 partition Here you can save your recorded titles to the FAT 32 partition of your PleXtor MediaX. They will be saved as MPG files. Once the files are in FAT 32 partition and you connect your PleXtor MediaX to your PC, you can manipulate these files as you would any file on your PC (make a CD or DVD etc). 1. Select the title you want to copy, with Title Edit highlighted on the top bar, press Enter 2. In the Edit Title menu, use ▼ to highlight Copy to FAT 32 partition, then press Enter 3.
12.0 Tools Here you can delete all the titles in your REC List Press ◄► buttons until Tools is highlighted in the top bar, then press Enter Press Enter to return without deleting Press ▼ button to select Delete All Titles then press Enter to delete. A Confirmation window will appear Select Return to cancel delete or OK to confirm delete Note: If you select to delete all the recorded titles in the REC List, you cannot undo it.
13.0 Editing AV files stored in FAT 32 Enter Browser section You can edit your AV files stored on your PleXtor MediaX hard drive, external USB hard drive and USB memory (FAT 32 file system only). 1. In the Browser section, select the type of AV file you want to edit Music, Movies and Photos by pressing ◄► button. . NOTE: Only the selected AV file type will be shown on TV. If you select an AV file type and no files appear on TV screen, check that you have chosen the correct AV file type.
4. Highlight the file you want to edit by pressing ◄►buttons, then press EDIT on you remote control. • Return :Go back without editing • Rename: Change file name The Virtual Keyboard will show up Select letters& numbers by pressing◄►▲▼ buttons. When a number or letter is highlighted, press Enter Continue until you finish the new name.
Time Shift When a Set Top box (Terrestrial, Satellite or Cable) is connected to the AV input on your PleXtor MediaX, you can enjoy the Time Shift function. Enter A/V In section 1. Press the Source button on your remote, selecting your chosen AV input 2. Press the Time Shift button on your remote control at the point you want to start. Live TV will be Paused. Press the Play button to allow the program to progress forward.
• Display: Show and hide Time Shift bar • Stop: Stop Time Shift Note: If you are at the end of the Time Shift section the Time Shift bar will disappear and some of the key functions above will not work You can set the Permanent Time Shift On in the Setup section (Please refer to the record section in the Set Up menu) in this case, Time Shift will start automatically when you enter the Video In mode.
Playback 1.0 AV File Playback You can playback various Audio, Video and Photo files form the Installed Disc Drive, USB Storage and Network. Please check the supported media format guide before you start this section. Enter Browser section In the Browser section, select the type of AV file you want to playback Music, Movies and Photos by pressing ◄► button. NOTE: Only the selected AV file type will be shown on your TV.
Select the device where the files you want to playback are located. Highlight by pressing the ▲▼, then Enter • • • USB HDD NET (See playback AV files in network computers) Highlight the directory where the files are located by pressing ▲▼ buttons, then Enter to select. Highlight the required file by pressing ◄►, then Enter to playback in full screen Note: When you enter a movie folder containing a .IFO file on your PleXtor MediaX the film will auto play.
2.0 Playback AV files in network computers You can playback AV files stored on you network computer without copying them to your PleXtor MediaX. Here are a some tips before you start • The folders you want to be seen by your PleXtor MediaX must be public or shared • The files you want to playback must be compatible with your PleXtor MediaX First make sure your network connections are correct in the Network part of the Set UP section.
On your PleXtor MediaX, select the WORKGROUP name that you want and press Enter You will now find the same name you set in your computer (full computer name) Select the folder you shared in your computer and enjoy the AV files on your TV Note: Transcode Server (see CD provided) You may enjoy some AV files that your PleXtor MediaX does not support through LAN playback such as WMV, asf, mkv, h.264, in this case ensure that the proper codec’s are installed on your PC.
3.0 Setting a LAN connection in My Shortcuts You can connect to a number of computers on a LAN via a router. If your LAN is connected to an intranet, then more than one IP address can be added and you can easily enjoy the files you want to play back in the sharing folder of all the computers connected through the LAN.
Select Add, then press Enter The Network Browser window appears • Net User ID Enter and then type your user ID (if assigned) or you can skip this without typing anything. • NET Password Enter and then type your password (if registered) or you can skip this without typing anything. • Specific File Server IP Type the IP address of the computer you want to connect to. Now when you go to MY Shortcut and enter you will see the new IP address.
4.
5.0 Subtitle File Your PleXtor MediaX supports subtitle files such as smi, ssa and srt • Subtitle On or OFF Press SUBTITLE button on the remote control during playback to set subtitle On or OFF (default setting is On) • Subtitle Size During the playback, you can adjust the size of the subtitle by pressing ► button for bigger size or ◄ button for smaller size. • Location Change During playback, press ▲ button for moving upward or ▼ for moving down.
6.0 Advanced Playback You can enjoy the following advanced playback function on your remote control. Note: Dependent on the file format, some of these functions may not work 7.
Using Set Up Menu On the front screen guide menu highlight Setup and press the ENTER button 1.0 Video Use ▲▼ to highlight • • • • Aspect Ratio TV Input Decoder Video Output Then ENTER to change selection 2.0 Aspect Ratio If you have a wide screen TV, select the “16:9 wide” setting. If you have a conventional TV, choose either “4:3 Letter Box” or “4:3 Pan Scan”. In Letter Box mode , the widescreen files are shown with black bars at the top and bottom of the screen.
4.0 Decoder You can select On or OFF. Only set to On if you are connected to a decoding box Euro AV In/Out 5.0 Video Output Component Change to component if you connect to your PleXtor MediaX to a TV with Component Cable (Y. Cb.Cr) Scart Change to SCART if you connect your Plextor MediaX to a TV with SCART Cable (RGB) * Composite Video is always available in both settings Note: Please be aware that you may not see the video signal if your settings are incorrect.
6.0 Record Use ▲▼ to highlight • • • • • Quality Auto Chapter Permanent Timeshift Recording Device Timeshift device Then ENTER to change selection 7.0 Quality You can change the default recording quality to HQ, SP, LP, EP and SLP (Please refer to the recording section for explanation) 8.
Permanent Time Shift 9.0 You can set the Time Shift function to On or OFF (Please refer to the Time Shift section for further explanation). 10.0 Recording Device You can select the recording device as HDD or USB (Please refer to the recording section for further explanation) 11.0 Time Shift Device HDD: Time Shift will be done on your Hard Disk Drive (Buffer time is based on your setting during HDD format).
12.0 Network Press ENTER then use ▲▼ to highlight • • • Cancel DHCP IP (AUTO) FIX IP (MANUAL) Then ENTER to change selection 13.0 DHCP IP (AUTO) Select this option if you are getting IP addresses automatically using DHCP (most modern routers automatically assign new devices connected to them with an IP address) 14.
• Select Control panel then Network connections. Right click on Local Area Connection, then Properties., In Details you can find the IP Address and Subnet Mask (Take Under a note)General tab select Internet Protocall (TCP/IP) then Properties Select Use the Following IP Address and enter IP Adress (e.g. 192.168.16.
• In your PleXtor MediaX Set Up Menu, select Fix IP (Manual). • Type the IP address of your computer in the cells 1 through 3 and type a random number in the 4th cell (e.g. 192.168.16.1) • Type in the Subnet Mask • Press Enter button and save current settings.
Firmware Upgrade You can upgrade your PleXtor MediaX Firmware as and when new firmware is released. 1. Unzip the firmware upgrade file 2. Copy unzipped file to a USB memory stick 3. Turn Off your PleXtor MediaX 4. Insert USB memory stick 5. While pressing the Guide button (home button) on the front panel, switch your PleXtor MediaX On. Keep pressing the Guide button on the front panel until the loading screen appears, then you can release the Guide button. 6.
Additional Information Specifications General Encoding (Recording) Decoding (Playback) MPEG4 Subtitle Function In/Out Rear Terminal HDD Type SATA up to 1TB File Format Recording Partition: UDF File Partition: FAT32/NTFS Power Adapter Power Consumption Compatible OS Dimensions Weight Recording Mode Video Format Audio Format Video Audio Picture Text Subtitles HD Playback Recording & Time Shift Network External HDD File Copy by Remote Control USB (Host) USB (Target) LAN SCART In/Out SCART In/Out Vid
Trouble Shooting Incorrect operation is most often mistaken for a problem or malfunction. If you think there is something wrong with your PleXtor MediaX, check the points below.