
Integrated Amplifier Instruction Manual 9200


6
RECORD SOURCE
V
OLUME
xxx
TUNE R
TA P E 1
T
APE 2
STANDBY
CD
PHONO
PLINIUS
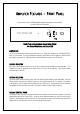
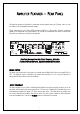
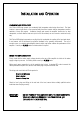
AMPLIFIER FEATURES – FRONT PANEL
The front of the Plinius 9200 Integrated Amplifier incorporates all the facilities
you will require on a daily basis.
FRONT PANEL LAYOUT SHOWING VOLUME KNOB, RECORD
A
ND SOURCE SELECTORS, AND DISPLAY LED
DISPLAY LED
An LED on the front panel indicates that the power is on. When first switched on, the display LED will
pulse for ten seconds - this is an initialisation sequence, after which the LED remains lit during the time
the amplifier is powered on. Whenever mute or a remote button is pressed, the LED will dim.
SOURCE SELECTOR
This rotary switch enables selection of any of the five different inputs available on the back panel. This
selection is fed to the speakers via the output posts on the rear of the amplifier. Note that in standby
mode no input is selected.
RECORD SELECTOR
This rotary switch allows recording of any of the five different inputs available on the back panel. Note that
when recording, the source that is being listened to will not be interfered with. For example, it is possible
to be listening to the CD input whilst recording from the TUNER input. Two tape decks can be connected
and dubbing in either direction is possible. Note that in standby mode no input is selected.
VOLUME CONTROL KNOB
The volume control is an ALPS motorised unit that will accurately convey the source signals to the power
amplification stage of the Plinius 9200. The knob can be adjusted manually or with the remote control
supplied. When using the remote control to alter the volume level, briefly press the button to make small
adjustments, or hold the button down to continuously adjust the volume.