Stereo Preamplifier
CONGRATULATIONS on your decision to become the proud owner of this Plinius M8 Preamplifier. This manual has been prepared to help you understand the operation of your amplifier, and to provide information about its design and the variety of ways it may be used. We have designed and manufactured this preamplifier to reproduce your favourite music faithfully and accurately.
Introduction ...................................................................................................................................Page 3 Precautions ...................................................................................................................................Page 5 Preamplifier Features – Front Panel .............................................................................................Page 6 Preamplifier Features – Rear Panel .....................................
Please take special note of the following precautions before operating your new preamplifier: • This preamplifier operates at hazardous voltage levels. We recommend that any work requiring removal of the lid be referred to a suitably qualified and experienced service technician. • DO NOT attempt to connect any input of this preamplifier to its own outputs.
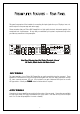
The front of the Plinius M8 Preamplifier. Front Panel Layout Sho Showing wing Volume Knob, Vacuum Fluorescent Display, And Display LED DISPLAY DISPLAY LED An LED below ‘PLINIUS’ indicates when the preamplifier is in standby mode. This LED also lights to show whenever the remote control is being used to change the volume level. VACUUM FLUORESCENTT DISPLAY VACUUM FLUORESCEN Whenever a modification is made to the M8 settings (via the remote control) these changes will be viewable on the display.
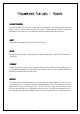
This panel incorporates all the terminals for connecting the input signals from your CD player, tuner, etc, and the outputs to the power amp and mains supply. Please remember that your Plinius M8 Preamplifier is a high quality electronic instrument capable of an exceptional level of performance. Be sure that you understand your system’s requirements fully before you make any connection to this preamplifier.
PROCESSOR INPUT INPUT This input is for use specifically with home theatre processors. In some circumstances you may wish to use the power amplifier and speakers that the M8 is connected to as the front two channels of a surround or home theatre environment. The processor input can be used for this purpose, as any signal connected to the processor inputs can be sent directly to the power amplifier bypassing the M8 entirely.
VOLUME VOLUME CONTROL Use these two buttons to control the volume level of the preamplifier. The right side button increases volume, while the left side button decreases the volume. Briefly press either button to make fine adjustments to the volume level. Hold down either button to continually adjust the volume level. MUTE Pressing this button toggles the Plinius M8 in and out of mute.
SOURCE SELECTION SELECTION The source selection buttons enable changing from one input to another when needed – either CD, Line 1, Line 2, Line 3, or Line 4. MENU ACCESS BUTTONS The three buttons labelled Menu and Enter are used to set the M8 menu items. Use the Enter button to access the menu, then the Up and Down buttons in conjunction with Enter to change settings as desired (see the settings menu structure section following).
PLACEMENT PLACEMENT AND VENTILATION Ventilation through and around your Plinius M8 Preamplifier should be kept unimpeded, so ensure that the heat vents (slots in the lid and base) are not covered or restricted in any way. The Plinius M8 design incorporates a very high level of mechanical de-coupling of the input and output. However, it can still be influenced by acoustical feedback in the operating environment.
It is important that you connect your power amplifier/s (outputs) and source components (inputs) to your Plinius M8 Preamplifier correctly to ensure the preamplifier is not damaged, and sounds its best within your system. Now that you have read and familiarised yourself with the various connections on the preamplifier, as covered in previous sections, we will describe in detail how to connect the preamplifier to your system.
CONNECTING THE MAINS SUPPLY Now that your Plinius M8 Preamplifier is configured to your system correctly, the mains cable can be plugged into the IEC socket on the back of the preamplifier. Re-check all interconnection cables are fitted correctly. Turn on the power switch on the rear panel. The vacuum fluorescent display will now display the messages ‘PLINIUS’, ‘M8’, ‘SERIAL NO XXXX’, while the internal circuitry stabilises. The preamplifier will then close the mute circuit and set the active input to CD.
A major feature of your Plinius M8 Preamplifier is the settings menu. Options such as balance, display brightness and CD input type are all configured via this menu. USING USING THE SETTINGS MENU After pressing the Menu button on the remote, the settings menu can be accessed. The Down and Up buttons can then be used to scroll through the following sub-menus: Balance Bypass Display CD Mode To enter any sub-menu listed above, press the Enter button.
SETTINGS MENU DIAGRAM Menu EXIT Enter BALANCE Enter BYPASS Enter Up/Down DISPLAY CD MODE Enter Enter M8 returns to Main Screen Up Balance Left -dB Down Balance Right -dB Up/Down Balance Bypassed Up/Down Balance Enabled Up Display Level 31 Down Display Level 1 Up/Down CD Single Ended Up/Down CD Enter Enter Enter Enter Balanced Denotes a button press Up or Down can be held down to perform repetitive key presses Press and hold Up and Down together within Balance sub-menu to r
EXIT EXIT SUB-MENU When ‘Exit’ appears on the display, press Enter to return the preamplifier to the main screen from the settings menu. BALANCE SUB-MENU Press Enter and you can now use the Down and Up buttons to vary the signal between the right and left channels. Note that if you depress the Up button the signal to the left channel is reduced as denoted by the screen message. The opposite applies when using the Down button.
REMOTE CONTROL Provided with your Plinius M8 is a 15 function remote control. Two AAA batteries power the remote, and these are replaced by removing the two posi-drive screws on the rear face of the remote that hold the battery compartment in place. The bottom end of the remote is now free to slide down for access to the batteries. Replace the two batteries, taking care to refit the new ones with correct polarity.
S FREQUENCY RESPONSE: 20Hz to 20kHz ±0.2dB. S DISTORTION: Typically <0.05% THD at rated input level. S HUM & NOISE: -80dB at rated input level, A Weighted. S INPUT SENSITIVITY FOR RATED OUTPUT: 125mV RMS unbalanced inputs. 62mV RMS balanced input. S INPUT IMPEDANCE: 50kΩ. S RATED OUTPUT LEVEL: 500mV RMS into 10kΩ or higher. S OUTPUT SOURCE IMPEDANCE: Typically 100Ω. S HEIGHT: 90mm (3 1/2") S WIDTH: 450mm (17 3/4") S DEPTH: 400mm (15 3/4") S WEIGHT: 5.
Balance Control..................................................................................................................... Pages 10,16 Date of Manufacture .......................................................................................................................Page 3 Display LED ...................................................................................................................................Page 6 Front Panel Layout.....................................................
All operational, technical and descriptive material published here is subject to change at any time without notice. For further product information or queries, please contact us at the address below. PLINIUS products are designed and manufactured by: Audible Technologies Ltd. P.O. Box 1836 1836 Palmerston North New Zealand Phone: Facsimile: Email: Internet: 64 6 354 8583 64 6 354 8586 info@pliniusaudio.com www.pliniusaudio.com ©2003 Audible Technologies.