Getting started with Anna. In combination with the Smile T230. version PW 3.
Content Nederlands In het pakket van Anna. 4 Meer informatie. 4 Belangrijke informatie! 5 De installatie. 5 Controleren netwerkbereik. 6 Verbinden met netwerk. 6 Controleren netwerkinstallatie. 7 Smile aansluiten. 8 De installatie. 8 Anna aansluiten. 9 Anna-app installeren. 9 Anna bedienen. 10 Milieu. 10 Contact. 10 English In the package of Anna. 11 More information. 11 Important information! 12 The installation. 12 Check the network coverage. 13 Connecting to network.
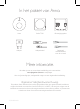
In het pakket van Anna. Anna Smile T230 Bevestigingsplaat Adapter Adapterkabel Optioneel: Installatiekabel voor de cv-ketel Meer informatie. We raden je aan om naast deze handleiding ook onze website www.plugwise.nl/anna te raadplegen. Hier vind je handige tips, veelgestelde vragen en een uitgebreide handleiding. Algemene Veiligheidswaarschuwing. Dit product dient uitsluitend te worden geïnstalleerd door een gecertificeerd installateur volgens de lokale voorschriften (conform NEN1010 of AREI).
Belangrijke informatie! De bestaande cv-draden, die de cv-ketel met de thermostaat verbinden, moeten op de ketel zijn aangesloten op de aan/ uit-aansluiting (0-230V, max. 5A). Je vindt dit terug in de handleiding van de cv-ketel. De cv-draden die de cv-ketel met de thermostaat verbinden, moeten minimaal van het kabeltype H05VVH2-F 2x1.0 mm² zijn, mogen niet langer zijn dan 50 meter en geen grotere weerstand dan 5 Ohm per draad hebben. Als dit wel het geval is, adviseren wij de draden te laten vervangen.
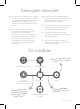
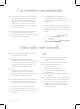
Controleren netwerkbereik. Controleer of er via kabel (UTP-kabel) een netwerkbereik is bij de cv-ketel. Of controleer je WiFi-bereik bij de ketel. Gebruik hiervoor een smartphone of tablet die is verbonden met het WiFinetwerk waarmee straks ook de Smile wordt verbonden. Wanneer je smartphone aangeeft dat er een WiFi-bereik van minimaal 2 ontvangststreepjes is, dan kun je ervan uitgaan dat dit voldoende is.
WiFi via WPS. LAN. Heeft jouw WiFi-router een WPS-knop? WiFi via WPS wordt alleen ondersteund via een speciale WPS-knop op de router. Druk 2 seconden op de zwarte knop op de Smile. Wacht tot het lampje “WLAN” snel en regelmatig blijft knipperen. Druk op de WPS-knop op de WiFi-router om te verbinden met WiFi. Sluit je de Smile liever aan met een netwerkkabel (UTP-kabel) op de router? Ook dat is mogelijk.
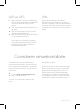
Smile aansluiten. Houd rekening met waar de Smile moet komen te hangen ten opzichte van het stopcontact en de lengte van de draden tussen de cv-ketel en thermostaat. Zorg ervoor dat de spanning van de cv-ketel is voordat je de Smile aansluit. Volg hiervoor de veiligheidsbepalingen. Draai de schroeven op de draadklem (3) in de bevestigingsplaat los. Plaats de installatiekabel die je zojuist geplaatst hebt bij de cv-ketel langs de daarvoor bestemde opening in de draadklem.
Anna aansluiten. Verwijder de oude thermostaat. Plaats het montagedeel dat bij Anna hoort op de muur. Plaats de cv-draden door het montagedeel en schroef deze vast in de connector. Controleer of Anna goed is aangesloten. De gemeten temperatuur verschijnt in het scherm van Anna. Zet de kamertemperatuur met Anna hoger door op de rechter metalen knop te tikken zodat de ketel moet gaan opwarmen. Controleer ook of de vlam van de cv-ketel gaat branden.
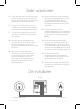
Anna bedienen. Met de drie delen van de metalen rand kun je Anna aan de muur bedienen. Door de bovenzijde kort aan te raken verander je de status. Bij lang aanraken zet je het schema aan of uit. Op www.plugwise.nl/anna vind je meer informatie over het gebruik van Anna en de app. Door de linkerzijde aan te raken zet je de temperatuur lager. De rechterzijde gebruik je om de temperatuur hoger te zetten. Milieu. Oude elektrische en elektronische apparaten bevatten vaak waardevolle materialen.
In the package of Anna. Anna Smile T230 Mounting frame Adapter Adapter cable Optional: Installation cable for the boiler More information. In addition to this instruction manual, we advise you to also consult our website www.plugwise.com/anna. Here you will find handy tips, frequently asked questions and an extensive instruction guide. General Safety Warning. This product can be installed only by a certified installer in accordance with the local regulations.
Important information! The existing boiler wires that connect the boiler to the thermostat have to be connected to the on/ off connection (0-230V, max. 5A) of the boiler. You can find this information in the manual of your boiler The boiler wires that connect the boiler to the thermostat, must at least be cable type H05VVH2-F 2x1.0 mm², cannot be longer than 50 metres and must not have a greater resistance than 5 Ohm per wire. If this is the case however, we advise you to have the wires replaced.
Check the network coverage. Check whether there is network range at the boiler through the cable (UTP cable) . Or check your WiFi signal at the boiler. To do this, use a smartphone or a tablet that is connected to the WiFi network to which later on the Smile will also be connected to. Unsufficient WiFi coverage near the boiler? A WiFi repeater can offer the solution here by amplifying the signal. Take a picture of the 8-letter code on the side of the Smile.
WiFi via WPS. LAN. Does your WiFi router have a WPSbutton? WiFi via WPS is only supported via a special WPS-button on the router. Press the black button on the Smile for 2 seconds. Wait until the light “WLAN” is blinking quickly and regularly. Press the WPS-button on the WiFi router to connect to WiFi. Do you rather connect the Smile with a network cable (UTP-cable) to your router? That is also possible.
Connecting Smile. Keep in mind where the Smile is going to be mounted in relation to the power outlet and the length of the wires between the boiler and the thermostat. Before connecting the Smile, you must first unplug the boiler. To do this, follow the safety regulations. Unscrew the screws from the wire clamp (3) in the wall bracket. Fit the installation cable you have positioned near the boiler along the appropriate opening in the wire clamp.
Connecting Anna. Remove the old thermostat. Position the mounting frame included with Anna on the wall. Place the boiler wires through the mounting frame and screw these firmly into the connector. Check if the installation has been completed successfully. The measured temperature will be displayed on Anna’s screen. Turn up the room temperature with Anna by pressing the metal button on the right side in order for the heater to start warming up. Check also if the flame of the boiler has ignited.
ick! Controlling Anna. You can control Anna at the wall by touching the three parts of the metal brim. By briefly touching the upper side, you can change the status. By touching the upper side longer, you can turn the schedule on or off. On www.plugwise.com/anna you will find more information about the use of Anna and the app. By touching the left side, you can put the temperature lower. You use the right side to put the temperature higher. Environment.
Dans l’emballage d’Anna. Anna Smile T230 Plaque de fixation Adaptateur Câble d’adaptateur En option: Câble d’installation pour la chaudière Plus d’informations. Nous vous conseillons de consulter également notre site Internet www.plugwise.com/anna en plus de ce mode d’emploi. Vous y trouverez des astuces pratiques, des questions fréquemment posées et un manuel détaillé. Avertissement général de sécurité.
Informations importantes ! Les fils existants du chauffage central qui relient la chaudière au thermostat doivent être raccordés sur la chaudière à la connexion marche/arrêt (0-230 V, max. 5 A). Vous pouvez retrouver ce point dans le mode d’emploi de la chaudière. Contrôlez préalablement la présence et la qualité d’une connexion réseau et d’une prise libre à côté de la chaudière. Assurez-vous d’avoir le mot de passe du réseau WiFi auquel vous voulez connecter Anna à portée de main.
Contrôler la portée réseau. Vérifiez si la portée WiFi par câble (UTP) à côté de la chaudière est suffisante. Ou vérifiez votre réseau WiFi dans la chaudière. Pour cela, utilisez un smartphone ou une tablette qui est relié au réseau WiFi auquel le Smile sera bientôt lui aussi connecté. Lorsque votre smartphone indique une portée WiFi d’au moins 2 barres de réception, vous pouvez supposer que c’est suffisant.
WiFi via WPS. LAN. Votre routeur WiFi possède-t-il un bouton WPS ? Le WiFi par WPS fonctionne uniquement au moyen d’un bouton WPS spécial sur le routeur. Appuyez 2 secondes sur le bouton noir du Smile. Attendez que le voyant « WLAN » clignote de manière rapide et régulière. Appuyez sur le bouton WPS sur le routeur WiFi pour établir la connexion avec le WiFi. Vous préférez connecter le Smile avec un câble réseau (UTP câble) sur votre routeur ? C’est également possible.
Raccordement du Smile. Dans ce cadre, prenez en considération la distance de la prise au Smile et la longueur des fils entre la chaudière et le thermostat. Assurez-vous que la chaudière soit hors tension avant de raccorder le Smile. Pour cela, suivez la détermination de la sécurité. Dévissez les vis sur le serre-câble (3). Introduisez le câble d’installation supplémentaire que vous venez de placer sur la chaudière le long de l’ouverture prévue à cet effet dans le serre-câble.
Raccordement d’Anna. Retirez l’ancien thermostat. Placez la pièce de fixation d’Anna sur le mur. Faites passer les fils du chauffage central à travers la pièce de fixation et vissez-les dans le connecteur. Vérifiez qu’Anna est bien connectée. La température mesurée apparaît sur l’écran d’Anna. Augmentez la température ambiante avec Anna en appuyant sur le bouton métallique à droite afin que la chaudière commence à chauffer. Vérifiez aussi que la flamme de la chaudière s’allume.
Utiliser Anna. Vous pouvez utiliser Anna au mur avec les trois parties du bord métallique. Touchez brièvement le bord supérieur pour changer le statut. Touchez plus longuement pour activer ou désactiver le programme. Surfez sur www.plugwise.com/anna pour plus d’informations sur l’utilisation d’Anna et de l’application. Touchez le côté gauche pour diminuer la température. Utilisez le côté droit pour augmenter la température. Environnement.
In Annas Paket enthalten. Anna Smile T230 Wandhalterung Netzteil Micro-USB Kabel Fakultativ: Installationskabel für die Heizungsanlage Weitere Informationen. Wir empfehlen, unsere Website www.plugwise.com/anna zu besuchen sowie die Anna Bedienungsanleitung zur Hand zu nehmen. Hier finden Sie praktische Tipps, häufig gestellte Fragen (FAQs) und zusätzliche digitale Anleitungen.
Wichtige Hinweise! Die vorhandenen Kabel, die den Heizkessel mit dem Thermostat verbinden, müssen an den potentialfreien Kontakt (0–230 V, max. 5 A) des Heizkessels angeschlossen sein. Konsultieren Sie hierzu die Anleitung der Heizungsanlage. Die Kabel, die den Heizkessel mit dem Thermostat verbinden, sollten minimal der Kabeltyp H05VVH2-F 2x1,0 mm², dürfen höchstens 50 m lang sein und keinen größeren Widerstand als 5 Ohm je Kabel aufweisen. Andernfalls empfehlen wir Ihnen einen Austausch der Kabel.
Prüfen Netzwerk-Empfang. Prüfen Sie zunächst, ob am Heizkessel ausreichender WLANEmpfang besteht. Verwenden Sie hierzu ein Smartphone oder Tablet, das mit demselben WLAN verbunden ist, mit dem Sie den Smile verbinden wollen. Sollten Sie mit Ihrem mobilen Endgerät feststellen, dass Ihre WLANSignalqualität mindestens 2 Balken aufweist, können Sie sicher gehen, dass die Informationen für den Betrieb von Anna drahtlos versendet werden.
WLAN per WPS. LAN. Verfügt Ihr WLAN-Router über einen WPS-Taster? WLAN per WPS wird nur von speziellen Routern unterstützt, die eine WPS-Taste besitzen. Drücken Sie die schwarze Taste auf dem Smile 2 Sekunden lang. Warten Sie, bis die Leuchte “WLAN“ schnell und regelmäßig blinkt. Drücken Sie die WPS-Taste auf dem WLAN-Router, um eine Verbindung mit dem WLAN herzustellen. Möchten Sie den Smile lieber mit einem Netzwerkkabel (UTP Kabel) an den Router anschließen? Auch das ist möglich.
Anschluss des Smile. Beachten Sie dabei die Entfernung zwischen dem Smile und der Steckdose sowie die maximale Länge der Kabel zwischen dem Heizkessel und dem Thermostat. Schalten Sie die Heizungsanlage zunächst spannungsfrei, bevor Sie den Smile anschließen. Befolgen Sie hierbei die Sicherheitsrückstellung. Lösen Sie die Schrauben an der Kabelklemme (3). Führen Sie das Installationskabel, das Sie soeben am Heizkessel installiert haben, durch die hierfür bestimmte Öffnung in die Kabelklemme.
Anschluss von Anna. Nehmen Sie das alte Thermostat ab. Befestigen Sie die Wandhalterung für Anna an der Wand. Schieben Sie die Heizkabel in die Wandhalterung und schrauben Sie sie im Verbinder fest. Möglicherweise müssen zusätzliche Löcher für die Befestigung gebohrt werden. Achten Sie darauf, beim Bohren keine in der Wand verlaufenden Kabel zu beschädigen! Kontrollieren Sie, ob Anna korrekt angeschlossen ist. Die gemessene Temperatur erscheint im Display von Anna.
Bedienung von Anna. Mit den drei Teilen des Metallrands kann Anna an der Wand bedient werden. Durch kurze Berührung der Oberseite wird der Status verändert. Durch lange Berührung wird das Programm ein- oder ausgeschaltet. Auf www.plugwise.com/anna finden Sie weitere Informationen zur Verwendung von Anna und der App. Durch Berührung der linken Seite wird die Temperatur gesenkt. Durch Berührung der rechten Seite können Sie die Temperatur erhöhen. Umweltschutz.
Nella confezione di Anna. Anna Smile T230 Piastra di fissaggio Adattatore Cavo dell’adattatore Opzionale: Cavo di installazione della caldaia per riscaldamento centralizzato Ulteriori informazioni. Oltre a questo manuale, consigliamo di consultare il sito www.plugwise.com/anna. Potrai trovare consigli utili, domande frequenti e un manuale approfondito. Avvertenza generale per la sicurezza.
Informazioni importanti! I cavi del riscaldamento centralizzato esistenti, che collegano la caldaia al termostato, devono essere allacciati al protocollo di attivazione/disattivazione della caldaia (massimo 230 V, 5 A). Puoi trovarlo nel manuale della caldaia per riscaldamento centralizzato. I cavi che collegano la caldaia al termostato devono essere come minimo del tipo H05VVH2-F 2x1,0 mm², non devono superare 50 metri di lunghezza e la resistenza non deve superare 5 Ohm per ogni cavo.
Controllo della portata della rete. Controlla che la caldaia sia collegata alla rete tramite un cavo (UTP). In alternativa, controlla che la caldaia si trovi entro la portata del WiFi. A questo scopo, utilizza uno smartphone o un tablet collegato alla rete WiFi a cui intendi collegare Smile. Se lo smartphone indica almeno 2 tacche di ricezione WiFi, puoi presumere che il campo è sufficiente.
WiFi tramite WPS. LAN. Il tuo router WiFi ha un pulsante WPS? Il WiFi tramite WPS è supportato soltanto da uno speciale pulsante WPS sul router. Tieni premuto per 2 secondi il pulsante nero su Smile. Attendi che la spia “WLAN” inizi a lampeggiare rapidamente e in modo regolare. Premi il pulsante WPS sul router WiFi per stabilire il collegamento WiFi. Preferisci collegare Smile al router utilizzando un cavo di rete (UTP)? Puoi farlo.
Collegamento di Smile. Stabilisci dove vuoi fissare Smile tenendo conto della posizione della presa e della lunghezza del cavo che collega la caldaia al termostato. Prima di collegare Smile, controlla che la tensione della caldaia per riscaldamento centralizzato sia scollegata. Osserva le prescrizioni per la sicurezza. Allenta le viti del morsetto del cavo (3) piastra di fissaggio. Fai passare il cavo di installazione che hai appena collegato alla caldaia nel foro apposito nel morsetto.
Collegamento di Anna. Rimuovi il vecchio termostato. Installa il supporto di montaggio di Anna sulla parete. Fai passare i cavi della caldaia attraverso il supporto di montaggio e avvitalo al connettore. Controlla che Anna sia collegata correttamente. Sullo schermo di Anna appare la temperatura misurata. Aumenta la temperatura ambiente con Anna toccando il pulsante di metallo a destra, in modo che la caldaia inizi a scaldare. Controlla anche che la fiamma della caldaia si accenda.
Azionamento di Anna. Puoi azionare Anna sulla parete con i tre segmenti del bordo di metallo. Toccando brevemente il segmento superiore puoi modificare lo stato. Toccandolo più a lungo, puoi attivare o disattivare la programmazione. Sul sito www.plugwise.com/anna puoi trovare ulteriori informazioni sull’uso di Anna e dell’applicazione. Toccando il bordo sinistro puoi ridurre la temperatura. Con il lato destro puoi aumentare la temperatura. Ambiente.