
Installation Instructions

Assembly (Steps 6-10)
Have an installation question? DO NOT RETURN THIS PRODUCT TO THE
STORE. Call toll free: 1-800-545-5230 Monday thru Friday 8:00am - 5:00pm CST
4.
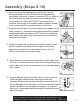
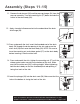
7. Wrap thread seal tape in a clockwise motion to the copper tubing
shank threads (17). Attach the water supply lines onto the copper
tubing shanks and hand tighten. (NOTE: If you are installing new
water supply lines, please refer to the supply line manufacturer’s
installation instructions.)
8. Tighten the supply line connections using two wrenches. Place
the first wrench on the tubing shank to hold it in place while
tightening the supply line with the second wrench. This will
prevent any twisting of the copper tubing.
7
16
7
8
9
9. Apply thread seal tape onto the threads of the water supply shut
off valves in a clockwise motion. Attach the remaining ends of the
water supply lines to the hot and cold shut-off valves and tighten
with a wrench.
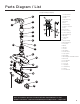
6. Secure the faucet by threading the mounting nuts (18) onto
the mounting bolts (13). Check the position of the faucet and
hand tighten until faucet is securely mounted. NOTE: It is helpful to
have a second person hold the faucet in place while tightening
the mounting nuts (18).PLEASE NOTE: Do not remove the
customer service tag with the model number and phone number
as this will be helpful if you need assistance in the future.
18
13
6
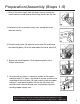
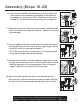
10. Remove old pop-up drain assembly. Clean all sink surfaces to
remove old putty and dirt before installing the new drain
assembly. Please check the drain body (26) and drain seat (28)
for any damage prior to installation. If there is no damage, please
install as directed. If any damage occurs please call Customer
Service for a replacement before installing. Disassemble the new
pop-up assembly.
10
27
32
33
26
28
34
30
29
31