Installation Usage & Maintenance Troubleshooting
All trademarks and brand names mentioned in this publication are property of their respective owners. © 2004. All rights are reserved. No portion of this document may be reproduced without permission. The screen shots in this guide were made with Windows 2000. If you are using Windows 98, Me or XP, your screens will look somewhat different but function the same.
Table of Contents INTRODUCTION ....................................................................................................1 How to Use This Guide............................................................................................... 1 Conventions of This Guide ......................................................................................... 2 A Note about Icons .....................................................................................................
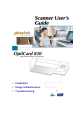
Introduction Welcome to the world of Plustek scanners – the ultimate in computer imaging. Your new scanner will improve the professionalism of your day-to-day computing tasks by allowing you to input images and electronic text into your computer system. Like all of our products, your new scanner is thoroughly tested and backed by our reputation for unsurpassed dependability and customer satisfaction. Please remember to register your scanner.
Chapter II describes how to use, maintain and clean your scanner. Appendix A contains technical support information that can help you solve simple problems. Before calling for help, please read through Appendix A: Troubleshooting. Appendix B contains the Specifications of the scanner you purchased. Appendix C contains our limited warranty agreement and FCC statement concerning the product. Conventions of This Guide Bold — [XXX] — Important note or first use of an important term in a chapter.
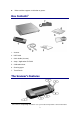
Video card that supports 16-bit color or greater Box Contents2 1. Scanner 2. USB Cable 3. Quick Guide (Scanner) 4. Setup / Application CD-ROM 5. Calibration Sheet 6. Cleaning paper 7. Travel Pouch The Scanner’s Features 2 Save the box and packing materials in case you need to transport this scanner in the future.
1. USB port: It connects the scanner to a USB port on your computer by the included USB cable. 2. Page feed slot: Feed the document into the scanner from this direction. You can feel the document being grabbed by the scanner. 3. Alignment arrow: Always align the edges of your documents to this arrow sign. 4. SCAN button: Press this button to start scanning and save the images into your computer. 5. BCR button: Press this button to start scanning for business card reading within Cardiris program. 6.
Chapter I. Installing the Scanner Before installing your scanner, please verify that you have all of the proper components. A list of the package contents is provided in the Box Contents section of this guide. Software Installation Requirements Your scanner comes with the image-editing software, BCR software, the scanner’s driver, and the Smart Touch software. All of these software applications use approximately 250 megabytes of hard disk space after they are installed into your computer.
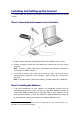
Installing and Setting up the Scanner Please follow the step-by-step procedures described below to install the Plustek scanner. Step 1. Connecting the Scanner to Your Computer 1. Plug the square end of the included USB cable to the USB port of the scanner. 2. Plug the rectangular end of the USB cable to the USB port on the back of your computer. Note: If there is another USB device connected to the computer, connect the scanner to an available USB port. 3.
2. For Windows 98 & 2000 a. Click on the [Next] button when the “Add New Hardware Wizard” window is displayed. b. Select “Search For The Best Driver For Your Device [Recommended]” and click on the [Next] button. c. The next window will ask you where to search to find the drive. Select [CDROM drive], and deselect [Floppy disk drives] if it is checked. d. Insert the Setup/Application CD-ROM, included with your scanner, into your CD-ROM drive and then click on the [Next] button. e.
calibration. 8. Insert the special calibration sheet, included with the scanner, face up into the page feed of the scanner. 9. Follow the on-screen instructions to complete the scanner calibration. Note: The buttons on the scanner are designed to work with bundled software. To make those buttons work properly, you need to install NewSoft Presto! ImageFolio and Cardiris software in the CD-ROM to your system.
Attention If the test failed in any way, please refer to “Appendix A: Troubleshooting” section of this manual and follow the instructions therein. Software Setup Troubleshooting Carefully review the steps outlined in this guide and the Quick Guide that accompanied your scanner. If you are still having problems, please check that: You have 250MB of free space on your hard disk drive. The scanner is plugged in and has power. You are using the USB cable supplied with the scanner.
4. Start installing your Windows XP upgrade software by following Microsoft’s related procedures. 5. When the Windows XP upgrade is done, re-install the scanner’s hardware and software. Refer to the scanner setup quick guide for details.
Chapter II. Usage and Maintenance Operating the Scanner Your scanner accepts documents as small as business cards and as large as 4”x6” photographs. However, some software programs have limitations as to the information they can handle. The capacity of the computer’s memory and free space on your hard drive can also limit the physical size of the document that you scan. There are two different ways to operate the scanner: 1. From within an image-editing program that can acquire images from the scanner. 2.
Using the Scanner Buttons Your scanner is equipped with two function buttons designed to make your scanning experience more convenient and efficient. With simply one touch of the button, you can scan to Presto! ImageFolio or Cardiris program. 1. SCAN Button 2. BCR Button Attention To use the buttons, ensure you have installed the relevant software (e.g., Newsoft Presto! ImageFolio is required for using the SCAN function) beforehand.
1. Click on the Smart Touch icon located on the Windows system tray. From the menu that pops up, point to [SCAN Button Link] and then click [Continuous Scan]. 2. Insert the document or image face up into the scanner. Align the paper to the arrow sign on the left of the scanner. 3. Press the SCAN button on the scanner. The scanning starts immediately. 4. Follow the on-screen instructions to insert another document or image until you have scanned all. 5.
Attention Changes you make in the Smart Touch window are automatically saved every time you click Close to close the Smart Touch window. 3. Insert the document or image face up into the scanner. Align the paper to the arrow sign on the left of the scanner. 4. Press the SCAN button on the scanner. The scanning starts immediately. 5. When the scan completes, the scanned image appears in the Presto! ImageFolio program that opens, ready for you to perform other image editing tasks. 6.
Continuous scans by the same settings: If you have more than one business card with similar card style to scan (for example, those business cards are from the same country), you can follow the steps below: 1. Click on the Smart Touch icon located on the Windows system tray. From the menu that pops up, point to [BCR Button Link] and then click [Continuous Scan]. 2. Insert the business card face up into the scanner. Align the paper to the arrow sign on the left of the scanner. 3.
2. To change the scanning settings, click on the Smart Touch icon again, and then click [Properties] from the menu that pops up. Make desired adjustments within the Smart Touch Setting window that opens and then click [Close] button. Attention Changes you make in the Smart Touch window are automatically saved every time you click Close to close the Smart Touch window. 3. Insert the business card face up into the scanner. Align the paper to the arrow sign on the left of the scanner. 4.
Scanner Connection The first step to take when troubleshooting connection problems with your scanner is to check all physical connections. The Smart Touch icon , located on the Windows system tray, indicates if the scanner software is properly launched and the scanner and computer are communicating with each other. Appearance Status The Smart Touch program has been successfully launched and the scanner is connected with the computer, ready to scan mages. The scanner is not connected with the computer.
Click on the Smart Touch icon located on the Windows system tray. Uncheck [Enable Warning] from the menu that pops up. Click the [No] button in the message box that appears. If you would like to be prompted with this message again, Attention you may click on the Smart Touch icon and check [Enable Warning] from the menu that pops up. Click the [Yes] button in the message box that appears.
Cleaning the Scanner When you use this scanner for the very first time after installation, you are suggested to clean the scanner before use. If unusual dots or lines are found in your scanned image, it is very likely that dust particles or other foreign objects have been brought inside the scanner. You may clean the scanner to rectify the problem. The following describes how to clean the scanner: 1. Insert the special cleaning paper into the page feed slot of the scanner.
Do not attempt to disassemble the scanner. There is danger of an electrical shock and opening your scanner will void your warranty. Do not subject the scanner to excessive vibration. It may damage the internal components. Do not insert any document into the scanner with small objects such as paper clips, pins, staples or any other fasteners attached. Do not insert damp, curled or wrinkled documents into the scanner for scanning. These documents can cause paper jams and possibly damage the unit.
Appendix A: Troubleshooting Scanning Problems Most problems are easily solved, and some of the most common questions and their recommended solutions are listed below. Symptom: Cause 1: Solution 1: After following the installation instructions, my computer cannot find the scanner. Your software may have not been successfully installed. Please insert the CD-ROM and reinstall the scanner software. Follow the on-screen instructions carefully when installing the software.
Cause 2: Solution 2: You are scanning at a high resolution (DPI). Reduce the resolution. Symptom: The scanner is not in the list of supported scanners in other commercial software. Select TWAIN as the scanner. Solution: Symptom: Solution: Unable to scan from other software other than the one that came with the scanner. Enter the Scanner Setup within the program, Select TWAIN and you will see your scanner listed. Symptom: Cause 1: Solution 1: Unable to save to a floppy diskette.
Cause2: Solution 2: The printer brightness setting is not set properly. Adjust the brightness in the printer. Some printers allow you to change the brightness settings. Please consult your printer documentation. Symptom: Cause1: Solution1: The scanned image takes too long to be sent with an email message. The image was scanned at a high resolution or is physically large. Scan at a lower resolution (DPI). Cause 2: Solution 2: The Internet might be congested. Try sending the message at a later time.
Solution 3: Make sure that the AC adapter is connected to an outlet. If the scanner is connected to a Surge Protector, make sure that the Surge Protector is turned on. Symptom: The document or photo has been inserted into the scanner but is not fed through the scanner. The document or photo was not correctly inserted into the scanner. Make sure the document or photo is properly inserted into the page feed of the scanner.
Consult your Word Processor documentation for more information on how to import images. Symptom: Solution: How do I send a scanned image using my email program? Save your scanned image in a format that is supported by your email program (JPG, GIF or PNG are recommended). Once your picture is saved, consult the documentation of your email program on how to attach a file to a message.
Appendix B: Specifications5 Plustek OptiCard 820 5 Physical dimensions 174.5mm x 60.5mm x 38.5 mm Weight 194g Operating Temperature 10° C to 40° C (50° F to 104° F) Scan Area Maximum 105 mm x 148 mm (4.13” x 5.
Appendix C: Customer Service and Warranty If you encounter problems with your scanner, please review the installation instructions and troubleshooting suggestions contained in this guide. For further assistance call our customer support phone number listed on the last page of this guide. One of our representatives will be happy to assist you from Monday through Friday in office working hours as shown below: Europe 9:00 a.m. – 5:30 p.m. (CET) Other Countries or Areas 9:00 a.m. – 6:00 p.m.
This Limited Warranty service does not provide for carry-in exchange when the problem results from accident, disaster, vandalism, misuse, abuse, unsuitable environment, programme modification, another machine or non-vendor modification for this product. If this product is an optional feature, this Limited Warranty applies only when the feature is used in a machine for which it was designed.
Increase the separation between the equipment and receiver. Connect the equipment to an outlet on a circuit different from that which the receiver is connected. Shielded interconnect cables and shielded power cord which are supplied with this equipment must be employed with this equipment to ensure compliance with the pertinent RF emission limits governing this device. Consult the dealer or an experienced radio/TV technician for help if the conditions persist.
Contacting Plustek Europe Plustek Technology GmbH Gutenbergring 38, 22848 Norderstedt, Germany Tel.: Fax: E-mail: Website: +49 (0) 40 523 03 130 +49 (0) 40 523 03 500 support@plustek.de www.plustek.de Worldwide except Europe Plustek Inc. 13F-1,No.3 (Building F), Yuan Qu St., Taipei, Taiwan. Tel: Fax: Website: +886-2-2655 7866 +886-2-2655 7833 www.plustek.