
User Manual


Introduction 3
1
Introduction
The DocAction program,
seamlessly integrat
ing
the operation of your scanner with
your
computer and other peripherals, provides a quick and convenient way to
perform various scanning functions.
With DocAction, you don't need to adjust settings every time you scan. Simply
press any button on the scanner's panel or click any scanning menu item of
DocAction on the screen. The scanner starts to scan your paper documents and
transfer them to your assigned destination. The destination can be a printer, your
e-mail program, files on your disk drives, an image-editing program, etc. For
example, if you want a printout copy of a purchase order, you may do that in only
two steps:
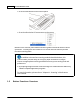
Step 1: Place the paper on the scanner.
Step 2: Press the Copy button on the scanner.
The scanner starts scanning instantly and then sends the image directly to your
printer.
DocAction makes this integration and convenience possible at your fingertips.
When DocAction is on, you will see the icon
in your Windows system tray.
Right-click on this icon will open a pop-up menu
and allow you to:
·
Configure button settings
.
The settings for each single-touch button on the
scanner's panel are configured through DocAction.
·
Perform predefined scanning tasks in the same way as you press a button on the
scanner panel.
·
Access Scanner Utility where you may set up the power save mode for the
scanning lamp and adjust the initial scanning position
.
·
View information about this program.
We will guide you through
how to configure button settings and how to use scanner
buttons to carry out your different scanning tasks.
As for the
Scanner Utility, please
r
efer to "Chapter III. Care And Maintenance" of the Scanner User's Guide
for more
1.1
Operate the Scanner