
Instructions / Assembly


Here is a basic, step-by-step guide to installing a nail fin type, new construction
window, including recommended flashing details often used in the industry.
NEW CONSTRUCTION
WINDOW INSTALLATION INSTRUCTIONS
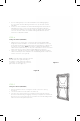
Sealing The Window (REQUIRED)
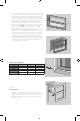
1. Apply a generous (at least 3/8”), continuous bead of exterior-grade sealant
designed for window installation, on the back side of the nail fin, across the top
portion and vertical sides of the window within close proximity of, or directly over,
the nail holes in the nail fin. NOTE: For aluminum or aluminum-clad windows,
sealant must be applied directly over any joints located at the corners. The bottom
nail fin must have a continuous bead of sealant applied. (See Figure A).
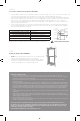
2. Leave two 2” skip gaps per unit in the sealant creating a discontinuous bead of
sealant to allow any moisture trapped in the sill pan flashing area to escape to the
exterior of the home. (See Figure B).
STEP 4:
Figure A
Figure B
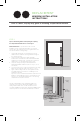
Setting The Window (REQUIRED)
1. Place the window in the RO, centering it from side to side in the opening
as needed.
2. Close and lock all locks to help square the window up.
3. If the sill of the rough opening is not level and true, place shims as needed to
prevent the sill from bowing or sagging, otherwise you may place the window unit
directly onto the rough opening sill. (If your window is a horizontal sliding window,
make sure each meeting rail is supported.)
STEP 5:
Shims
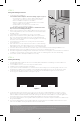
3. Press the flashing firmly to the horizontal sill plate. Fit the flashing tightly to
the corners and extend the flashing a minimum of 6” up each side of the RO
side jambs.
4. At this point, if the membrane is a flexible material designed to stretch, fan the
material at the bottom corners of the sill while pressing it at the same time
ensuring that the flashing covers at least 2” past the outside edge of the sill as
seen here. Otherwise, follow the membrane flashing manufacturer’s specific
instructions for application details.
NOTE: A vertically mulled combination window
unit will require more gaps depending on
the number of units combined to create the
combination, for example, a twin needs four
gaps, a triple needs six gaps, etc.).