
Instructions / Assembly

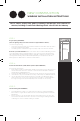
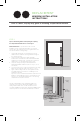
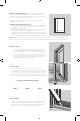


Level, Square, Plumb & Fasten the Window (REQUIRED)
1. Using an approved fastener (See Chart below), fasten the window through in the center of one hole in the nail fin near
the top of each vertical nail fin of the window unit. Level the sill as needed and fasten at each corner.
2. Next, plumb and square the window unit side to side (shimming if necessary) to maintain square and plumb jambs.
Make sure the sill and head are level and not crowned or sagging. Ensure that the window measures the same within
1/16” across the top, middle and bottom, and measures diagonally be relatively square (1/8” +/-). NOTE: Over-
shimming can cause binding and prevent proper window operation. Use a small amount of exterior sealant on the
shims to help hold them in place.
3. After checking the operation of the window, complete attaching the window in the opening by placing fasteners
in the provided nailing fin holes, space according to the chart. (If nail holes are not provided, follow the installation
instructions provided with the windows.)
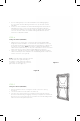
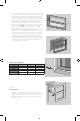
Flashing The Window (RECOMMENDED)
1. NOTE: When a sill pan flashing is present, do not use flashing that
will impede proper drainage of the pan on the bottom.
2. Following the flashing manufacturer’s recommendations, apply
flashing to the nail fin and surrounding wall surface starting with
the sides, and finally the top, creating a shingle eect.
STEP 6:
STEP 7:
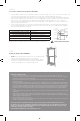
Flashing
(recommended)
Sealant
Fastener
Sheathing
Nail Fin
Penetration
Depth*
Framing
Member
Shim
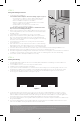
SPACING 8” spacing or every other hole
MAX DISTANCE FROM WINDOW CORNERS 4” or nearest hole
BLDG FRAMING PENETRATION 1-2” min. (see instructions with window)
MIN. CORROSION-RESISTANT NAIL SIZE 10 gauge with 3/8” min. head diameter
BLDG FRAMING SCREW PENETRATION 1” min. (local code may dictate)
MIN. CORROSION-RESISTANT SCREW SIZE #8 or larger modified truss head
NOTE: Mulled units may have additional instructions. See Ply Gem
Windows website for additional instructions that may apply to mulled units.
*Consult local building codes to verify that
sheathing is considered a framing member.
2
2
3
1
PRECAUTIONARY NOTES
• For trim and siding, allow 1/8”–1/4” gap all the way around the window frame to allow for
expansion. If exterior is brick or masonry, leave a 3/8“ gap between the bottom sill of the window
and the masonry to avoid “brick binding”.
• Exterior wall systems like stucco and EIFS must be designed to manage moisture around the
window opening.
• Follow the siding manufacturer’s requirements for sealing between the siding and window frames.
• Any low-expansion foam used should conform to AAMA 812-04 (see manufacturer’s requirements),
but any binding or damage of any type caused by the insulation will not be covered under warranty.
• Painting cellular PVC components dark colors (L<56) may result in deformation or other damage
that will not be covered by warranty. Contact Ply Gem for special instructions for painting dark
colors.
• Do not paint any vinyl part of this window for any reason. Painting vinyl will render null and void all
warranties.
• Seal all open exterior joints (except the gap at the bottom of stationary sash) and fastener holes
with a quality exterior latex caulk before painting. Contact Ply Gem Windows for complete painting
and finishing recommendations.
• Do not block or seal weep holes.
• Before installing the stool, apply ahead of caulk along the inside edge of sill and end of stool where
it makes contact with the side jamb.
The steps in these instructions will help you properly install your Ply Gem Windows. For more
information, refer to the installation instructions supplied with your Ply Gem Windows and chosen
weather resistant barrier and flashing manufacturer. Additional information may be requested by
calling 800-999-8400, Extension 6220.
FOR MORE INFORMATION, VISIT www.PlyGem.com.
Here is a basic, step-by-step guide to installing a replacement window.