
Installation Guide


windows and door trim
accessories installation
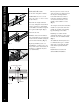
NOTE: If installing mantel over
existing siding or masonry surfaces,
use brick end caps. If installing new
siding, the mantel system should be
installed using siding end caps with
integrated J-Channels before the
siding is applied.
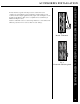
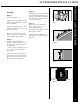
Determine the type of siding
accessory to be used around opening.
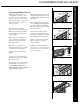
When using a standard J-Channel,
cut the mantel to the width of the
opening. (Fig.1)
When using a 3-1/2˝ window and
door casing lineal, determine the
width of the opening and add 5˝,
then cut the mantel.
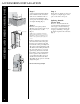
When using a 5˝ corner lineal,
determine the width of the opening
and add 8˝, then cut the mantel.
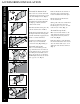
Clean the cut ends of the mantel.
(Fig.2)
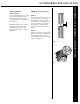
Insert the end cap into the mantel
and mark the end cap with a pencil.
Remove the end cap.
Spread a thin coat of styrene adhesive
(included with caps) onto the end
cap. CAUTION: Contact with
styrene adhesive will cause painted
surfaces to smear. (Fig. 3)
Install mantel end caps to both sides
of the mantel. Allow adhesive to set
10 minutes using clamps to hold end
caps in place.
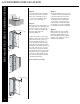
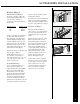
Before installing the mantel, apply
a 1/4˝ caulking bead along the back
edge of the window/door framing,
and on the backside perimeter of the
mantel and end caps.
Center the mantel with attached
end caps over the frame and fasten
through the pre-drilled holes, using
screws/washers provided. (Fig.4)
Install cover strip onto the mantel.
(Plain & dentil cover strips are
available.) (Fig.5)
NOTE: When installing dentil cover
strip, it may be necessary to trim cut
from both ends to center the dentil
blocks on the mantel.
Window/Door Frame
Width + 5"
3
1
/2"
Lineal
5"
Lineal
Window/Door Frame
Width + 8"
Inside
(Back) View
Mark Mantel
Apply
Adhesive
Fig.1
Fig. 3
Caulk
Caulk
Backside
Perimeter
Snap In
Cover Strip
Fig. 4
28
Long Length Mantel System