
Installation Guide

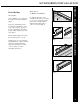

Cut to
Exact Length
Tab
Window Trim Capping
Measure the required dimensions to
cover window trim. Also, determine
the required lengths of trims.
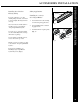
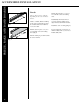
Cut trim sheet to the measurements
and form each sheet on a bending
break. (Fig.1)
Trim sheet should be installed in the
following order: bottom, sides, top.
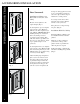
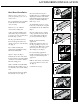
Place the trim sheet on the window
frame and mark it for cutting.
Create tabs into the trim sheet (both
ends of bottom piece and tops of both
side pieces) so that it covers the edge
areas.
Miter the bottom of the side pieces
and both ends of the top piece.
(Fig. 2)
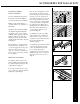
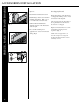
Nail into place using painted
aluminum or stainless steel trim
nails. Pre drill nail holes and do not
nail tight. The top piece should be the
last section to be nailed into place.
(Fig. 3 )
NOTE: Dissimilar Materials:
Direct contact of aluminum products
with certain dissimilar materials,
or contact with water run-off from
dissimilar materials, is likely to result in
corrosion. Accordingly, care should be
taken during installation to avoid such
contact of aluminum with dissimilar
materials including dissimilar metals
(e.g. copper, zinc, steel, etc.), concrete,
stucco, asbestos siding, pressure
treated/pretreated lumber, masonry,
roofing materials or roofing systems
containing metallic granules or strips,
or corrosive non-metallic materials.
A barrier must be used to separate trim
from any pre-treated lumber. Optional
barriers include: plastic, house wrap,
roofing felt, foam, or a high quality
primer or paint.
Fig.1
Fig. 2
Fig. 3
windows and door trim
accessories installation
34