
Installation Guide


14
fastening procedures
Step 1
Make sure the bottom lock of the
panels are fully engaged along
the entire length of the panel.
WARNING: Push the panel up fully
but do not stretch the panel by pulling
it from the top.
Step 2
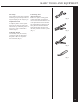
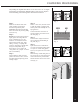
Do not drive the head of the fastener
tightly against the siding nail hem.
Leave a minimum of 1/32˝ (the
thickness of a nickel) between the
fastener head and the vinyl. Tight
nailing, screwing, or stapling will
cause the vinyl siding to buckle with
changes in temperature (Fig.1).
If the head or crown contacts the
vinyl panel it may “pimple” or distort
due to heat build-up.
Step 3
After locking the panel, fasten the
panel in the center, work in, to both
ends.This method helps keep panels
running straight.
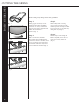
Step 4
Nail 8˝ or more away from the end of
a panel that will be overlapped with
another panel. This will help the over-
lap appearance.
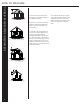
Center the fasteners in the slots to
permit expansion and contraction of
the siding (Fig. 2).
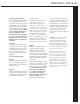
Step 5
Drive fasteners straight and level to
prevent distortion and buckling of
the panel (Fig. 3).
Step 6
Space the fasteners a maximum of
16˝ apart for horizontal siding panels,
12˝ apart for vertical siding panels,
and 8˝ to 10˝ apart for the accessories.
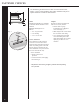
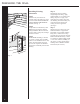
Step 7
Start fastening vertical siding and cor-
ner posts in the top of the upper-most
slots to hold them in position. Place
all other fasteners in the center of the
slots (Fig. 4).
Vinyl siding can expand and contract 1/2˝ or more over a 12´ 6˝ length
with changes in temperature. Whether using a nail, screw or staple to
fasten the siding, the following basic rules must be followed:
YES NO
YES
NO
Fig. 2
Fig. 3
Fig. 4
Fig. 1
YES
NO