
Installation Guide


49
vertical siding installation
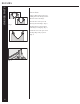
1"
Remove
1/4˝
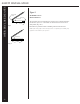
Fig.1
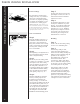
Fig. 2
Preparation
Step 1
Install a solid, nailable sheathing prior
to applying vertical siding, if needed,
to level the surface or provide suf-
ficient material for proper fastener
penetration. Use minimum 7/16˝
plywood, OSB or equivalent.
Step 2
Snap a level chalkline around the
base of the sidewalls. Typically, the
chalkline is positioned so that the bot-
tom of the J-Channel is 1/4˝ below
the lowest point on the wall that
will be sided. (See the “Installing
Accessories” section for tips on snap-
ping a chalkline.) Install a J-Channel
along the chalkline as a receiver for
the vertical siding.
Installation
Step 1
Install vinyl outside corner posts,
inside corner posts, and door/window
trim, and/or J-Channel as needed.
See previous sections for corner post
installation techniques.
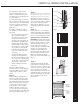
Step 2
Install top and bottom J-Channel:
Apply J-Channel along the top and
bottom of the walls to receive the
siding panels (Fig. 1).
A Install the bottom J-Channel.
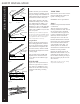
Overlap J-Channels 3/4˝. To do this,
cut out a 1˝ section of the nailing
flange and face return (see Fig. 2).
B Install inverted J-Channel along
the top of the wall, under the eave and
the gable. Overlap J-Channels 3/4˝ to
allow for expansion.
NOTE: If you’re going to install soffit, you
may want to install the receiving channels for
the soffit prior to this point.
When installing vertical siding, follow these steps: