
Installation Guide


leaf relief
73
leaf relief
5˝/6˝ Leaf Relief
®
New Gutter
Installation
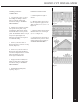
Prepare the Gutter
Prepare the gutter for downspouts
and end caps (including sealant)
according to job requirements.
NOTE: Shingles shall extend past
drip edge no more than 1/2˝.
Install Leaf Relief
®
System
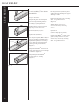
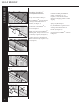
Option One (Preferred)
Use snap-lock punch (Malco SL5) or
end-cap crimping tool (Malco SL2 –
adjustment required) to create lugs
every three feet on the back of the
gutter (open lug toward fascia).
(Figure 1)
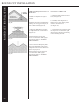
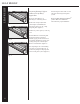
Clip the Leaf Relief
®
into the front
of the gutter and snap it over the lugs
on the back. (Figure 2)
Clip subsequent Leaf Relief
®
sections with 1/2˝ overlap.
(Figure 3)
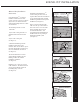
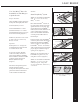
Lift the gutter and system into place
against the fascia and align for proper
drainage to outlet.
Fasten into the fascia every 24˝ using
#9x1-1/2˝ gasketed screws.
(Figure 4)
NOTE: Required to use a 6˝
extension on drill for inserting
screws.
Option Two
(when no drip edge is present)
Clip the Leaf Relief
®
system on the
gutter (overlap sections 1/2˝) and
secure every two feet by screwing
#9x1-1/2˝ gasketed screws.
1/2" Overlap
Fig. 1
Fig. 2
Fig. 3
Fig. 4