
Instructions / Assembly

Installation Instructions for
Ply Gem Raised and Louvered Shutters
INSTALLATION INSTRUCTIONS
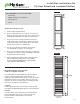
1. Position shutter beside window.
2. Drill a ⁄" diameter hole for a screw (or a ¼" hole for a
plug) at locations described in steps 3 or 4. Drill holes for
screws/plugs a minimum of 2" deep from front of wall.
3. Use four (4) screws or plugs for shutters up to 55" in
length. Position top screws/plugs 6" down from the top
of the shutter and bottom screws/plugs 6" up from the
bottom of the shutter (see “Drawing A”).
4. Use six (6) screws/plugs for shutters 55" and over.
See “Drawing B” for position of screws/plugs.
5. Try to locate screws/plugs above the edge of clapboard
or shingles, if possible, to enable screw/plug to penetrate
the greatest amount of material.
6. Insert screws/plugs. Tighten screws or tap plugs with
hammer until just touching surface of the shutter.
DO NOT FORCE SCREWS/PLUGS DOWN TIGHTLY
ONTO THE SHUTTER SURFACE.
IMPORTANT INSTRUCTIONS FOR THE
CARE OF YOUR NEW SHUTTERS
Your new shutters are painted with specially formulated
polymer coating that will provide you with years of
maintenance-free beauty. Paint systems (such as automotive,
industrial and exterior house paints), when exposed to the
elements, are subject to weathering. The following tips will
help keep your shutters looking their best.
CLEANING
A dull or dingy appearance can be freshened up by using
clean water and dishwashing detergent (no harsh chemicals).
PAINTING
Clean the surface as described above, then paint shutters
with a high quality exterior latex or water-based paint.
DO NOT sand the original paint or use oil-based
paint products.
MS/0719
RECOMMENDED TOOLS & ACCESSORIES:
• Power Drill
• Phillips Head Bit or Screwdriver
• Safety Glasses
• Gloves
Shutters 55"
and over
CENTER
6"
6"
Shutters
up to 55"
DRAWING A
DRAWING B
6"
6"