
Installation Guide

window and door trim
accessories installation
Door Surrounds
Installation of Pilasters on
Brick, Stucco or before vinyl
siding.
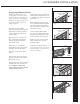
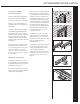
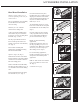
Measure and cut pilasters to the
required length. (Fig. 1)
To attach pilaster caps, use template
enclosed in the carton. Mark and
drill holes into back of pilasters (use
3/16˝ drill bit). IMPORTANT: When
installing during new construction
before vinyl siding, use lower
set of holes on the template. This
will ensure that the caps will sit 3/4˝
above the top of the pilasters. Attach
caps to pilaster using 4 screws
(enclosed).
To attach pilaster bases, use template
enclosed in the carton. Mark and drill
holes into back of pilasters (use 3/16˝
drill bit).Attach caps to pilaster using
4 screws (enclosed). (Fig.1)
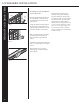
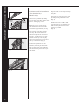
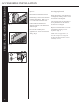
Attach mounting clips and pilasters
(three sets for 96˝ and four sets for
144˝) by locating top clips 8˝ from
top and bottom clips 12˝ from the
ground. Space third set at mid-point
for 96˝ pilasters. Evenly space the
other two sets for 144˝ pilasters. If
the clips are being applied to beveled
wood or vinyl siding, bend the two
tabs on the clips so that the clips are
installed in a vertical position.
Locate clips 1/8˝ from door trim.
Attach the clips onto the substrate
with two screws (enclosed).
Place pilasters over clips and snap
into place. (Fig. 2)
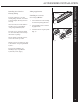
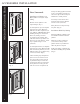
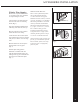
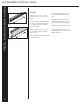
Installation With Vinyl Siding
Follow Installation of Pilasters and
then install J-Channels around the
pilasters.
Make sure to allow a small gap
(3/16˝) between the top of the
pilasters and the top J-Channel to
allow the pilaster to expand.
Install vinyl siding, completing the
wall before installing the top mantel.
(Fig.3)
Fig. 2
Cut to
Required
Length
8"
12"
3/16"
Fig. 3
31